Resin Crystal Hair Clips: 5 Trendy DIY Styles
June 5, 2026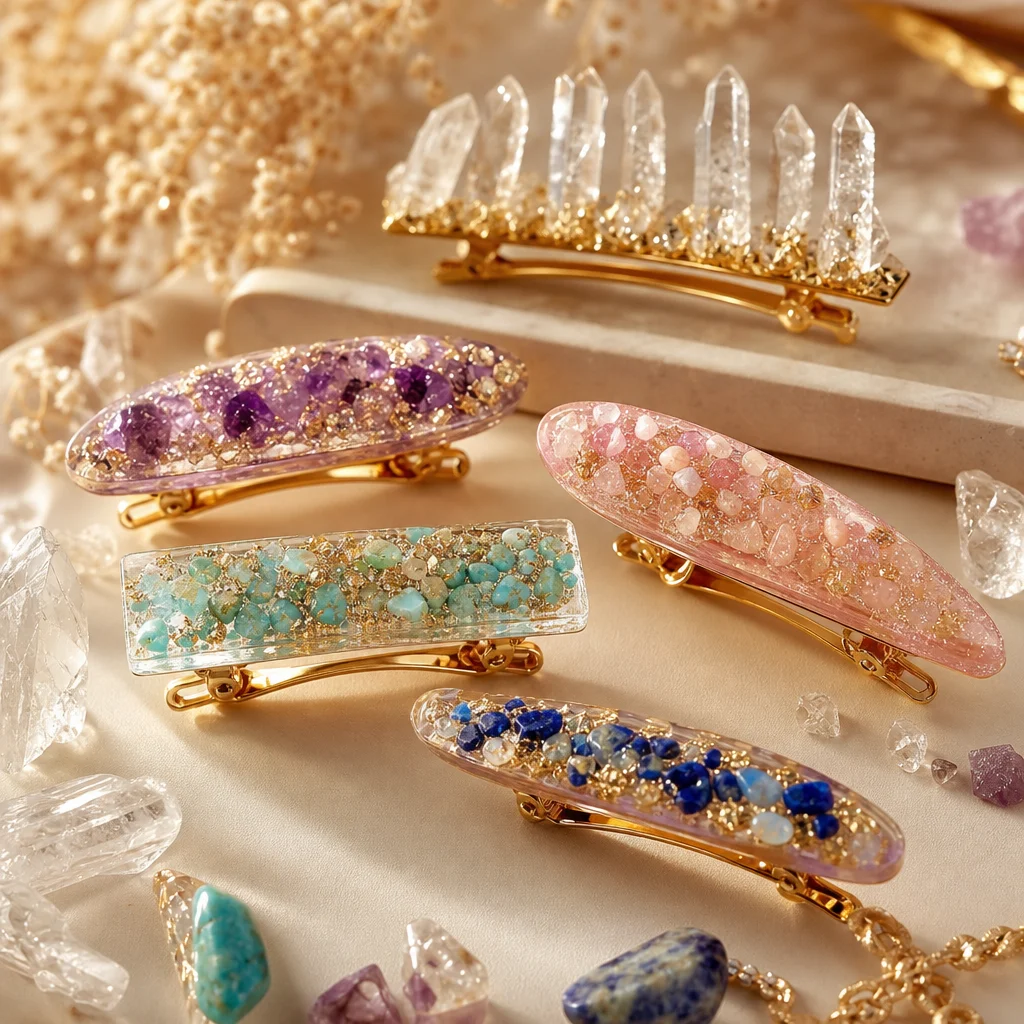
Why Resin Crystal Hair Clips?
Hair accessories have gone through a massive style revival in recent years, and resin crystal clips sit at the intersection of two trends: the handmade/DIY movement and the crystal jewelry boom. A well-made resin crystal hair clip looks like something you'd find in a boutique — but costs a fraction of the retail price and can be customized to match any outfit, hair color, or personal aesthetic.
The basic concept is simple: embed crystal fragments, chips, or small tumbled stones into resin and attach the resin piece to a hair clip base. But the execution has nuance — choosing the right resin, arranging the crystals effectively, achieving a clean surface finish, and ensuring the clip is durable enough for daily wear. This guide walks you through five distinct styles with detailed instructions for each.
Always work in a well-ventilated area when using resin. Wear nitrile gloves and eye protection. Review the safety section at the end before starting.
Resin Selection: UV vs. Epoxy
Two types of resin are commonly used for hair clip projects, and the choice significantly affects your working process:
UV resin: Cures in 1-5 minutes under a UV lamp (or 10-30 minutes in direct sunlight). It comes in a single bottle, ready to use with no mixing. Best for thin layers (1-3mm) and small projects like hair clips. The fast cure time means you can complete a clip in under 20 minutes. Downsides: UV resin can yellow slightly over time with sun exposure, and thick pours may not cure completely (the UV light doesn't penetrate deep enough). It also has a shorter shelf life — typically 6-12 months unopened, less once opened.
Epoxy resin (two-part): Consists of resin (Part A) and hardener (Part B) that must be mixed in precise ratios (usually 1:1 by volume or weight). Cures in 12-24 hours at room temperature. Better for thicker layers and larger projects. Produces a harder, more durable final product. Downsides: longer wait time, more cleanup, mixing must be precise (wrong ratios result in sticky or brittle cured resin), and you need to work quickly before the mixed resin begins to thicken (pot time is typically 20-40 minutes).
For hair clips specifically: UV resin is usually the better choice. The layers are thin, the cure time is fast, and the convenience of no-mixing outweighs the slightly lower durability. Hair clips experience less wear and tear than rings or bracelets, so UV resin's adequate hardness is sufficient. Reserve epoxy for projects requiring thick pours or maximum durability.
Clip Base Options
The foundation of every resin crystal hair clip is the clip itself. Three main types work well:
Alligator clips (single or double-prong): The most versatile clip base. Available with or without teeth (teeth help grip hair). Standard size holds a resin piece up to about 4cm long. Double-prong clips provide better grip for thick hair. These are inexpensive and available at craft stores and online in bulk.
Snap clips (pressure clips): A curved metal clip that snaps open and closed. They come in various sizes — the 40mm and 60mm sizes work best for resin pieces. Snap clips have a flat inner surface that's ideal for gluing resin pieces. They're less visible when worn (the clip curves under the hair) compared to alligator clips.
Barrettes (French-style clasp): The classic barrette with a hinged clasp that snaps shut. Available in sizes from 40mm to 120mm. Larger barrettes can accommodate resin pieces up to 10cm long, making them ideal for statement pieces. Barrettes provide the most secure hold for heavy hair clips.
5 Crystal Hair Clip Designs
Design 1: Single Crystal Focal Clip
The simplest design — a single small tumbled stone or crystal chip centered in a drop of resin on a clip base. Perfect for beginners and for creating a set of matching clips in different colors.
Materials: Alligator clips (flat top, no teeth), small tumbled stones (6-10mm), UV resin, UV lamp or sunlight.
Process:
- Clean the clip surface with rubbing alcohol and let dry. This removes oils that would prevent the resin from bonding.
- Place the clip flat on a silicone mat (resin won't stick to silicone).
- Apply a small puddle of UV resin to the clip's top surface — about 3mm diameter and 2mm deep.
- Using tweezers, place the tumbled stone in the center of the resin puddle. Press it down gently so it's partially submerged but still protruding above the resin surface. The resin should flow up around the lower half of the stone.
- Cure under UV lamp for 2-3 minutes (or in direct sunlight for 10-15 minutes).
- Apply a second thin layer of resin over the top of the stone to create a dome effect. This seals the stone and creates a smooth, rounded surface. Cure for another 2-3 minutes.
Crystal suggestions: Amethyst chips, Rose Quartz tumbles, Citrine nuggets, Black Tourmaline fragments. The stone should be small enough to fit comfortably on the clip without overhanging the edges.
Design 2: Crystal Chip Scattered Clip
Instead of one focal stone, this design scatters dozens of small crystal chips across the clip surface, creating a galaxy-like or terrazzo effect. More visually complex and eye-catching than the single stone design.
Materials: Barrettes (60-80mm), crystal chips (2-4mm), UV resin, UV lamp.
Process:
- Prepare the barrette surface as above.
- Pour UV resin into the clip well (or create a well with tape if the clip is flat). Fill to about 1.5mm depth.
- Using tweezers, scatter crystal chips across the resin surface. Don't overthink placement — a random, organic pattern looks more natural than a perfectly arranged one. Aim for 60-70% surface coverage with gaps showing clear resin between chips.
- Let the resin sit for 30 seconds to slightly thicken (this prevents chips from sinking too deep during the next step).
- Cure under UV lamp for 2-3 minutes.
- Add a second layer of resin to completely cover the chips. This layer should be about 1mm thick — enough to seal the chips but thin enough to keep the clip lightweight. Cure for another 2-3 minutes.
Crystal suggestions: Mix multiple crystal types for color variety — Amethyst + Rose Quartz chips together, or a monochromatic gradient using different shades of blue (Aquamarine + Sodalite + Blue Lace Agate). Pre-sort chips by size for a more controlled look, or mix sizes for organic texture.
Design 3: Gold Foil + Crystal Clip
This design adds metallic gold leaf or foil to the resin, creating a luxury aesthetic that elevates the crystal chips into something that looks like high-end costume jewelry.
Materials: Alligator clips or snap clips, crystal chips, imitation gold leaf sheets (available at craft stores as "gold leaf flakes" or "schmear"), UV resin, UV lamp.
Process:
- Prepare clip surface.
- Apply first layer of UV resin (about 1mm deep).
- Using tweezers or a dry brush, place small pieces of gold leaf onto the wet resin. The gold leaf will float on the surface. Arrange it in organic, irregular shapes — don't try to cover the entire surface.
- Place crystal chips on top of and around the gold leaf. Position 2-3 crystals so they overlap the gold for a "treasure emerging from gold" effect.
- Cure for 3 minutes.
- Apply second resin layer to seal. The resin will slightly blur and soften the gold leaf edges, creating a beautiful integration between the metal and crystal. Cure for another 3 minutes.
Crystal suggestions: Warm-colored stones pair best with gold — Citrine, Carnelian, Amber, Sunstone. For contrast, try Black Tourmaline or Obsidian against gold — the dark stones create dramatic visual tension with the bright metal.
Design 4: Pressed Flower + Crystal Clip
Combine dried flowers with crystal chips for a nature-inspired design that's popular in cottagecore and bohemian aesthetics. This is the most technically demanding design because dried flowers are fragile and can discolor in resin if not properly prepared.
Materials: Barrettes or alligator clips, dried pressed flowers (flat, no moisture), tiny crystal chips (1-2mm), UV resin, UV lamp. Flowers must be completely dry — any moisture will cause bubbles and clouding in the resin.
Process:
- Prepare clip surface.
- Apply first resin layer (1mm deep).
- Place the pressed flower in the resin using tweezers. Position it off-center for a more dynamic composition. Gently press it down with the tweezers tip to ensure it's fully submerged.
- Pop any bubbles that form around the flower using a toothpick or heat gun on low setting.
- Place crystal chips around the flower — 3-5 small chips positioned as if they're growing from the flower's stem or scattered nearby. Cure for 3 minutes.
- Apply sealing resin layer. The flower should be completely encapsulated. Cure for 3 minutes.
Important: Some dried flowers can leach color into UV resin, creating a tinted background. Test a small piece of your chosen flower in resin first before committing to the full design. Lavender, baby's breath, and small daisy petals tend to work well without significant color leaching. Rose petals can tint the resin pink — which may or may not be your intended effect.
Design 5: Color Gradient Clip
This design creates an ombré or gradient effect using crystal chips of the same color family at different intensities, or completely different colors transitioning smoothly from one to the next.
Materials: Large barrette (80mm+), crystal chips sorted into 3-4 color groups, UV resin (tinted and clear), UV lamp. You'll need resin tint/pigment for the background color — or use multiple layers of different-colored resin.
Process:
- Sort crystal chips into color groups: light, medium, and dark. For an amethyst gradient, this might be pale lavender → medium purple → deep violet → dark purple.
- Prepare clip surface.
- Apply a thin layer of clear resin to one end of the clip. Place the lightest-colored chips in this area. Cure for 2 minutes.
- Apply clear resin to the adjacent section. Place medium-colored chips. Cure for 2 minutes.
- Continue section by section, working from light to dark. Each section slightly overlaps the previous one to create a smooth transition.
- Apply a final clear resin layer over the entire surface. Cure for 3 minutes.
Alternative approach: Instead of working section by section, use tinted UV resin for the background. Pour light purple resin on one end, dark purple on the other, and let them blend in the middle. Then scatter crystal chips randomly across the whole surface — the resin background does the gradient work, and the chips add texture and depth.
Durability: Making Clips That Last
Hair clips experience more physical stress than most people realize — they're bent during insertion, squeezed during removal, exposed to hair products, and occasionally sat on or dropped. Here's how to maximize durability:
Resin thickness: Keep the total resin thickness under 4mm. UV resin thicker than this may not cure completely in the center, leaving a soft, uncured core that can crack. If you need a thicker resin piece, build it in 2mm layers, curing each layer before adding the next.
Edge finishing: Rough edges catch on hair and eventually chip. After curing, sand any rough edges with fine-grit sandpaper (400-800 grit), then apply a thin edge coat of clear resin and cure again. This creates a smooth, rounded edge that won't catch or chip.
Attachment: Glue the resin piece to the clip using a strong jewelry adhesive — E6000 or a UV-curable adhesive. Apply adhesive to both surfaces, press together, and let cure fully (24 hours for E6000, 5 minutes for UV adhesive) before wearing. For extra security, wrap a thin strip of wire around the resin piece and clip before gluing — the wire provides a mechanical connection that supplements the adhesive bond.
Stress testing: Before wearing, gently flex the clip open and closed 10 times to simulate use. Check for any cracking or separation at the resin-clip junction. If it survives this test, it should handle normal daily wear.
Safety Guidelines
Resin safety is non-negotiable. UV resin and epoxy resin both contain chemicals that can irritate skin, eyes, and respiratory systems:
- Work in a well-ventilated area — open windows, use a fan, or work outdoors
- Wear nitrile gloves (latex doesn't protect against resin chemicals)
- Wear safety glasses — resin in your eye requires immediate medical attention
- Don't eat, drink, or smoke while working with resin
- Keep resin away from children and pets
- Dispose of uncured resin as hazardous waste — don't pour it down the drain
- If UV resin gets on skin, wash immediately with soap and water — don't cure it with a UV lamp while on skin
FAQ
Can I use real flowers instead of dried ones?
Not directly — fresh flowers contain water, and water trapped in resin creates bubbles, clouding, and can cause the resin to cure incompletely. Fresh flowers must be pressed and dried first. The easiest method: place the flower between sheets of parchment paper inside a heavy book for 7-10 days. The flower will be completely flat and dry. Microwave flower presses can speed this to 2-3 minutes but require practice to avoid scorching.
Will the resin yellow over time?
UV resin has a tendency to yellow with prolonged sun exposure — typically noticeable after 6-12 months of daily wear in sunny conditions. Epoxy resin is more UV-resistant but can also yellow eventually. For hair clips worn occasionally (not daily sun exposure), yellowing is minimal and may not be noticeable. Using a UV-resistant topcoat or storing clips in a dark box when not worn can significantly slow yellowing. Some premium UV resins are formulated with UV inhibitors that reduce (but don't eliminate) yellowing.
How do I fix a crystal that fell out of my finished clip?
If a crystal becomes dislodged from the resin, you can reattach it with a small drop of UV resin. Place the crystal back in its position, apply a tiny drop of fresh UV resin around its base, and cure under the UV lamp for 2-3 minutes. If the cavity left by the missing crystal is too large for the replacement crystal, fill the cavity with resin first, position the crystal, and cure. The new resin should bond seamlessly with the existing resin.
Frequently Asked Questions
How do I prevent bubbles in my resin crystal hair clips?
To achieve that flawless, artisan finish, always pour your resin slowly and stir gently to avoid introducing air. Before embedding your natural crystals, lightly coat them with a tiny amount of resin to seal the surface. Using a heat gun or a quick pass with a small butane torch over the wet resin will easily pop any lingering surface bubbles for a perfect, glass-like finish.
Can I wash or get my resin crystal hair clips wet?
While cured resin is completely waterproof, fully submerging your handcrafted hair clips isn't recommended. Prolonged water exposure can eventually degrade the metal clip base or loosen the adhesive over time. If your clips get dirty, simply wipe them gently with a damp microfiber cloth. Proper care ensures your beautiful crystal accessories remain durable and last for years.
Comments