How to Wire Wrap a Raw Crystal Without a Drill
June 5, 2026
What You Need to Get Started
Tools:
Oh, you're about to dive into the fun stuff, aren't you? You'll need some round-nose pliers for making loops and curves, and the chain-nose pliers are awesome for grabbing, flattening, and tucking those wire ends. Wire cutters are a must-have, and I'm a big fan of the flush cutters. If you've got 'em, Nylon-jaw pliers are totally optional, but they're super handy for straightening out bent wire. And hey, a small ruler or a measuring tape to keep things in check never hurt anyone!Wire:
- Frame wire: I'm all about 16-gauge or 18-gauge for the main frame. Thicker wire's a no-brainer for keeping those big bad stones in place.
- Wrapping wire: For the decorative wraps, I'm a fan of 22-gauge or 24-gauge. It's so easy to wrap 'em tight and keep everything snug.
- Copper wire's great for getting your feet wet, but for the final touches, I'm all about sterling silver or gold-filled wire. They just add that extra something.
Stones:
Hey! So, when you're diving into raw crystal points, tumbled stones, geode slices, or just plain ol' mineral finds, I say go for the ones with a flat side or a more regular shape. You know, not those super round and super smooth ones – those are a pain to wrap, honestly. I mean, they're awesome, but what I love about angular or a bit wonky ones is they're just so much easier to play with!Technique 1: The Cage Wrap
The cage wrap is like that Swiss Army knife, you know? It's so versatile! It's like my go-to for all those undrilled stones. It's like giving the stone a gentle wire hug, you know? Keeps it nice and snug without hiding too much of that gorgeous surface. It's a real charm, because it's like it knows exactly what to do — fits points, lumps, wonky shapes, even those round ones. And what I really love is that it's like, well, it's adaptable for just about any stone you can throw at it!
How it works: You make a wire frame to wrap around the stone, all the way around. Then, you add these decorative wraps that hold the stone nice and tight, with just a little bit of tension and some cool geometry to it.
Step-by-step:
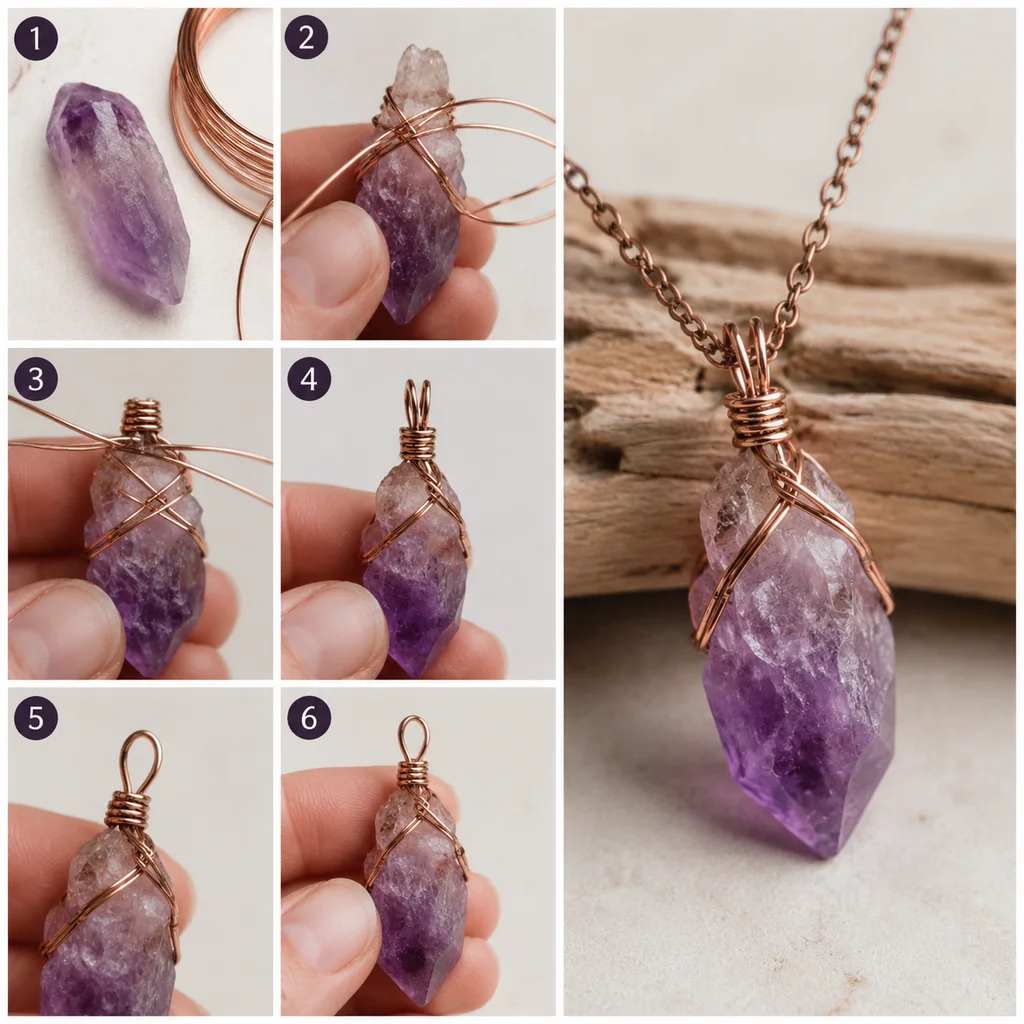
- Alright, first things first, measure your stone. Just hold it and guess how much wire you need to wrap around the widest part. Don't forget to add 3 inches for the bail (that's the loop for hanging) and a little extra for good measure. For stones that are 25-30mm, you'll need about 10-12 inches of 18-gauge wire for the frame and 6-8 inches of 22-gauge wire for the wraps.
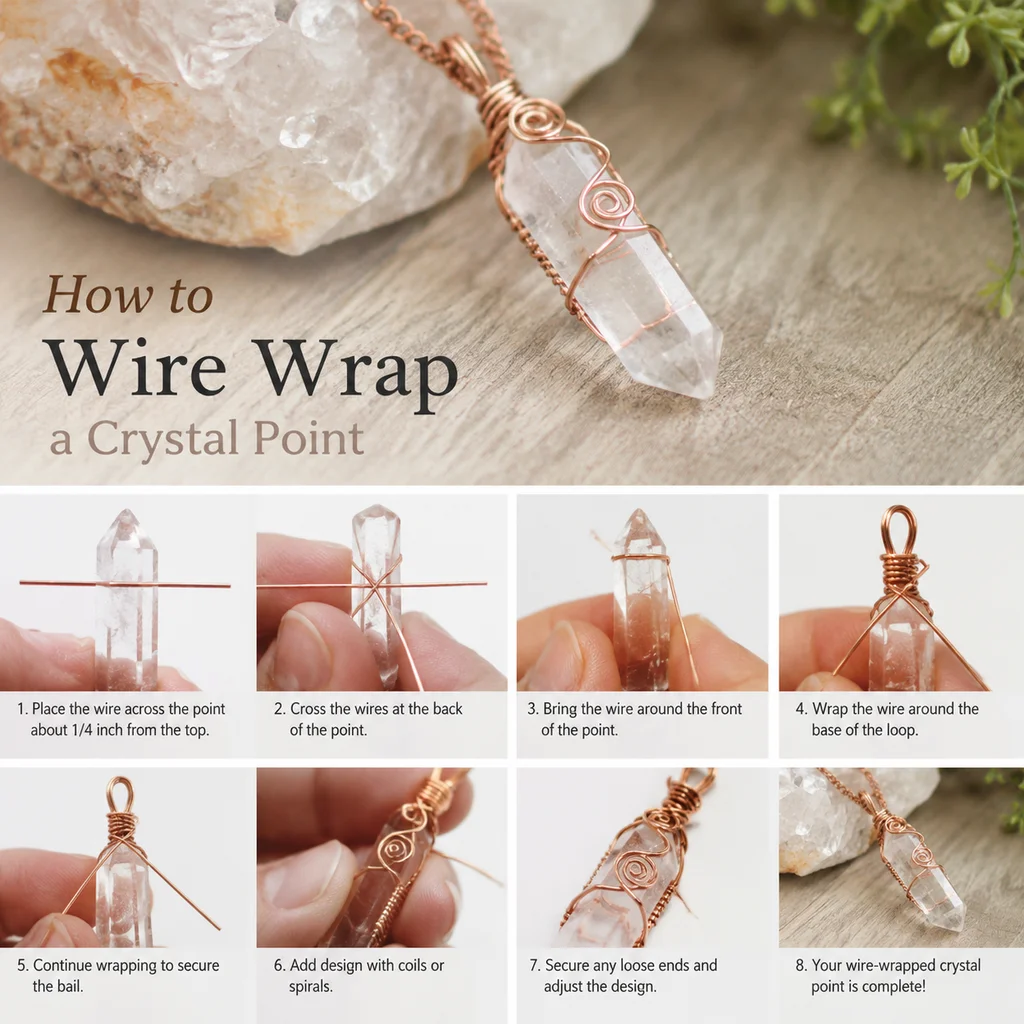
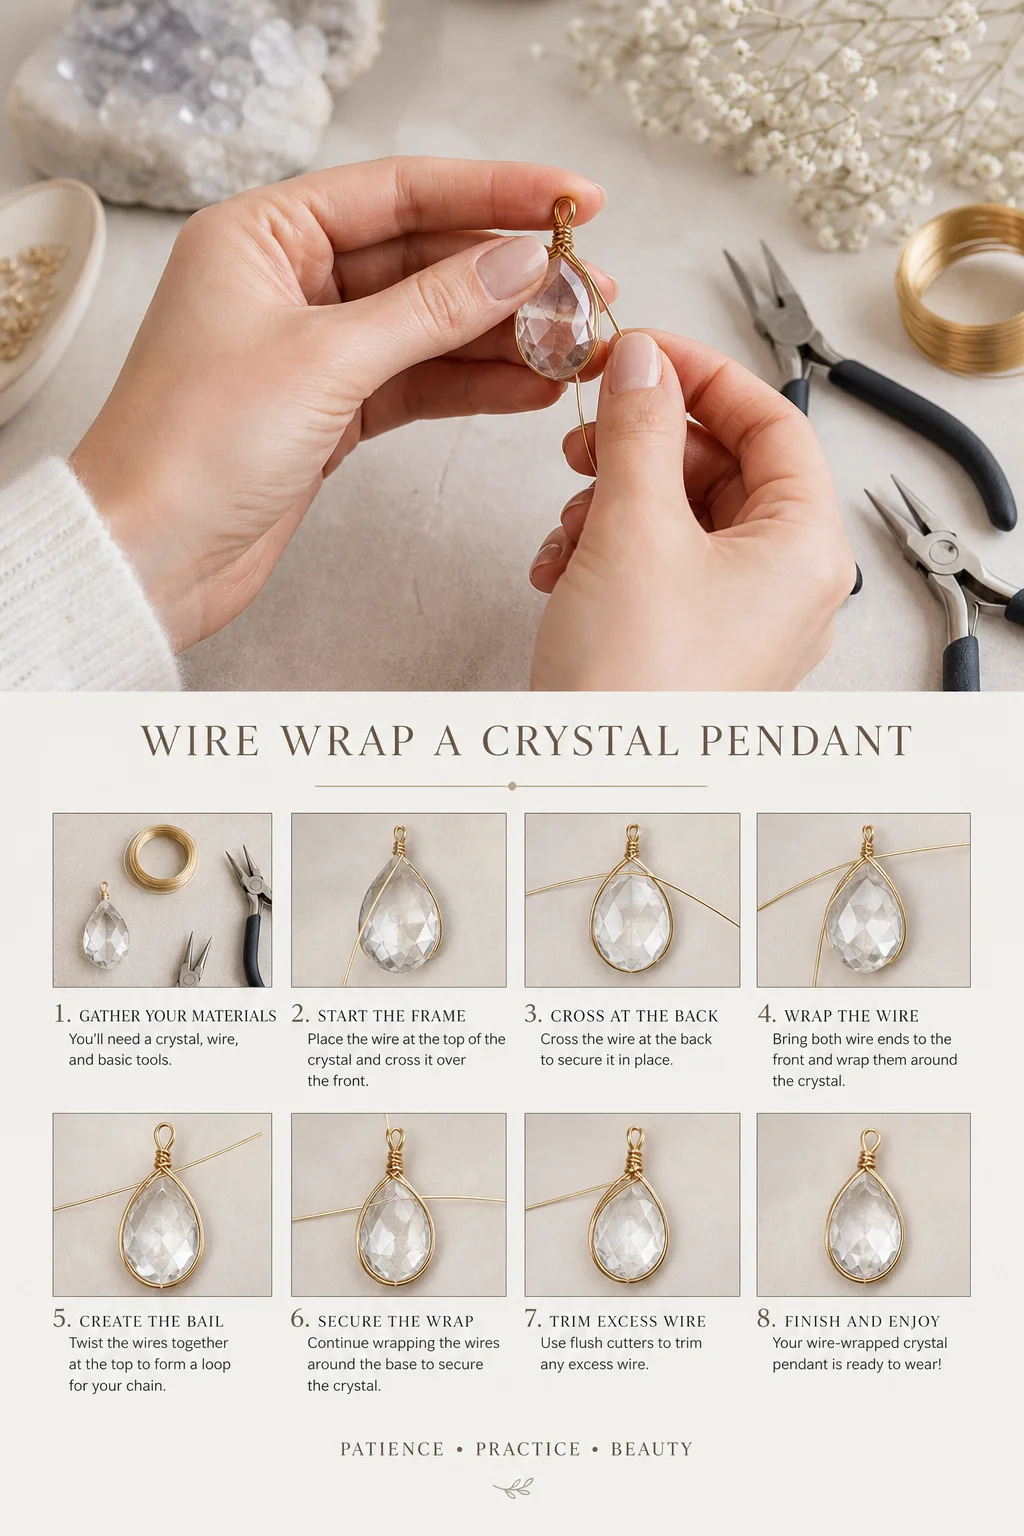
- Now, let's make the bail loop. Grab your frame wire and use those round-nose pliers to make a loop at one end. That's the bail, the loop where your chain or cord goes. Just cross the short tail over the long tail and wrap it a couple of times right below the loop to keep it in place.
- Time to shape the frame around the stone. Hold the bail against the top of the stone and bend the long tail down one side, across the bottom, and up the other side, kind of following the stone's shape. The wire should fit nice and snug but not so tight it cracks the stone. And at the top, just cross the wire over the bail area.
- Now, secure the frame. Wrap the wire tail around the base of the bail a few times to make a good connection. And voilà, you've got a basic U or V shape frame hugging the stone.
- Now for the cross wraps. Use that 22-gauge wire and make wraps across the front of the stone. Just wrap the wire diagonally and anchor each wrap around the frame wires on the sides. Do 3-4 wraps one way, then 2-3 the other way, making an X or lattice pattern.
- Don't forget to tuck all the wire ends. Use your chain-nose pliers to flatten them against the frame. You don't want sharp ends snagging on clothes or skin. And if there are any rough spots, just file them down.
- Finally, give it a shake. The wrapped stone shouldn't rattle or move around. If it does, add a couple more wraps to tighten it up.
Best for: Crystal points, those quirky chunks, natural beauties, or any stone with a bit of an edge or a flat spot. They're so cool, you know? I've found what I love about them is their unique vibe and that little bit of character they bring to any piece.
Technique 2: The Split Shank
Oh, the split shank technique is a total game-changer! I mean, it's perfect for those flat stones and crystal points that are the same width all the way down. You just make one band that splits into two at the top—it's like giving the stone a cozy hug, you know? And it doesn't require wrapping it around like you would with other designs. It's just so much cleaner!Step-by-step:
Alright, so here's what you do. Start by cutting about 6-8 inches of 16-gauge or 18-gauge wire. Then, you gotta bend it into a U-shape so it fits perfectly around the bottom of your stone. And make sure the band's shape matches your stone — go wider if it's big, narrower if it's pointy. Now, at the top of that U, you don't want to close the band. Instead, split the two arms up and out so they sorta hold the sides of the stone. Drop the stone into the band, and it should be nice and secure. The split arms will be on either side, keeping the stone steady. Next, bring those two arms back over the stone. Cross them over the top and wrap them together where they meet to make a bail loop. Then, you gotta secure everything with some 22-gauge wire. Add 3-4 wraps at each junction point — where the band meets the split arms and where the arms cross at the top. This keeps the stone from sliding out, I've found. And if you're into it, you can add a decorative twist before wrapping the arms at the top. Just grab both wires with your chain-nose pliers and twist them like you're making a rope. Lastly, don't forget to smooth all the ends. You don't want any sharp bits sticking out!Best for: Flat tabular stones, crystal points with uniform width, small geode slices. Oh, and they're perfect for those adorable little geode slices too!
Hey, so Technique 3 is all about The Prong Setting!
Oh, the prong setting is so cool! It's like a twist on the old-school faceted stone settings in fancy jewelry, but for wire work. It's perfect for crystal points and tumbled stones that kind of look like they're symmetrical. Instead of a full cage or band, you make these individual wire prongs that really grab onto the stone at certain spots. It's like giving the stone a little hug with wire!Step-by-step:
- First things first, make the base ring. Snag some 18-gauge wire and twist it into a circle that fits your stone just right. And don't forget to wrap the join three times to make sure it stays put. This ring is a big deal since it's where the prongs will hang out.
- Now, let's make four prongs. Snip four 2-3 inch pieces of 20-gauge wire, bend 'em in half to get that V-shape, and attach 'em to the base ring by wrapping the bottom around the ring wire. Make sure they're evenly spaced on top, bottom, left, and right. Evenly, get it?
- Time to pop the stone in. Sit the stone in the ring so it's resting on the lower prongs, and the upper prongs are just dangling over the top like a tiny hat.
- Now, shape those prongs. Gently bend each prong inward so it curves over the stone. They should hold the stone nice and tight but not so tight that they leave any marks or stress the stone out. Keep it chill, right?
- Don't forget about the bail. At the top, join the two upper prongs and wrap 'em together to make a loop. Add a wrapping wire to keep it all nice and tight.
- Double-check your work. Grab the chain-nose pliers and squeeze each prong to make sure they've got a good grip. Give the piece a little shake to see if the stone moves. If it does, tweak the prongs a bit. Just make sure they're snug but not too tight. Easy peasy!
Best for: Symmetrical stones, crystal points, tumbled stones – anything where you want to show off more stone and less wire, you know?
Figuring Out the Best Technique for Your Stone
Hey there! So, you're diving into the world of crystals, huh? Choosing the right technique can be a bit of a puzzle, but it's totally doable. First things first, think about what you're going for. Do you want to clean 'em up, maybe charge 'em with some positive vibes, or maybe you're into making some cool crystal jewelry? I've found that what I love about different stones is how they react to different methods. For example, you know how some crystals are super sensitive to heat? Well, don't even think about using a torch on those! But, if you're into cutting or polishing, a diamond tool is your best friend. The thing is, it's all about trial and error. You'll find your groove eventually. Just remember, it's all about what works best for you and your crystals. Happy crafting!Hey crystal friends! So, you've got your special stone and now you're pondering which technique to try. Honestly, it's all about what you're after. If you're going for that glossy look, polishing is the way to go. And if you're aiming for that rugged, cool look, sandblasting is rad. But hey, some stones are more fragile than others. Like, you don't wanna cook amethyst too much or it might crack. So, take your time to learn about each stone's quirks. Now, if you need any tips on how to DIY it, our how-to guide is a total game-changer!
So, the shape of your raw crystal is a big deal, really. It tells you which technique will work like a charm.
Choosing the Right Setting for Your Crystal Jewelry
So, I've found that long, narrow crystal points with that split shank or prong setting are a winner. They just fit in your hand so nicely, thanks to their natural taper. And, you know, the cage wrap is great for irregular chunks and specimens. It's so adaptable; it can wrap around almost anything! Flat tabular pieces? I'm all about the split shank. They just sit so comfortably in the band; that's what I love about them. And rounded or egg-shaped stones? Prong setting is the way to go. The prongs catch those curves like a pro. For those tiny stones under 15mm, prong setting is the cleanest choice, and small cage wraps won't look bulky at all. But for the big guys, over 40mm, you've got to go with the cage wrap and thicker wire (16-gauge). The thing is, other techniques just won't cut it for structural support.
Handling Sharp Crystal Edges
Raw crystals are a bit of a wild card, they've got those jagged edges and points that can really snag on things, like wires. Here's a quickie tip on how to handle 'em:
Hey, so here's the deal. Wrap your wire around the sharp bits, not right up against them. It looks way cooler and keeps the edges safe. Plus, use a nail file to buff out those sharp edges – it keeps the stone looking totally natural and safe for your skin. And if your wrapping wire is getting cut, just pop in a tiny piece of that 24-gauge wire to shield the edge while you wrap. Safety first, so don't forget to grab those safety glasses when you're filing or handling those tiny, sharp crystals. It's totally worth it, I promise!
Frequently Asked Questions
Hey, so you're wondering if the wire will scratch the crystal, right? I've found that with the quality of wire we use, it's pretty unlikely. But honestly, the thing is, it's always good to be gentle with your jewelry, no matter what. Just give it a little tender loving care, and it'll last you a long time!
Softer metals like copper can leave faint marks on very hard stones (quartz, topaz), though these are usually invisible without magnification. Silver and gold-filled wire are softer and slightly more likely to mark, but the marks are cosmetic only and do not damage the stone structurally.
How do I make the wrap tighter if the stone is loose?
Add more wrapping wire at the points where the stone meets the frame. Tight diagonal wraps that press the wire frame against the stone are the most effective way to snug up a loose fit without redesigning the whole piece.
Can I wrap a crystal that has been tumbled smooth?
Yes, but smooth stones are actually harder to wrap than rough ones because the wire has less to grip against. Use the prong setting technique for tumbled stones — the individual prongs create pressure points that hold smooth surfaces more effectively than a cage.
Final Thoughts
Wire wrapping raw crystals without drilling is a skill that improves dramatically with practice, but even your first attempts will produce wearable results. The key is choosing the right technique for your stone's shape, working patiently with the wire rather than forcing it, and accepting that each wrap will be slightly unique — that is the beauty of handmade jewelry. Start with inexpensive copper wire and practice stones, then graduate to silver wire and special specimens as your confidence grows.
Frequently Asked Questions
What gauge wire is best for wrapping raw crystals?
For handcrafted jewelry, using two different wire gauges is best. A thicker wire (18 to 20 gauge) creates the structural frame or prongs needed to hold the raw stone securely. Then, use a thinner, more pliable wire (24 to 26 gauge) for the decorative weaving and tight binding. This combination ensures your artisan pendant remains durable while allowing for beautiful, intricate detailing.
How do I wrap an oddly shaped or asymmetrical crystal?
Raw stones often have unique, asymmetrical profiles, which makes handcrafted crystal jewelry so special! The trick is to map out your wrap by finding the stone's natural "ledges" or indentations. Use these natural quirks to anchor your wires, creating a custom cage or prong setting. Finding the stone's center of gravity ensures your wire-wrapped pendant hangs perfectly straight when worn.

Comments