Wire Wrapping Cabochons Without Drills
May 31, 2026
Why Wire Wrapping a Cabochon Is Different From Tumbled Stones
Wire wrapping tumbled stones is relatively forgiving—most tumble-polished stones have smooth, rounded shapes that wire conforms to easily. Cabochons are a different beast. They're flat on the bottom and domed on top, with defined edges where the curve meets the flat base. This shape requires a deliberate framing technique rather than the organic wrapping style used for rounded stones.
The good news: once you learn the cabochon wrap, a huge range of stones becomes available to you. Many of the most beautiful cut stones on the market—turquoise, larimar, moonstone, opal, tiger's eye—are sold as cabochons, not tumbles. Learning this technique essentially doubles your design possibilities.
Tools You'll Need
Get these ready before you start. Having everything within reach prevents the frustration of stopping mid-wrap to hunt for pliers:
- Round-nose pliers — For making loops, curves, and the bail. Get a pair with graduated jaw sizes (small to large) so you can make loops of different diameters.
- Chain-nose pliers — Flat interior jaws for gripping wire, flattening, and tucking wire ends. Two pairs are ideal—some steps require holding wire with one pair while bending with the other.
- Flat-nose pliers — Wider, perfectly flat jaws. Better for holding large areas of wire and making sharp right-angle bends.
- Wire cutters — Flush cutters (cuts wire flat on one side) are essential for clean finishes. Standard diagonal cutters leave pointed ends that can snag clothing or scratch skin.
- Nylon-jaw pliers — Optional but incredibly useful for straightening bent wire and smoothing kinks without scratching the surface.
- Ruler or caliper — For measuring wire lengths accurately. Eyeballing leads to waste.
- Marker (fine-tip Sharpie) — For marking positions on the wire before cutting or bending.
Choosing Your Cabochon
For your first cabochon wrap, pick a stone with these characteristics:
- Oval shape — The easiest to wrap. Avoid freeform shapes until you've done a few ovals.
- 25-35mm — Large enough to handle comfortably, small enough that the wire requirements aren't excessive.
- Standard dome height — Not too flat (hard to frame securely) and not too tall (requires more wire for the frame).
- Smooth edges — Sharp corners on angular cabochons (rectangles, triangles) are much harder to wrap smoothly.
Good beginner cabochons: turquoise, jasper, agate, or moss agate. These are affordable ($5-$15 for 25mm ovals), widely available, and forgiving to work with. Avoid opals for your first attempt—they're expensive, fragile, and mistakes hurt more.
Wire Selection: What Gauge and How Much
For a 25-35mm cabochon, you'll need:
- 20-gauge (0.8mm) half-hard round wire — Main frame wire. You'll need enough to go around the stone perimeter plus 3-4 inches on each side for the bail and finishing. For a 30mm oval, about 12-14 inches total.
- 26-gauge (0.4mm) dead-soft round wire — Weaving wire. You'll need substantially more of this—about 3-4 feet per pendant for a basic wrap, more for elaborate designs.
Wire material matters:
- Copper — Best for learning. Affordable ($5-8 per roll), workable, and takes a nice patina over time. The warm orange color complements earthy stones.
- Silver-plated copper — Looks like silver at a fraction of the cost. Plating can wear off at friction points over time.
- Genuine sterling silver — $20-30 per roll for 20-gauge. Beautiful finish but work-hardens faster, meaning it gets stiffer as you bend it and requires periodic annealing (heating with a micro-torch) to stay workable.
- Gold-filled — Premium option with a thick gold layer over a base metal core. $25-40 per roll. Durable and won't tarnish like sterling, but expensive for practice pieces.
Step 1: Measure and Cut the Frame Wire
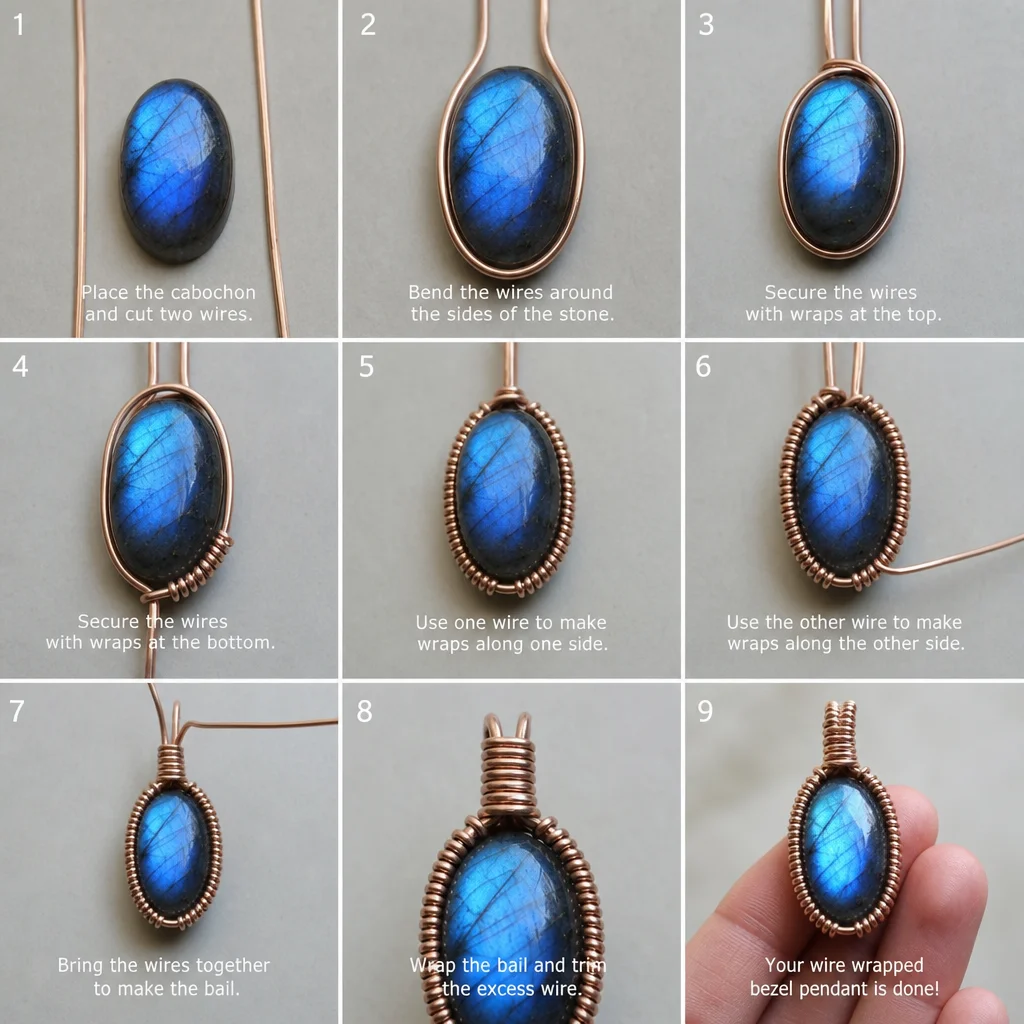
Measure the perimeter of your cabochon at its widest point (where the dome meets the base). Add 3 inches on each end for the bail. Mark the center of your 20-gauge wire with your fine-tip marker.
Example: if the perimeter measures 5 inches, cut a 12-inch piece (5 + 3 + 3 + 1 for the bail curve). Using flush cutters, cut cleanly and file any sharp burrs with a nail file or wire rounder tool.
Step 2: Create the Front Frame
Using your round-nose pliers, make a small loop at the center mark on your frame wire. This loop will eventually become part of the bail. The loop should be about 3-4mm in diameter—big enough to thread a chain through, small enough to look proportional to the pendant.
Hold the loop with your flat-nose pliers and bend both wire arms downward at a roughly 90-degree angle, creating a U-shape with the loop at the apex. The two arms will become the frame that wraps around the cabochon's edges.
Step 3: Shape the Frame to the Stone
Lay the U-frame over the front of your cabochon, with the loop at the top. Gently bend the wire arms around the sides of the stone, following its contour. Use your fingers first—pliers can create sharp kinks that are hard to smooth out. Only switch to pliers when your fingers can't provide enough leverage.
The wire should sit snugly against the stone's edge where the dome meets the flat base. Don't wrap it tightly around the dome itself—you're framing the edge, not hugging the stone. There should be a small gap between the wire and the stone's face, which you'll fill with weaving wire later.
Work both sides evenly. Bend one side a little, then the other side a little, alternating. This keeps the frame symmetrical and prevents one side from becoming tighter than the other.
Step 4: Secure the Frame Ends at the Back
When both wire arms meet at the bottom of the stone, cross them over each other behind the flat base. Use chain-nose pliers to press them flat against the back. If you have excess wire, trim it to leave about 1-1.5 inches on each end.
These ends will be wrapped around each other to lock the frame in place. Using your 26-gauge weaving wire, bind the two ends together with 3-4 tight wraps. Clip the weaving wire and tuck the tail flat with chain-nose pliers. This is your first anchor point.
Step 5: Start Weaving the Side Wire
Cut about 18-20 inches of your 26-gauge weaving wire. Hold the frame in one hand (or use a helping hands clamp if you have one). Starting from one of the anchor points at the bottom, begin weaving the thin wire around both arms of the frame, wrapping snugly at 2-3mm intervals.
The technique: wrap the 26-gauge wire around one arm of the frame 2 times, then cross to the other arm and wrap 2 times, creating a figure-eight or zigzag pattern between the two frame arms. Each wrap should sit neatly next to the previous one without overlapping.
Work from the bottom anchor upward along one side. The weaving wire should sit at the stone's edge, creating a decorative border that also holds the stone in place. The tighter your wraps, the more secure the stone will be.
Step 6: Weave Across the Front Face
After you've woven up one side to the top, bring the weaving wire across the front of the stone. This is where you can add decorative elements. Common patterns include:
- Straight horizontal lines — Simple wraps across the face at regular intervals
- V-shapes — Diagonal wraps that create a chevron pattern
- Spirals — Small coiled spirals between the frame and the stone face
- Scrolls — Curved wire accents that add visual interest
For your first pendant, keep the front weaving simple—2-3 horizontal wraps at most. Elaborate front designs look impressive but are much harder to execute cleanly as a beginner.
After crossing the front, continue weaving down the other side to the bottom anchor point. This mirrors the first side and completes the frame enclosure.
Step 7: Finish the Bail
At the top of the frame (where you started with the loop in Step 2), you need to create a proper bail—the loop or ring that your chain passes through. There are several approaches:
Simple Bail from the Loop
The loop you created in Step 2 might already be sufficient. Check if it's large enough for your chain or cord. If it's too small, use your round-nose pliers to gently enlarge it. Wrap the base of the loop with your 26-gauge weaving wire (4-5 wraps) to secure it and create a neat finish.
Enhanced Bail
For a more polished look, take the two wire arms extending above the frame loop and wrap them around your round-nose pliers in the opposite direction, creating a second, larger loop above the first. Wrap the base of this larger loop with weaving wire to secure it. This double-loop bail is stronger and more visually balanced than a single loop.
Decorative Bail
Advanced wrappers sometimes create elaborate bail designs—braided wire, coiled wire, or wrapped loops with bead accents. Save these for later pieces. For now, a clean, simple bail that functions well is better than a fancy one that's uneven.
Step 8: Tuck and Finish All Wire Ends
This step separates amateur-looking wraps from professional ones. Every wire end needs to be tucked, not just snipped.
Using your flush cutters, clip each wire end as close to the wrap as possible. Then use chain-nose pliers to pinch the cut end flat against the nearest wire surface. The end should lie flush and smooth—not sticking up where it can catch on skin or clothing.
Check your entire piece: front, back, sides, bail. Run your finger over every wire end. If you feel any sharp points, clip and pinch again. This attention to finishing detail is what makes a wire-wrapped piece feel polished.
Step 9: Check the Stone's Fit
Gently press on the stone. It should not shift, rattle, or feel loose in any direction. If there's play, add a few more wraps of weaving wire at the loosest points. A well-wrapped cabochon should feel like a single solid piece—you shouldn't be able to slide the stone out by pressing from behind.
If the wire frame is too tight and the stone is being squeezed or compressed, you may need to slightly loosen the frame by gently prying the wire arms apart at the back. Be careful doing this—too much adjustment can create visible gaps at the front.
Common Mistakes and How to Fix Them
Wire Marks on the Stone
If your frame wire has scratched the cabochon's polished surface, check that the frame is sitting at the edge (where dome meets base) rather than pressing against the face. Stones softer than Mohs 7 can scratch from wire contact—turquoise (5-6), malachite (3.5-4), and calcite (3) are particularly vulnerable. If marks have already appeared, a jeweler's polishing cloth can often remove light scratches.
Uneven Wrapping
If one side of your weaving is tighter or looser than the other, it's usually because you applied uneven tension while wrapping. You can't easily fix this without unwinding, so prevention is key: wrap at a steady, moderate pace, and periodically check that both sides look symmetrical before you've gone too far.
Frame Wire Too Short
If you cut the frame wire too short and the arms don't meet at the bottom, you can add an extension: cut a short piece of 20-gauge wire, overlap it with the existing frame wire, and bind the joint with several wraps of 26-gauge wire. The joint will be visible, so position it at the back or bottom of the pendant where it's less noticeable.
Bail Not Centered
If the bail leans to one side, it means the frame wires aren't symmetrically bent. You can gently adjust by bending one arm inward and the other outward at the top, just below the bail. Small adjustments with flat-nose pliers usually fix this.
Taking It Further
Once you've completed a basic oval cabochon wrap, try these progression challenges:
- Freeform cabochons — Irregular shapes force you to adapt the framing technique on the fly
- Double-frame wraps — Two parallel frames with weaving between them creates a more elaborate border
- Accent beads — String small beads (3-4mm) onto the weaving wire between frame wraps for added texture
- Pendant rings — Wrap the frame completely in the round so the stone is visible from all angles
Each of these builds on the basic skills you've just learned. The cabochon wrap is the foundational technique that opens up the entire world of wire-wrapped stone jewelry. Once it feels natural, everything else gets easier.
Frequently Asked Questions
Can I use silver wire for my first attempt?
You can, but copper is recommended for learning. Sterling silver work-hardens quickly as you bend it, meaning it gets progressively stiffer and harder to shape. Copper stays pliable longer, giving you more time to adjust and correct your work. Once you're comfortable with the technique, switch to silver for finished pieces.
What if my cabochon has sharp corners?
Angular cabochons (rectangles, triangles, hexagons) require you to create crisp right-angle bends in the frame wire instead of smooth curves. This is harder for beginners because any slight error in the bend angle is immediately visible. Practice with a rounded-corner rectangle before attempting sharp corners.
Do I need to seal the wire?
Copper wire will oxidize and darken over time, developing a brownish patina. If you want to preserve the bright copper color, apply a jewelry sealant (like Renaissance Wax or a clear nail polish) after finishing. Sterling silver will tarnish to a dark grey but can be polished back to bright with a silver cloth. Neither coating is strictly necessary—many people prefer the natural aged look.
Frequently Asked Questions
How do you wire wrap a cabochon without a hole?
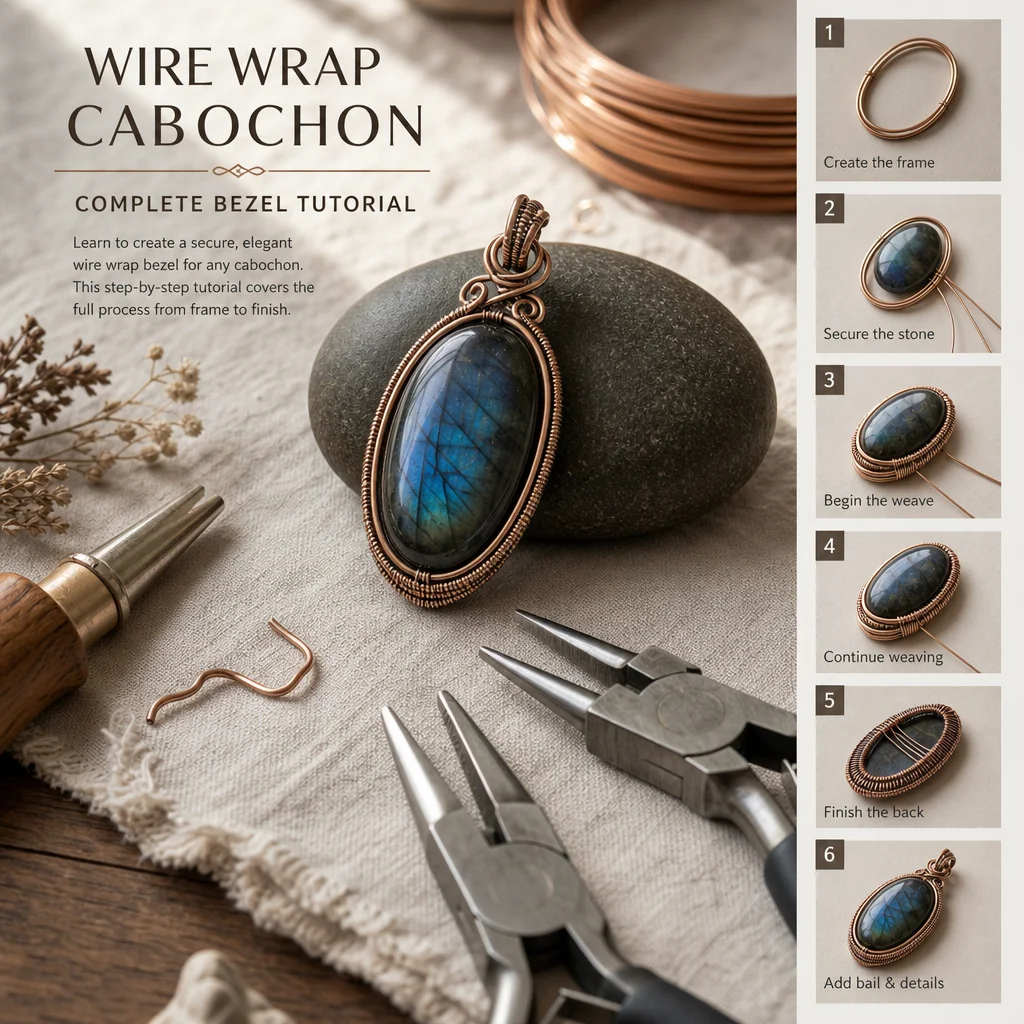
To wrap an undrilled cabochon, you must create a secure wire frame that uses tension to hold the stone in place. At SagStone, our artisans use a combination of a thicker base wire for the structural frame and thinner weaving wire to lock the crystal securely. You will shape the frame to match the stone's outline, add a backing wire to prevent it from falling through, and then weave the front bezel to hold the edge tightly.
How do you keep an undrilled stone from falling out of a wire wrap?
The secret to securing an undrilled stone is perfect tension and a structural back frame. When crafting handcrafted natural crystal jewelry, always ensure the back wires sit just low enough over the stone's curve to hold it from behind, while the front woven wires lock it in place. Test the tension by gently pressing the front wires before finishing your final weave to ensure your beautiful cabochon stays perfectly snug.
Comments