Rock Tumbling Basics: Your Ultimate Beginner's
May 14, 2026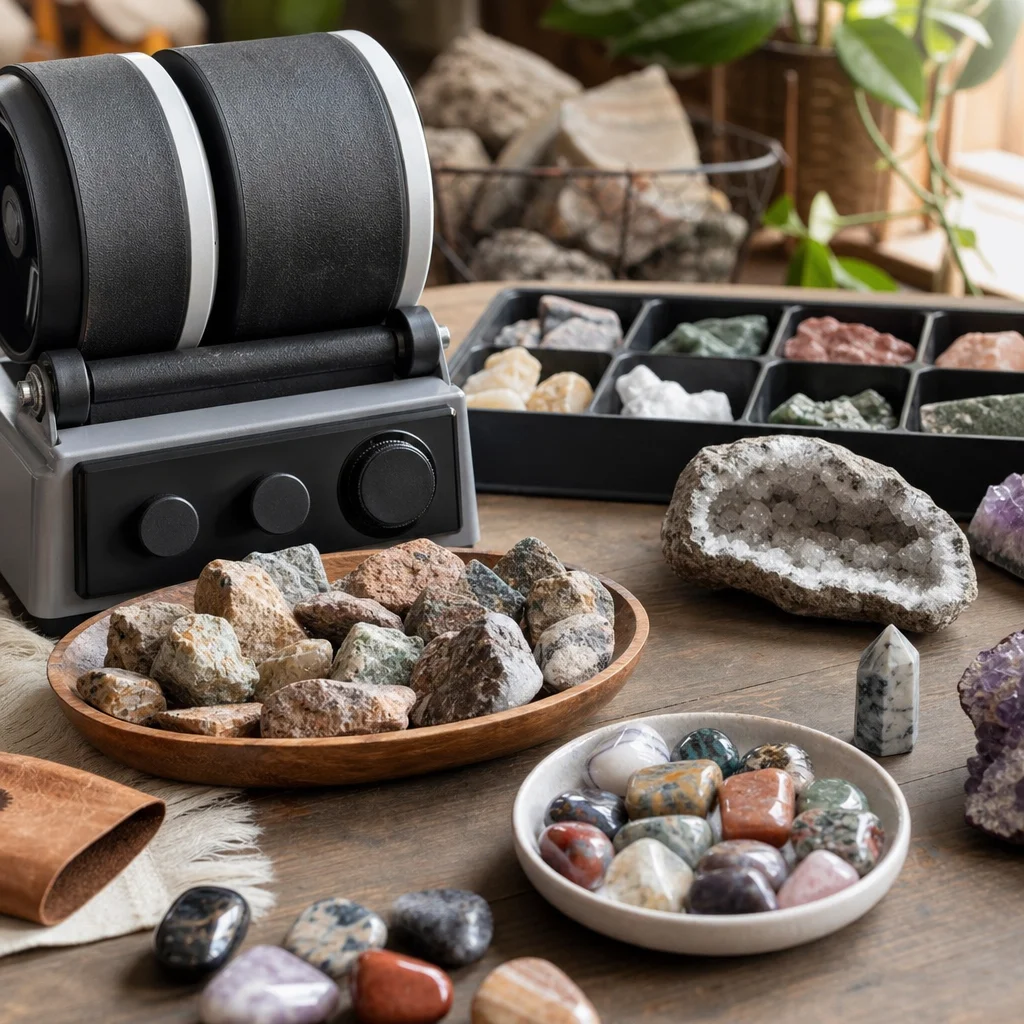
Rock Tumbling for Beginners: What Actually Happens Inside the Barrel
Rock tumbling is one of those hobbies that sounds simple — put rocks in a barrel with grit, turn it on, wait a few weeks, get shiny stones. The reality involves more steps, more patience, and more noise than most beginners expect. But the basic concept is straightforward, and the results are genuinely satisfying.
Here's what's actually happening at each stage, what equipment you need, and what I wish someone had told me before I started.
How Rock Tumbling Works
A rock tumbler is a motorized barrel that rotates continuously. Inside the barrel, rocks grind against each other and against abrasive grit. Over days and weeks, this grinding smooths rough surfaces, rounds edges, and eventually produces a polished finish.
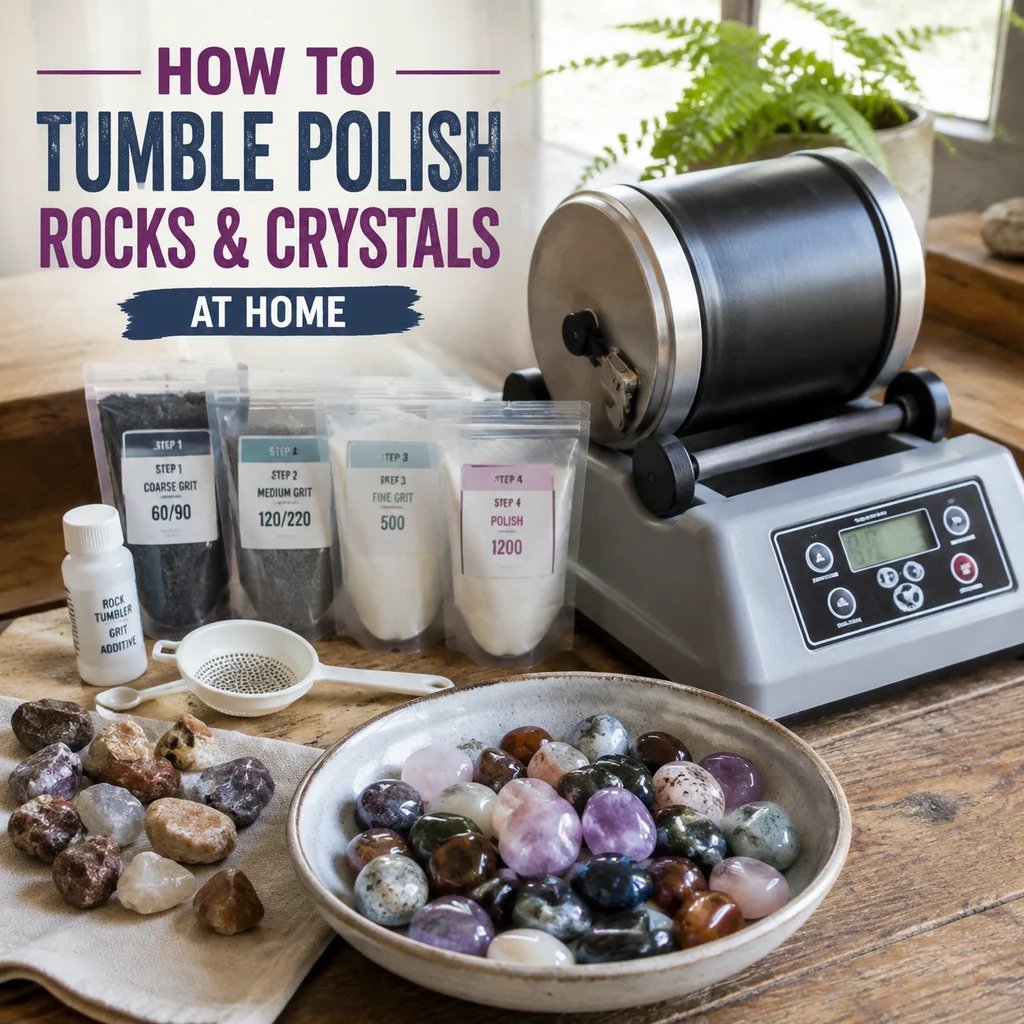
The process works in four distinct stages, each using progressively finer abrasive:
- Stage 1 (Coarse grind, 60/90 grit): Removes rough surfaces, shapes the rocks. This is where most material removal happens.
- Stage 2 (Medium grind, 120/220 grit): Smooths the scratches left by the coarse grit.
- Stage 3 (Fine grind, 500 grit): Pre-polish stage. Rocks should look smooth and almost shiny by the end.
- Stage 4 (Polish, aluminum oxide or tin oxide): Final polish. This is what produces the glossy finish.
Each stage takes 5-7 days of continuous running. Total process time: 3-5 weeks. There are no shortcuts that produce equivalent results.
Choosing a Tumbler
Rotary Tumblers (Standard)
The barrel rotates on its side, tumbling rocks like a clothes dryer. This is the most common type and what most people should start with.
Good entry-level options:
- National Geographic Hobby Tumbler: ~$60, 1 lb capacity, includes starter grit and rocks. Adequate for learning but the motor may not last beyond a few dozen batches.
- Chicago Electric (Harbor Freight): ~$50-70, 3 lb capacity. Surprisingly decent for the price. Loud.
- Lortone 3A: ~$120, 3 lb capacity. The standard recommendation for a "serious beginner" tumbler. Reliable motor, good barrel design, lasts for years.
Vibratory Tumblers
Instead of rotating, the bowl vibrates rapidly, causing rocks to rub against each other. Faster (1-2 weeks total) and better at preserving the original shape of rocks (less rounding). More expensive and noisier. Not recommended for first-time tumblers.
Selecting Rocks to Tumble
What Works Well
- Hardness 6-7 on Mohs scale: Agate, jasper, quartz, petrified wood, obsidian, tiger's eye
- Similar hardness within a batch: Mix rocks of similar hardness so they grind at the same rate. A mix of agate and talc will result in the talc disintegrating before the agate is smooth.
- Similar size: Rocks should be roughly the same size within a batch. Large rocks crush small ones.
What Doesn't Work
- Soft minerals (Mohs 1-3): Talc, gypsum, calcite — they disintegrate rather than polish
- Very hard minerals (Mohs 8-10): Topaz, corundum, diamond — technically polishable but take much longer and require specialized grit
- Rocks with large cleavage planes: They tend to split along these planes rather than rounding smoothly
- Sedimentary rocks: Sandstone, limestone, shale — the layers separate during tumbling
Where to Get Rocks
- Buy rough tumbling mixes ($10-20 per pound from rock shops or online)
- Collect your own (check local regulations before removing rocks from parks and beaches)
- River and stream beds are excellent sources of naturally pre-tumbled agate and jasper
The Process, Step by Step
Stage 1: Coarse Grind (7 Days)
- Fill barrel 2/3 to 3/4 full with rocks (not more, not less — overfilling prevents tumbling action)
- Add coarse grit (60/90): approximately 1 tablespoon per pound of rocks
- Add water to just below the top of the rocks
- Seal barrel, run for 7 days
- Check after 24 hours — if the slurry is too thick, add a little water. If too thin, add a little grit.
After 7 days, open the barrel outside (the sludge smells bad and clogs sinks). Rinse rocks thoroughly. Clean the barrel completely — any coarse grit left in the barrel will scratch rocks in later stages.
Stage 2: Medium Grind (7 Days)
- Return rocks to the clean barrel
- Add medium grit (120/220): 1 tablespoon per pound
- Add water to just below rock level
- Run for 7 days
At this point, rocks should feel smooth but look matte/dull. Deep scratches from Stage 1 should be gone.
Stage 3: Fine Grind / Pre-Polish (7 Days)
- Clean barrel again
- Add fine grit (500 or pre-polish compound)
- Add water
- Run for 7 days
Rocks should now look smooth and begin to show a slight sheen. If any rocks still have visible scratches, repeat this stage with fresh grit before moving to polish.
Stage 4: Polish (7 Days)
- Clean barrel thoroughly (this is critical — any grit contamination ruins the polish)
- Add polish compound (aluminum oxide or cerium oxide)
- Add water
- Optional: add plastic pellets to cushion the rocks and improve polish contact
- Run for 7 days
After polishing, rinse rocks and examine. If satisfied, you're done. If some rocks have dull spots, run an additional 2-3 days with fresh polish.
Cleaning Between Stages
This is the part most guides underemphasize. Cross-contamination between stages is the #1 cause of failed tumbling. A single grain of coarse grit in your polish stage will scratch every rock in the barrel.
Cleaning protocol:
- Open the barrel outside or in a utility sink
- Rinse each rock individually under running water
- Scrub the barrel interior with an old toothbrush and dish soap
- Rinse the barrel lid and seal
- Wipe the barrel exterior where it contacts the tumbler frame
- Let everything dry before reassembly
Do not skip this step. Do not rush this step. The 15 minutes you spend cleaning between stages is the difference between glossy stones and dull ones.
Common Problems and Solutions
Rocks Aren't Getting Smooth
- Insufficient time in coarse stage — some hard rocks need 2+ weeks
- Barrel too full (rocks can't tumble freely) or too empty (not enough grinding contact)
- Grit exhausted — after 7 days, the grit is worn down. Don't reuse it.
Rocks Have Flat Spots
- Barrel isn't rotating properly — check that the belt isn't slipping
- Too many rocks of the same flat shape — they stack instead of tumbling
- Barrel overfilled — rocks pack together and don't move
Polish Looks Dull or Frosty
- Grit contamination from insufficient cleaning between stages
- Rocks not fully smoothed in Stage 3 before moving to polish
- Polish compound exhausted or insufficient
- Some rock types (jasper, some agates) accept polish better than others
Barrel Leaks
- Check the rubber seal/gasket — it wears out over time and is replaceable
- Don't over-tighten the lid (warps the seal) or under-tighten (loose fit)
- Some leakage is normal with older barrels — place the tumbler on a tray
The Noise Issue
R tumblers run 24/7 and make a constant grinding/rumbling noise. Not deafening, but noticeable. Think of a running dishwasher in the next room.
Solutions:
- Keep the tumbler in a garage, basement, or spare room
- Place it on a rubber mat to reduce vibration transmission
- Some people build insulated boxes for their tumblers
- The noise decreases after the first 24-48 hours as rocks smooth out
Cost Breakdown
Initial investment:
- Tumbler (Lortone 3A): $120
- Grit kit (4 stages, enough for 3-4 batches): $20-30
- Rough rock (3 lbs): $15-25
- Plastic filler pellets: $8
Per-batch cost after initial purchase:
- Grit for one batch (4 stages): $5-8
- Electricity (3-4 weeks continuous): $2-5 depending on local rates
Total startup: ~$160-180. Per batch after that: ~$10-13.
Each batch produces 2-3 pounds of tumbled stones that would cost $30-60+ at a crystal shop. The math works if you plan to tumble more than a few batches.
For a comprehensive overview, see our Ultimate Crystal Guide for Beginners.
Rock tumbling is surprisingly addictive — and expensive. I tracked my hobby spending against returns using an investment return calculator to see if selling tumbled stones could break even.
Rock Tumbling Safety and Maintenance
Rock tumbling is a relatively safe hobby, but there are precautions you should take to ensure a pleasant and safe experience.
Safety Precautions
- Wear Protective Gear: Safety goggles are a must to protect your eyes from debris. Hearing protection is also recommended, especially if you're using a louder tumbler.
- Keep Children and Pets Away: The tumbling process can be noisy and the tumblers can be heavy, so it's best to keep them out of reach of children and pets.
- Handle with Care: Rocks can be sharp or have rough edges after tumbling, so handle them with clean, dry hands to avoid injury.
Maintenance Tips
- Clean the Barrel: After each tumbling session, remove the rocks and grit and clean the barrel thoroughly. This prevents grit buildup and keeps your rocks clean.
- Check the Tumbler: Regularly inspect your tumbler for any signs of wear or damage. Replace worn-out parts promptly to avoid accidents.
- Store Properly: When not in use, store your tumbler in a dry, cool place. This helps prevent rust and prolongs the life of the tumbler.
Rock Tumbling Tips and Tricks
Here are some tips and tricks that can help make your rock tumbling experience more enjoyable and successful.
Optimizing the Process
- Use the Right Amount of Grit: Too much grit can damage your rocks, while too little won't do the job effectively. Follow the manufacturer's recommendations.
- Regularly Check on Your Rocks: Every few days, remove a rock and inspect its progress. This allows you to adjust the process if needed.
- Use a Tumbling Jar: For small batches or irregularly shaped rocks, a tumbling jar can be a more effective option than a tumbling barrel.
Enhancing Your Experience
- Experiment with Different Grits: Try different grit sizes to see which one works best for your rocks and desired finish.
- Keep a Journal: Document your tumbling process, including the type of rocks, grit used, and any adjustments made. This can help you learn and improve over time.
- Join a Community: Connect with other rock tumblers for advice, tips, and inspiration. Online forums and local clubs are great resources.
Rock Tumbling Projects
Once you've mastered the basics, you can start tackling more complex projects to add a personal touch to your tumbling experience.
Custom Projects
- Personalized Gifts: Tumble rocks to create custom jewelry or gifts for friends and family.
- Art Pieces: Create unique art pieces by combining tumbling with other crafts, such as embedding your polished rocks in resin.
- Collectible Displays: Organize your tumbling collection into displays that showcase your favorite pieces.
FAQ
How long does it take to learn rock tumbling?
How long does it take to learn rock tumbling?
Learning rock tumbling can take anywhere from a few days to a few weeks. The learning curve depends on your willingness to experiment and learn from your experiences.
Can I tumble any type of rock?
Can I tumble any type of rock?
Not all rocks are suitable for tumbling. It's best to use rocks with a hardness of 6-7 on the Mohs scale, such as agate, jasper, quartz, and petrified wood.
What's the difference between a rotary and vibratory tumbler?
What's the difference between a rotary and vibratory tumbler?
A rotary tumbler rotates the rocks like a clothes dryer, while a vibratory tumbler vibrates rapidly. Rotary tumblers are more common and suitable for beginners, while vibratory tumblers are faster and better for preserving the original shape of rocks.
How do I clean my polished rocks?
How do I clean my polished rocks?
Clean your polished rocks with warm water and a mild soap. Avoid using harsh chemicals or abrasive materials that can damage the finish.
Can I tumble rocks outside?
Can I tumble rocks outside?
It's not recommended to tumble rocks outside. Tumblers can be noisy and the grit can attract pests. Plus, you'll want to protect your rocks from the elements.
Conclusion
Rock tumbling is a rewarding hobby that can be enjoyed by beginners and experienced enthusiasts alike. With the right equipment, patience, and a bit of practice, you can turn rough rocks into beautiful, polished gems. Happy tumbling!
| Rock Type | Hardness (Mohs Scale) | Recommended Grit Size |
|---|---|---|
| Agate | 6.5-7 | 500 grit and up |
| Jasper | 6.5-7 | 500 grit and up |
| Quartz | 7 | 500 grit and up |
| Petrified Wood | 6-7 | 500 grit and up |
| Obsidian | 5.5-6 | 500 grit and up |

Comments