Wire Wrapped Crystal Ring Designs: Easy Projects
May 31, 2026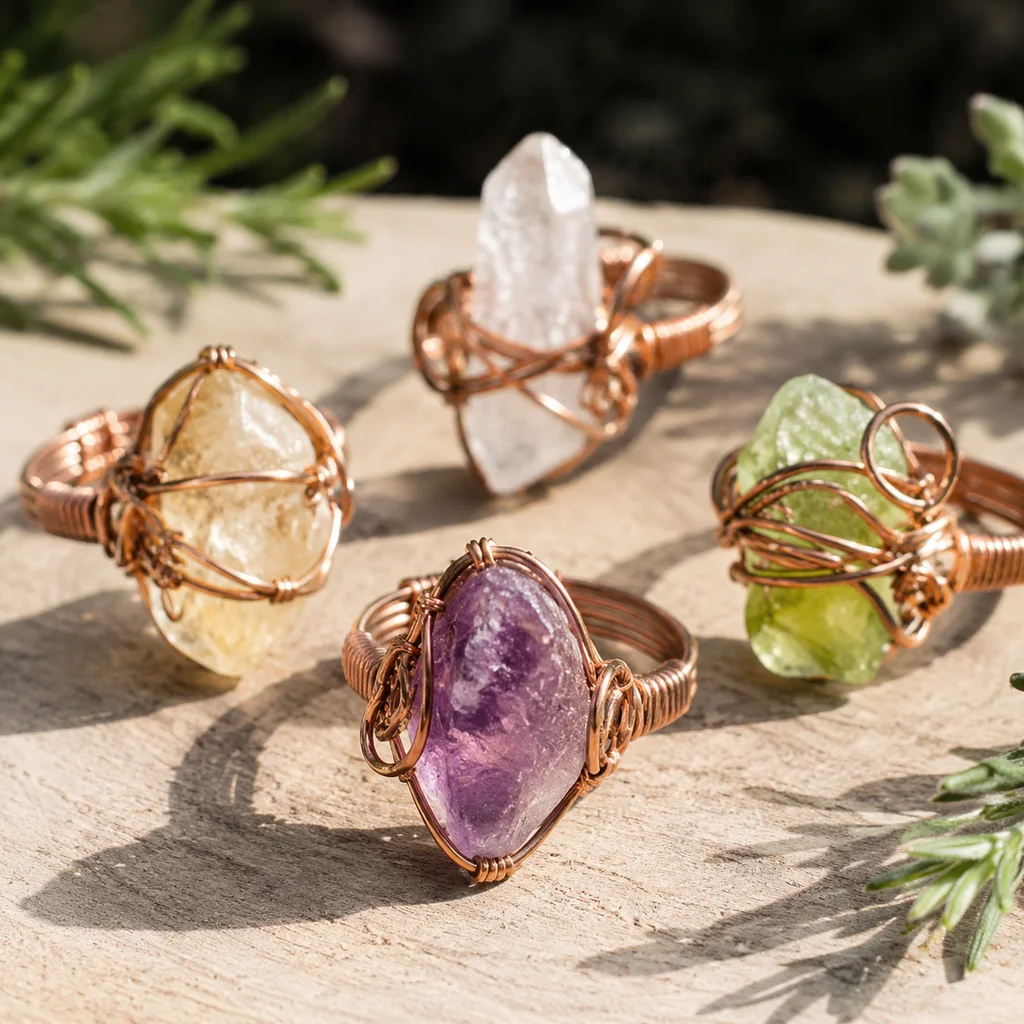
What You Need Before Starting
Wire wrapping is one of the most accessible jewelry-making techniques because it requires no soldering, no torch, and no expensive equipment. You need exactly four things: wire, a crystal, pliers, and something to cut the wire. Let's break down each:
Wire: 20-gauge (0.8mm) copper wire is the best starting choice. It's thick enough to hold its shape as a ring band but thin enough to bend with minimal effort. A small spool (5–10 meters) costs $8–$12 at any craft store and will make 15–20 rings. Copper develops a warm patina over time that many people prefer over the initial shiny look.
For a more polished appearance, use 20-gauge silver-plated copper wire ($10–$15 per spool) or sterling silver wire ($25–$40 per spool). The wrapping technique is identical regardless of wire material.
Crystals: Tumbled stones in the 6–12mm range work best for rings. Specifically, look for rounded or oval cabochons rather than faceted stones (faceted crystals have sharp edges that can snag on clothing and are harder to wrap securely). Good starter stones: amethyst, rose quartz, clear quartz, tiger's eye, or aventurine—these are inexpensive ($2–$5 each) and commonly available as tumbled cabochons.
Tools: Round-nose pliers (for creating loops and curves), chain-nose pliers (flat jaws for gripping and flattening wire), and wire cutters. A basic set costs $12–$20. That's the total tool investment needed.
Stone sizing note: 8mm round tumbled stones are ideal for most ring sizes. They're large enough to be visually prominent but not so large that the ring feels bulky or catches on everything. For a more delicate look, 6mm stones work. For a statement ring, 10–12mm work but require thicker wire (18-gauge) for adequate support.
Design 1: Simple Side Wrap Ring
This is the fastest design—most people complete it in 10–15 minutes on their first try. It looks elegant despite its simplicity, and the learning curve is minimal.
Materials per ring:
- 20-gauge wire: 12 inches (30cm)
- One 6–8mm tumbled stone
Step 1 — Size the band. Wrap the wire twice around a ring mandrel (or any cylindrical object close to your finger size, like a marker pen) at the point where you want the stone to sit. Two wraps create a sturdier band. You should have approximately 3 inches (7cm) of wire on each side of the wraps. If you don't have a mandrel, wrap directly around your finger—but not too tight, as you'll need to slide it on and off.
Step 2 — Create the wraps. Use chain-nose pliers to twist the two strands of the band together where they overlap on one side (about 1/4 inch of twist). This secures the base structure. The twisted section goes under the stone.
Step 3 — Position the stone. Place the tumbled stone on top of the twisted section. The two long wire tails should extend upward on either side of the stone.
Step 4 — Wrap over the stone. Take one wire tail and bend it over the top of the stone, crossing to the opposite side. Repeat with the other tail, creating an X shape over the stone. Use your fingers to press the wire against the stone's surface.
Step 5 — Secure the wraps. Take each wire tail down along the side of the stone and wrap it around the ring band 2–3 times. Use round-nose pliers to tuck the wire ends under the band or flatten them against it with chain-nose pliers. Snip off any excess wire with wire cutters.
Step 6 — File and finish. Use the flat side of your pliers to press down any sharp wire ends. A nail file can smooth wire ends that feel slightly rough. The ring should be comfortable on your finger with no sharp points.
Design 2: Braided Band Ring
This design creates a thicker, more decorative band that wraps around the stone in a braided pattern. It takes about 20–25 minutes and looks more complex than it actually is.
Materials per ring:
- 20-gauge wire: 24 inches (60cm)
- One 8–10mm tumbled stone
Step 1 — Cut three equal lengths. Cut the 24 inches of wire into three 8-inch (20cm) pieces. These three strands will form the braided band.
Step 2 — Braid the band. Hold the three strands together at their midpoints. Create a simple three-strand braid for about 1.5 inches (4cm)—long enough to wrap around your finger once. Don't braid too tightly; a loose, slightly open braid looks better and is easier to work with. Temporarily secure each end with a small twist of wire.
Step 3 — Wrap the band. Shape the braided section into a ring around your finger or mandrel. Overlap the ends by about 1/4 inch. Take a short (2-inch) piece of wire and wrap it around the overlap point 3–4 times to secure the band into a closed circle.
Step 4 — Wire the stone. Place the stone on top of the ring band at the desired position. Cut a 6-inch piece of wire (this is your "binding wire"). Thread it under the band at one side of the stone, bring it up and over the stone, thread it under the band on the opposite side, and repeat. Make 3–4 passes over the stone, spacing them evenly. Each pass should cross a slightly different angle to hold the stone securely.
Step 5 — Decorative spiral ends. Take the two remaining tails of the binding wire and use round-nose pliers to create small spirals (coils). Position these spirals on the sides of the stone for a decorative accent. Tuck the wire ends in and file smooth.
The braided band creates a visual texture that distinguishes this ring from the simple wrap design, and the spiral accents give it a finished, professional look despite being beginner-friendly.
Design 3: Bezel-Style Wrapped Ring
This design wraps the stone more completely, creating a "bezel" that cups the stone from the sides and bottom while leaving the top visible. It's the most secure of the three designs and takes 25–30 minutes.
Materials per ring:
- 20-gauge wire: 20 inches (50cm) for the bezel
- 18-gauge wire: 10 inches (25cm) for the band (slightly thicker for stability)
- One 8mm round tumbled stone
Step 1 — Create the band. Wrap the 18-gauge wire around your mandrel or finger one and a half times. This creates a double-thickness band. Cut and form a complete loop that fits your finger, overlapping the ends by 1/4 inch.
Step 2 — Build the bezel frame. Take the 20-gauge wire and wrap it around the stone's equator (widest point) once, creating a circle that matches the stone's diameter. This circle should sit on top of the ring band. Secure the bezel circle to the band by wrapping a short wire tail through both the circle and the band at two opposite points.
Step 3 — Form the cup. Take the remaining length of 20-gauge wire and create vertical wraps that rise up from the ring band, curve over the top of the stone (from equator toward the center but NOT covering the top face), and come back down to the band on the opposite side. Make 3–4 of these vertical wraps, evenly spaced around the stone. Each wrap should snug the stone against the bezel circle from the inside.
Step 4 — Tighten and secure. Gently squeeze the vertical wraps with your fingers to ensure they're snug against the stone's surface. Use chain-nose pliers to press any loose wire against the stone. The stone should feel firmly held with no wobble. Wrap each wire tail around the ring band 2 times, trim, and file smooth.
Step 5 — Final adjustments. Try the ring on. The stone should sit centered on the band without tilting. If it tilts, add one more vertical wrap on the lower side. If the band feels too tight or loose, adjust by re-shaping on the mandrel. File all wire ends until smooth.
Sizing Without a Mandrel
Ring mandrels are inexpensive ($8–$15), but if you don't have one, use these alternatives:
- A marker pen, chopstick, or thick dowel of similar diameter to your finger
- Wrap wire around your actual finger—but wrap at the knuckle joint (where rings pass over), not at the base (where rings rest), to ensure the finished ring can slide on and off
- Measure your finger circumference with a piece of string, then wrap the wire around a cylindrical object matching that circumference
Pro tip: wire rings are slightly adjustable. If the ring is a bit too loose, gently squeeze the band with pliers. If too tight, gently stretch the band by pulling outward from opposite sides. Don't do this repeatedly—repeated bending work-hardens the metal and makes it brittle.
3 Mistakes Beginners Make (and How to Avoid Them)
Mistake 1: Using stones that are too large. A 15mm stone on a 20-gauge wire ring band will be top-heavy, unstable, and catch on everything. Stick to 6–10mm for your first rings. The wire gauge needs to match the stone size: 6–8mm stones work with 20-gauge; 10–12mm stones need 18-gauge.
Mistake 2: Not filing wire ends. Unfinished wire ends scratch skin and snag clothing. ALWAYS file or flatten every wire end after trimming. A pair of chain-nose pliers (flat jaw) pressed firmly against the cut wire end usually does the job. For stubborn sharp points, use a fine nail file.
Mistake 3: Overworking the wire. Bending the same section of wire back and forth multiple times causes work hardening—the metal becomes brittle and may snap. If a piece isn't shaping right, it's usually better to cut a new piece of wire and start fresh rather than trying to force the old one into position.
Frequently Asked Questions
Can I make these rings with silver or gold wire?
Absolutely. The technique is identical. Sterling silver wire is stiffer than copper, so it holds shapes better but is harder to bend by hand—use pliers more. Gold-filled wire works similarly. Solid gold wire (14K+) is expensive but creates heirloom-quality pieces. Start with copper to learn the technique, then upgrade materials once you're confident.
Will the stone fall out?
If wrapped correctly, the stone should be secure through normal daily wear. However, wire-wrapped settings are inherently less secure than metal bezels or prong settings set by a jeweler. Avoid rough activities while wearing wire-wrapped rings, and periodically check the wraps—if they feel loose, re-tighten with pliers.
Can I sell these at craft fairs?
Yes—wire-wrapped crystal jewelry is a popular craft fair category. Price depends on materials: copper rings with quartz typically sell for $15–$25, silver-plated versions $20–$35, and sterling silver $35–$60. Factor in your material cost, time (15–30 minutes each), and local market rates when setting prices. Photography matters enormously for jewelry sales—invest in good lighting and clean backgrounds for product photos.
Frequently Asked Questions
What gauge wire is best for making wire wrapped rings?
For crafting durable wire wrapped crystal rings, you generally need two types of wire. Use a thicker base wire, like 16 or 18 gauge, for the ring band so it holds its shape securely against daily wear. Then, use a thinner wrapping wire, typically 24 or 26 gauge, to bind the crystal and create intricate designs without breaking. Copper and sterling silver are excellent choices for practicing these techniques.
How do you size a wire wrapped ring without a mandrel?
If you do not have a jewelry mandrel, you can easily size your wire wrapped ring using a ring sizer strip or a piece of string. Simply wrap the string around your finger to find the exact circumference, then measure the length against a ruler. Alternatively, you can use a cylindrical object that perfectly matches your finger size, like a thick marker, to shape your ring band while you are wrapping your beautiful natural stones.
Comments