Wire Gauge Chart for Jewelry Making
June 9, 2026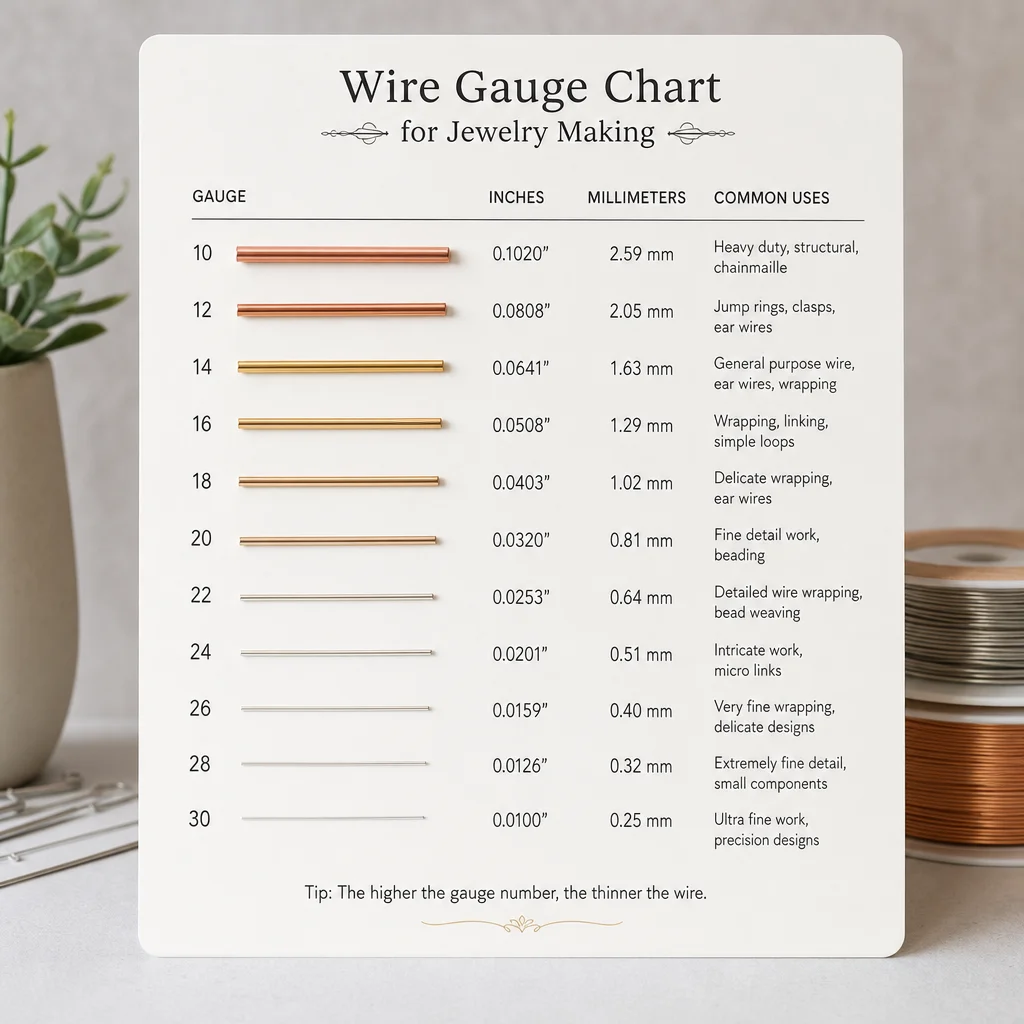
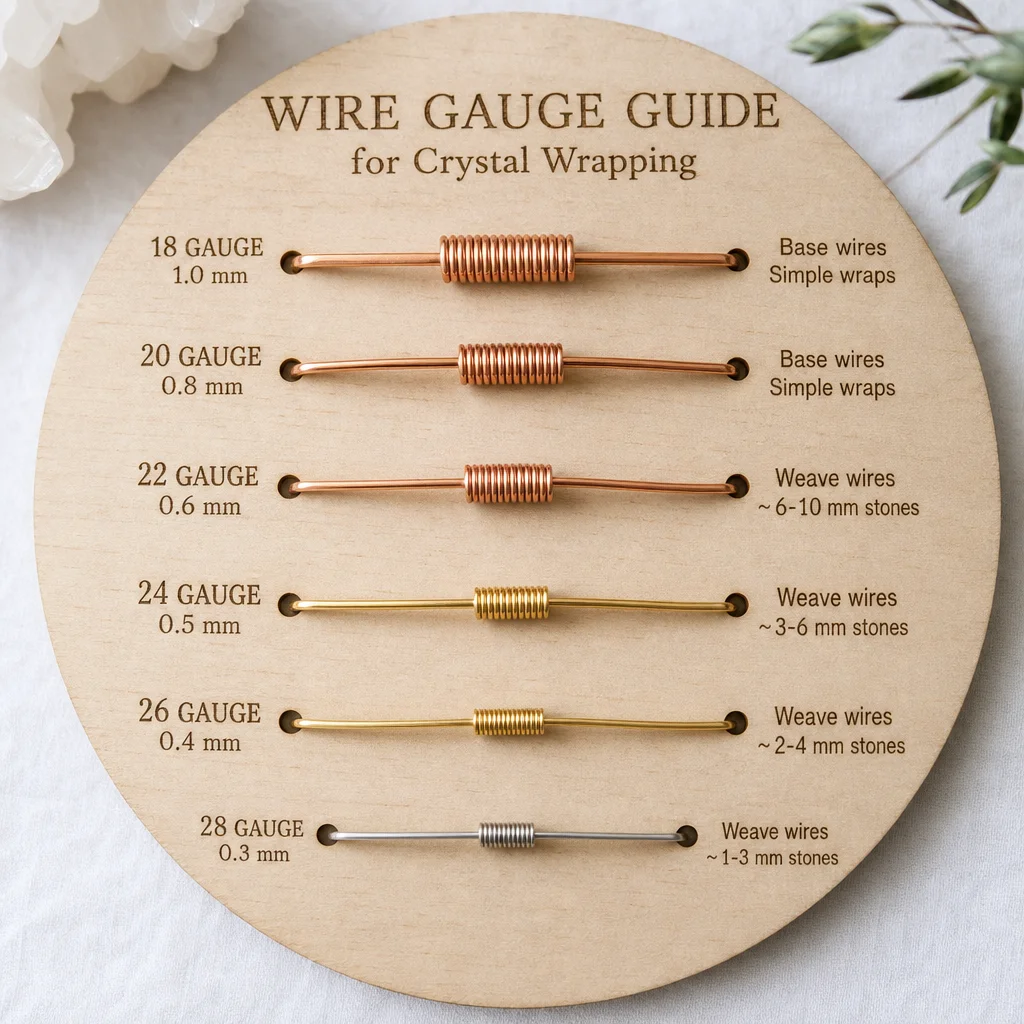
Wire Gauge Guide for Crystal Wrapping
Hey there! So, you're into crystal wrapping, right? I've found that knowing the right wire gauge is key. I mean, it's the thing is, if you use the wrong gauge, your crystals might not sit just right. I've tried different gauges, and honestly, I've found that a 20-gauge wire works great for most crystals. It's sturdy enough to hold them in place without being too bulky. Plus, it's easy to work with, you know? Just make sure to check out our selection of wire gauges here on SageStone.com. You'll find just what you need for your next project!
Hey there! Welcome to the complete guide on picking the perfect wire gauge for crystal wrapping. When you're making your own rad jewelry, the right gauge can totally transform how your final piece turns out—both in how it looks and how long it lasts. Keep scrolling to dive into the details of different wire gauges and the materials they're made of. I've been wrapping stones for ages, and I still remember the first time I picked the wrong gauge—it was a total bummer, my labradorite pendant was just flopping around like a fish out of water. Just trust me, getting this right is huge!
Common Wire Gauges
Alright, before we get into the nitty-gritty, let's just glance at some of the typical wire gauges we use in jewelry making, from the thicker ones to the thinner ones:
- 26g (0.4mm) – Fine: Perfect for intricate weaves and tiny accent stones. I use this for adding delicate spirals around small chips of turquoise or for creating eye-pins for dainty earrings.
- 24g (0.5mm) – Standard: My go-to for most medium-sized crystals, especially when I'm doing a basic cage wrap. It's thin enough to thread through small holes but thick enough to hold its shape.
- 22g (0.6mm) – General: This is the workhorse of wire wrapping. I reach for 22g when I'm wrapping a pendant that's about an inch long. It offers a great balance of flexibility and strength.
- 20g (0.8mm) – Sturdy: When I'm working with a hefty crystal like a large amethyst point or a chunky piece of raw pyrite, 20g is my bestie. It provides the backbone for the entire piece.
- 18g (1.0mm) – Structural: This is what I use for making frames, bails, and any part of the design that needs to bear significant weight. It's tough to bend with just your fingers—I often use my nylon-jaw pliers.
- 16g (1.3mm) – Heavy: Reserved for large, statement pieces or for creating the base armature of a wire tree sculpture that holds a crystal. You'll definitely need good tools for this one.
So, each gauge number is just like the thickness of the wire, right? Higher numbers mean it's thinner, and lower numbers mean it's thicker. Thick wire is great for holding bigger crystals, but if you need something delicate or a fine detail, finer wire is the way to go. I always tell newbies to grab a 22g and a 20g spool, 'cause with those two, you can pretty much make anything.
Materials
Okay, so you've got the gauge down, but here's the thing – knowing what these wires are made of is super important. It not only changes how your piece looks but also how it feels when you're working on it and how it'll look as time goes on.
Hey, Check Out These Fabulous Materials for Crystal Jewelry!
Copper: It's super affordable and totally durable, but it does tarnish, so you might have to keep an eye on the patina. I'm all about how it gets this really cool, antique vibe over time. If you want to keep it sparkly, a jewelry polishing cloth works great, but I'm a fan of the natural color change.
Gold-Filled: Get the gold look without the gold price tag. It's got 5% real gold by weight and is way more durable than that gold plating stuff. I use gold-filled wire for pieces that need to look fancy but can handle daily wear.
Sterling Silver: Classic stuff, but it needs some tender loving care to keep it looking sharp. It's a bit softer than copper, which is actually cool for doing those intricate wraps. Just keep in mind it can tarnish, especially if you've got acidic skin.
Brass: It's got that golden glow and is super versatile, mixing well with all sorts of metals and patinas. It's harder than copper, so it holds its shape like a boss. I love to mix brass and copper for that awesome two-tone look.
Niobium: Hypoallergenic, lightweight, and durable – perfect for sensitive skin peeps. Plus, it can be anodized to get those bright colors like purple, blue, and green without any dyes or coatings. It's a bit springier than other wires, so it takes some getting used to.
Oh, and don't forget about bronze and Argentium silver, they're super cool choices too! Bronze has this really nice reddish-brown hue that goes so well with earthy stones like jasper and agate. It's just so groovy how they mix.Temper
So, the thing is, the wire's temper totally impacts how bendy it is. I totally get that it's not the easiest to wrap your head around, but once I did, my wrapping skills got way better. Here are three main types of temper for you:
Wire Stuff: The Good, the Flexible, and the Strong
Okay, so let me break it down for you. We've got Dead Soft, which is like the flexible friend of the wire world. It's super soft and bendy, so you can shape it into all sorts of cool stuff without it springing back. I use this guy for about 90% of my wrapping. It's great for weaving, coiling, and wrapping around those wonky crystal shapes. The thing is, if you give it a little nudge, it might lose its shape, so I usually give it a little tap with a nylon hammer to set it. It's like work-hardening it, but in a good way.
Then we've got Half Hard, which is a bit more stubborn. It's got more resistance, so it holds its shape better once you bend it. This is my go-to for ear wires, jump rings, and clasps. It's also awesome for the structural frame of a pendant if I don't want to go with a thicker wire. It's a bit harder to bend, but it doesn't spring back as much. It's like a middle ground between Dead Soft and Full Hard.
Lastly, we've got Full Hard. This one is a beast. It's super sturdy and won't bend much at all. It's like the muscleman of the wire world. It's tough to work with by hand, so I usually need heavy-duty tools to play with it. I don't use it much for wrapping crystals directly, but it's perfect for making rigid stuff like hooks, findings, or the base of a wire sculpture. It's like the superhero of the wire world, but not always the easiest to handle.
Hey, quick trick: You can actually change the way your wire feels by working it! Like, bend a piece of that soft stuff back and forth, and it gets all stiffer. But if you want to make that half-hard wire softer, you're gonna need to heat it up with a torch (if it's copper or silver) and then cool it down quick. It's a bit of a fancy move though.
History of Wire Wrapping
Oh, it's so cool that wire wrapping is one of the oldest ways to make jewelry! It's been around way longer than soldering or welding. I mean, like, super old—like ancient Mesopotamia old, like around 2000 BCE. Imagine, people back then were wrapping gold and silver into super thin threads, then coiling and weaving them into awesome designs without even using a soldering iron!
Oh man, the technique really took off in ancient Egypt! They used wire to wrap up those precious stones and make all those amulets. The Egyptians were super pros at granulation and filigree, but basic wire wrapping was also a big deal for everyday bling. I just love imagining those ancient artisans, chilling in the sun, meticulously wrapping gold wire around a lapis lazuli stone, just like I do with my copper and quartz nowadays.
So, during those Viking days (like, 800 to 1050 AD), wire wrapping was all the rage in Northern Europe. The Vikings were into these cool twisted wire ropes and spiral designs for their jewelry. They had this rad "loop-in-loop" chain thing, which is like the chill, advanced version of wire wrapping. Not just for looks, though—they used these bad boys as money and to show off their status, honestly.
So, wire wrapping really took off in the '60s and '70s here in the States, especially with those back-to-the-land and hippie folks. They were all about finding easy ways to make jewelry without needing fancy tools. That's where the cage wrap style came in—think of a stone nestled in a little wire basket. Super cool, right? I scored my first cage wrap tutorial from a book from 1972, and honestly, the techniques are still pretty much the same!
Hey, wire wrapping has really taken off worldwide! Artists are constantly pushing the limits of what we can do. There are so many materials and tools to choose from, but the thing is, the core idea is still the same—using metal's strength and shine to really highlight the natural beauty of crystals.
Geology of Common Wrapping Wires
Hey, so I've been diving into the world of wrapping wires for our crystal jewelry. It's fascinating, honestly. There are so many different types out there, like copper, silver, and gold. I've found that what I love about copper is its natural patina—it just gets better with age. And the thing is, the wire's thickness can really make a difference in the final look. We've got everything from thin, delicate wires to chunky ones that add a real punch of style. It's all about finding the perfect fit for each piece. Now, have you ever wondered where these wires come from? It's a whole process, from mining the metals to rolling them out into wires. Cool stuff, right?
Okay, so you might not give a thought to the geology of your wire, but here's the deal: the metals we use are straight from the earth, just like our crystals! I've found that understanding where these metals come from really gives me a deeper appreciation for the whole creative process. It's like, it's all one big, interconnected deal.
Copper is one of those cool metals that you can actually find in nature without it being mixed with other stuff. It's like, it's pure, man! It's often hanging out in volcanic areas, and it's friends with minerals like chalcopyrite. Big copper spots are in Chile, the U.S. (like Arizona and Utah), and Peru. So, the copper in your wire could've come from a super deep mine, formed by all that old-timey hydrothermal fluid stuff. It's got this awesome, warm vibe that I think totally rocks with grounding stones like hematite and smoky quartz.
Silver is actually a bit of a rarity, but you can find it in its pure form. It's not as common as copper, though. It often pops up as a little surprise when they're mining for lead, zinc, or copper. So, the silver in your sterling silver wire? It's probably from Mexico, Peru, or China. It forms in these cool hydrothermal veins, usually hanging out with minerals like galena and sphalerite. And it's got this super cool, reflective vibe that just loves hanging out with high-vibration crystals like clear quartz and selenite.
Gold is the classic precious metal. It's incredibly dense and malleable. Gold is found in quartz veins and placer deposits (where it has eroded out of rocks and accumulated in riverbeds). The gold in gold-filled wire is a thin layer bonded to a brass core, but that gold layer is real, and it came from a mine somewhere—likely South Africa, China, or Australia. Gold is chemically inert, which is why it doesn't tarnish, making it a beautiful choice for heirloom pieces.
Brass is an alloy, meaning it's man-made from a mixture of metals, primarily copper and zinc. Zinc is a relatively common element, found in the earth's crust in minerals like sphalerite. By combining copper and zinc, we get a metal that is harder and has a different color than pure copper. It's a sign of human ingenuity, taking what the earth provides and creating something new.
Niobium is a fascinating metal. It's found in minerals like pyrochlore and columbite, often in association with granitic rocks. The largest deposits are in Brazil and Canada. Niobium is a refractory metal, meaning it has a very high melting point. It's also biocompatible, which is why it's used in medical implants as well as jewelry. The colors you see on niobium wire are created by anodizing—a process that uses electricity to grow a thin oxide layer that refracts light. No dyes are used, so the color is permanent and won't wear off.
Practical Uses of Wire Gauge Knowledge
Knowing your wire gauges isn't just for making pretty pendants. It has real, practical applications that will save you time, money, and frustration. Let me share a few scenarios from my own workshop.
Repairing a Broken Chain: If a jump ring on your favorite necklace breaks, you need to know what gauge to use for the replacement. Most commercial chains use 22g or 20g wire for their jump rings. If you use 24g, the ring will be too weak and will open again. If you use 18g, it might be too thick to fit through the chain's links. I keep a small card with holes punched in it that correspond to different gauges, so I can quickly check the thickness of the original ring.
Making Ear Wires: For ear wires, you want a balance of strength and comfort. I use 21g or 22g half-hard wire for most ear wires. If I use dead soft, the ear wire will bend out of shape too easily. If I use 20g, it can feel too heavy and thick in the earlobe. The gauge directly affects the wearing experience.
Creating a Stone Cage: When wrapping an irregularly shaped crystal, I use a combination of gauges. I'll use 20g or 18g for the main frame—the "cage" that the stone sits in. Then I'll use 26g or 28g for the fine weaving that holds the stone securely in place. The thicker wire provides structure, and the thinner wire allows for intricate detail without adding too much bulk.
Determining Strength for a Pendant Bail: The bail is the loop at the top of a pendant that the chain goes through. This part takes all the weight of the stone. I never use anything thinner than 20g for a bail on a medium-sized stone. For a large, heavy stone (like a 2-inch piece of citrine), I use 18g or even 16g. I also work-harden the bail by squeezing it with my flat-nose pliers to make it extra strong.
Matching Wire to Stone Size: Here's a simple rule I follow: for stones under 10mm, I use 24g or 26g. For stones between 10mm and 25mm, I use 22g. For stones over 25mm, I start with 20g or 18g for the frame. This isn't a hard rule, but it's a great starting point. A small, delicate stone like a 6mm garnet would be overwhelmed by 18g wire, and a large, chunky piece of rough malachite would snap 26g wire in no time.
Care Tips for Wire-Wrapped Crystals
Once you've put all that love and effort into wrapping a crystal, you want it to last. Here are my tried-and-true care tips to keep your wire-wrapped pieces looking beautiful for years.
- Store Separately: Wire can scratch, and crystals can chip. I recommend storing each wrapped piece in a soft pouch or a compartmentalized jewelry box. If you toss them all together in a drawer, the wire will get tangled and kinked, and the crystals might get scratched.
- Keep Away from Chemicals: This is a big one. Remove your wire-wrapped jewelry before swimming in chlorinated pools, soaking in hot tubs, or applying lotions, perfumes, and hairspray. Chemicals can accelerate tarnishing on copper and silver and can dull the surface of some crystals, like opals or pearls.
- Polishing Your Wire: For copper and brass, I use a Sunshine Polishing Cloth (it's treated with a gentle abrasive and anti-tarnish agents). For sterling silver, a dedicated silver polishing cloth works wonders. Be careful not to snag the cloth on any sharp wire ends. I always polish the wire before I wrap the stone, and then just give it a gentle buff afterwards.
- Embrace the Patina: Copper and sterling silver will naturally darken over time. This is called a patina, and many people (myself included) love the antique look it gives. If you want to force a patina, you can expose the wire to the fumes of a hard-boiled egg (the sulfur will darken it) or use a commercial liver of sulfur solution. Just be aware that this will also affect some porous stones, so it's best to patina the wire before adding the crystal.
- Check Your Wraps: Every few months, give your piece a gentle inspection. Look for any loose wraps or sharp wire ends that might have poked out. If you find any, you can gently push them back into place with your pliers. A little preventative maintenance goes a long way.
- Cleaning Crystals: Many crystals can be gently cleaned with a soft, damp cloth. However, avoid submerging porous stones like selenite, malachite, or turquoise in water, as it can damage them. For these, a dry cloth or a gentle wipe with a slightly moistened microfiber cloth is best.
Frequently Asked Questions
Q: What is the best wire gauge for a beginner to start with?
A: I always recommend starting with 22-gauge dead soft copper wire. It's thick enough to hold its shape and support small to medium crystals, but it's still flexible enough to bend easily with your fingers and basic pliers. Copper is also very affordable, so you won't feel bad about practicing. Once you're comfortable with 22g, you can try 20g for larger stones and 24g for finer details. Get a 50-foot spool—you'll use it up faster than you think!
Q: Can I use aluminum wire for crystal wrapping?
A: You can, but I don't recommend it for most pieces. Aluminum wire is very soft and lightweight, which makes it easy to bend, but it's also very weak. It won't hold a heavy crystal securely, and it can break easily if you bend it back and forth too many times. It also doesn't take a patina well, and it can leave a dark, powdery residue on your hands. I only use aluminum wire for very lightweight, temporary designs or for practicing new techniques. For lasting jewelry, stick with copper, brass, silver, or gold-filled wire.
Q: How do I know if my wire is dead soft or half hard if I lost the label?
A: This is a common problem! The easiest way to tell is by feel. Take a 6-inch piece of the wire and try to bend it into a sharp 90-degree angle with your fingers. If it bends very easily with almost no resistance and stays bent, it's likely dead soft. If you have to apply a bit of pressure and the wire springs back slightly, it's probably half hard. You can also try this: hold one end of the wire and tap the other end against a hard surface. Dead soft wire will have a dull thud, while half hard wire will have a slightly higher-pitched ring. When in doubt, I treat it as dead soft and then work-harden it as needed.
Q: Why does my wrapped crystal spin around inside the wire cage?
A: This usually means your wire isn't tight enough, or you're using a gauge that's too thin for the size of the stone. When you're wrapping, you need to pull the wire taut with each pass. I also recommend using a "binding" technique where you wrap a separate piece of thinner wire (like 26g or 28g) tightly around the main frame wires to cinch them together against the stone. Another trick is to use a small piece of rubber or a tiny dab of jeweler's epoxy (applied carefully and invisibly) between the stone and the wire to prevent slipping. But honestly, a well-executed tight wrap shouldn't need any adhesive. Practice making your wraps snug and even.
Related Crystal Recommendations
Choosing the right wire is only half the fun—you also need the perfect crystal to wrap! Based on the wire gauges and techniques we've discussed, here are some of my favorite pairings. I've wrapped all of these, and they each offer a unique challenge and reward.
- Clear Quartz Points (20g or 22g wire): Clear quartz is a classic for a reason. Its simple, elegant shape makes it perfect for a basic cage wrap. I love using silver or gold-filled wire for a clean, high-vibration look. The clarity of the quartz contrasts beautifully with the metal.
- Labradorite (22g or 24g wire): Labradorite has that incredible flash of color, and you don't want to cover it up with thick wire. I use a fine 24g wire for a delicate weave that holds the stone securely without obscuring its beauty. A simple bail in 22g completes the piece.
- Rough Amethyst Clusters (18g or 20g wire): These can be heavy and have sharp points. I use 18g wire to create a sturdy frame that cradles the cluster from underneath. Then I use 22g wire to wrap around the individual points to secure it. This is a more advanced project, but the result is stunning.
- Small Tumbled Stones (24g or 26g wire): For tiny tumbled stones like garnet, moonstone, or aventurine, I use very fine wire. I'll create a delicate spiral or a simple "X" wrap to hold the stone. These make beautiful, lightweight earrings or charm necklace accents.
- Raw Pyrite Cubes (20g or 22g wire): Pyrite has a beautiful metallic luster, so I like to use copper or brass wire to complement it. The sharp edges of the cube can be tricky to wrap, so I use a half-hard wire that holds its shape well. A simple frame wrap that exposes the cube's faces looks fantastic.
- Selenite Wands (22g or 24g wire): Selenite is very soft and fragile, so you need to be gentle. I use a soft, fine wire and wrap it loosely—never tightly, as the wire can cut into the stone. A spiral wrap along the wand's length is a beautiful and safe choice. Because selenite is white and ethereal, I love using silver or niobium wire.
I hope this expanded guide helps you on your wire-wrapping path. Remember, every master was once a beginner. Don't be afraid to make mistakes—I've kinked more wire than I can count, and I've had stones fly across the room when a wrap slipped. It's all part of the learning process. Grab some wire, pick a crystal that speaks to you, and start creating. Happy wrapping!
Frequently Asked Questions
What gauge wire is best for wrapping delicate crystals?
For delicate or fragile crystals, 26-gauge or 28-gauge wire is ideal. This thinner wire enables tight, intricate wraps without placing excessive pressure on the stone, preventing chips or cracks. At SagStone, our artisans carefully use these fine gauges to securely hold sensitive minerals while flawlessly showcasing their natural beauty and unique structural formations.
Comments