Resin Crystal Necklace: 5 Pendant Designs
June 9, 2026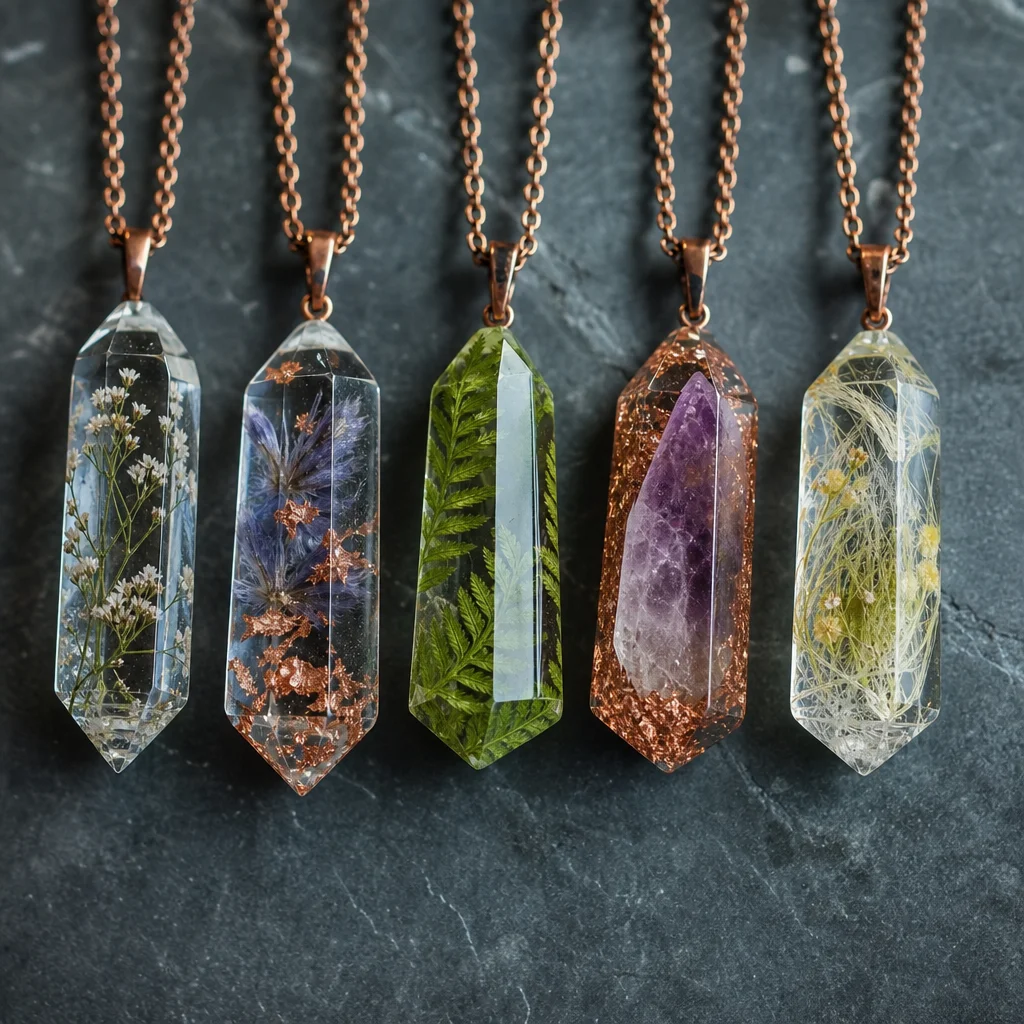
Resin Crystal Necklace: Crafting 5 Unique Pendant Designs
Hey there, fellow crystal lover! I’m so glad you’ve landed here. I’ve been absolutely obsessed with resin crystal necklaces lately, and I wanted to take you on a deep dive into my favorite craft. Today, we’re going to expand on the five pendant designs I’ve been tinkering with, but I’m also going to share everything else I’ve learned along the way. We’re talking history, geology, practical tips, and even some answers to questions I get all the time. So, grab your favorite mug of tea, settle in, and let’s get creative together. I promise, by the end of this, you’ll feel like you can make anything.
Before we jump into the designs, let’s set the stage. A resin crystal necklace is more than just an accessory—it’s a tiny world you get to build with your own hands. I’ve been making these for a few years now, and every single piece feels like a little adventure. The way the light hits the resin, the way the crystals sit inside, the way the colors blend… it’s pure magic. And the best part? You don’t need to be a professional jeweler to make something stunning. You just need a bit of patience, some good materials, and a willingness to experiment. So, let’s get started!
Resin Crystal Necklace: Crafting 5 Unique Pendant Designs
Design 1: Druzy Pendant (Micro Crystals Round Bezel)
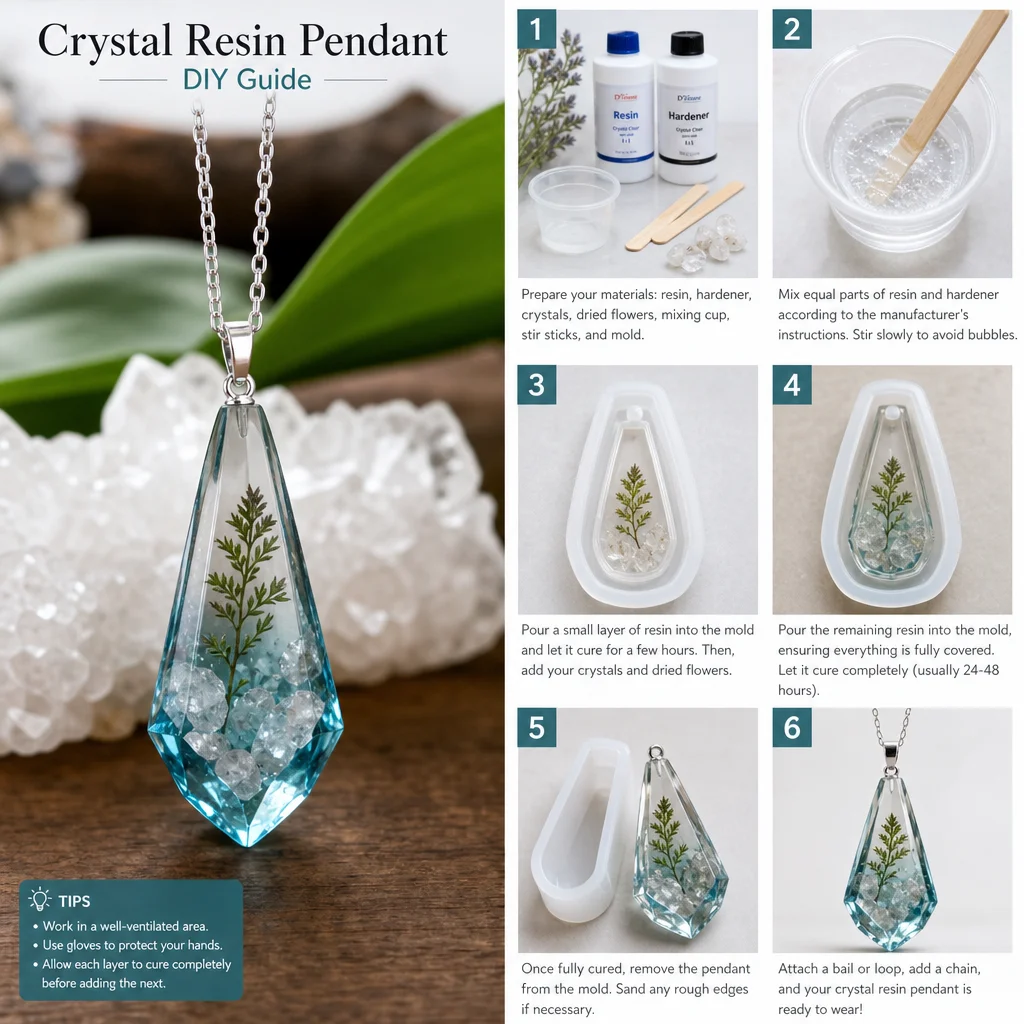
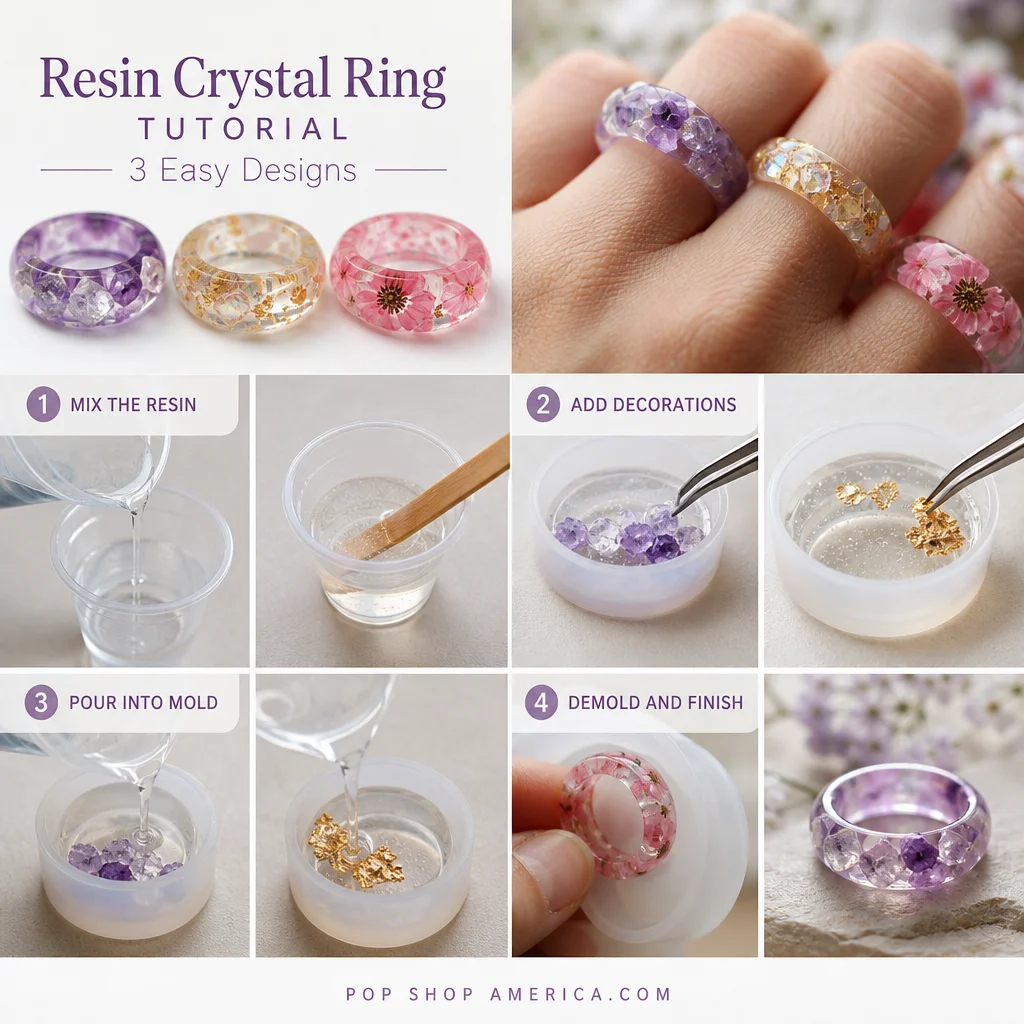
Creating a druzy pendant starts with selecting a round bezel. The bezel acts as the foundation, securely holding the micro crystals. I always go for a bezel that’s a bit deeper than I think I need—it gives me room to play. Mix the UV or two-part resin according to the manufacturer’s instructions. This is super important; I’ve learned the hard way that eyeballing it leads to sticky messes. Pour a thin layer into the bezel and carefully add your crystals. Be gentle to avoid displacement. I like to use tweezers for this part, especially with the tiny druzy clusters. Once the crystals are settled, add another layer of resin to cover them completely. Let it cure as directed and then apply sandpaper for a smooth finish. I start with a coarse grit and work my way up to a fine one. The result is a glossy, professional-looking pendant that catches the light beautifully.
Design 2: Botanical Pendant (Flower + Crystal Teardrop, Layered Pouring)
This design requires some patience with the layering process, but trust me, it’s worth it. Begin by creating a flower shape with clay and then add a teardrop-shaped crystal to the center. I use polymer clay for the flower—it’s easy to mold and bakes hard. Mix your resin and pour a small amount into the teardrop to create the base layer. Once cured, gently place the flower on top, and pour more resin. Continue this process, adding different colored resins to create a unique layered effect. I love using pastel pinks and soft greens for a whimsical look. Remember to leave space for the chain bail at the top. I always check the bail placement before the final pour—it’s a pain to fix later. The finished piece looks like a tiny garden frozen in time.
Design 3: Galaxy Pendant (Blue/Purple + Glitter + Crystal, Swirl Technique, Glow Option)
For the galaxy-inspired pendant, start by adding blue and purple resins to your mold, creating a gradient with a swirl technique. I use a toothpick or a small stick to gently swirl the colors together—don’t overmix, or you’ll lose the gradient. Incorporate glitter for that extra sparkle and crystals for depth. I love using chunky glitter and small clear quartz points for this. If you want the pendant to glow, add a UV reactive powder before pouring the resin. You can find these powders online, and they work best with UV resin. Once the base layer is cured, consider adding another layer with different colors to create more depth. I sometimes add a tiny bit of white resin to simulate stars. Allow this to cure completely and then proceed with sanding and polishing. The glow effect is always a crowd-pleaser, especially at night.
Design 4: Geode Slice Pendant (Natural Edge + Resin Back)
Use a natural geode slice for this pendant. I source mine from local rock shops or online—each one is unique. Clean the slice and apply a small amount of resin on the back to adhere the bail. I use a strong two-part epoxy for this step because it needs to hold well. Pour additional resin around the edges, leaving a small gap for sanding. The natural edges will give your pendant a rustic charm. I love how the rough stone contrasts with the smooth resin. Once cured, gently sand the edges to remove excess resin, and you'll have a unique piece with a natural edge and a solid resin back. This design is perfect for those who love earthy, organic jewelry.
Design 5: Rainbow Layered Pendant (Colored Chips Sequential Layers)
This is a fun project for those who love colors! Mix colored resin chips with the base resin and layer them sequentially in the mold. I use a rainbow order—red, orange, yellow, green, blue, purple. Each layer should be allowed to cure before adding the next one. This method requires careful planning to achieve a clean gradient. I use a silicone mold for this, and I make sure each layer is thin enough to let the color show through. The waiting time between layers can be a bit tedious, but the final result is a vibrant, rainbow-filled pendant that looks like a piece of art. I often add a clear top coat to give it extra shine.
The History of Resin and Crystal Jewelry
Now, let’s take a step back and talk about where all of this comes from. I find it fascinating to know the history behind the crafts I love. Resin itself isn’t new—it’s been used for thousands of years. Ancient Egyptians used natural resins like amber and copal in jewelry and for embalming. They valued these materials for their beauty and preservative qualities. Fast forward to the 20th century, and synthetic resins were developed. These were a game-changer for artists and jewelers. Suddenly, we had a clear, durable, and versatile material that could encapsulate anything.
Crystals, on the other hand, have an even longer history. Humans have been drawn to crystals for millennia. The ancient Greeks believed amethyst prevented drunkenness, while the Romans used rock crystal for cooling drinks. In many cultures, crystals were used in spiritual practices, as talismans, or simply as adornments. The combination of resin and crystals is a modern innovation, but it taps into that ancient love for preserving and displaying beautiful things. I love thinking about how my little pendant is part of a long tradition of human creativity.
The Geology of Crystals Used in Resin Jewelry
I’m a bit of a geology nerd, so I wanted to share some cool facts about the crystals we use. Most of the crystals you see in resin pendants are minerals that formed deep within the Earth over millions of years. Take clear quartz, for example. It’s made of silicon dioxide and forms in hexagonal crystals. It’s one of the most common minerals on Earth, but each piece is unique due to inclusions and growth patterns. Amethyst, the purple variety of quartz, gets its color from iron impurities and natural radiation.
Druzy crystals, which I love for Design 1, are tiny crystals that form on the surface of a rock. They’re often found in geodes, which are hollow rocks lined with crystals. Geodes form when gas bubbles in volcanic rock are filled with mineral-rich water over time. The crystals slowly grow inward, creating that beautiful sparkly interior. When you use a geode slice for Design 4, you’re literally wearing a piece of Earth’s history. It’s incredible to think about the forces that created these stones.
Other common crystals in resin jewelry include citrine (yellow quartz), rose quartz (pink quartz), and labradorite (which has a stunning iridescence). Each has its own unique formation process and properties. If you’re interested in the geology, I recommend looking up the Mohs hardness scale—it helps you understand how durable your crystals are. Quartz is a 7 on the scale, so it’s pretty tough. Softer stones like selenite (a 2) are more delicate and might not hold up as well in resin jewelry.
Practical Uses for Resin Crystal Necklaces
So, you’ve made or bought a beautiful resin crystal necklace. What do you do with it? Obviously, you wear it! But there are so many practical uses beyond just accessorizing. Here are a few of my favorites:
- Everyday Wear: These necklaces are surprisingly durable. I wear mine with everything from t-shirts to dresses. They add a pop of color and a touch of nature to any outfit.
- Gift Giving: A handmade resin crystal necklace makes a thoughtful gift. You can customize the colors and crystals to match the recipient’s personality. I’ve made them for birthdays, holidays, and even as wedding favors.
- Stress Relief: I know this sounds a bit woo-woo, but I find that holding a smooth resin pendant is calming. The weight and texture are grounding. It’s like a little pocket-sized worry stone.
- Home Decor: If you don’t want to wear it, you can hang it in a window or display it on a shelf. The light shines through the resin and crystals, creating beautiful patterns. I have a few on my desk that I look at when I need a creative boost.
- Meditation Aid: Some people use crystals in meditation. A resin crystal necklace can be a focal point or a tactile object to hold during practice. I like to focus on the colors and the way the light moves through the piece.
Care Tips for Your Resin Crystal Necklace
Taking care of your resin crystal necklace is easy, but there are a few things to keep in mind. I’ve learned these through trial and error, so I hope they help you avoid my mistakes!
- Clean Gently: Use a soft, damp cloth to clean your pendant. Avoid harsh chemicals or abrasive cleaners, as they can scratch the resin. If it’s really dirty, a tiny bit of mild soap on a cloth works wonders.
- Avoid Heat: Resin can warp or discolor if exposed to high heat. Don’t leave your necklace in a hot car or near a heater. Also, avoid wearing it in saunas or hot tubs.
- Store Properly: When you’re not wearing your necklace, store it in a soft pouch or a jewelry box. This prevents scratches and keeps the crystals from getting knocked around. I keep mine in a lined box with separate compartments.
- Check the Bail: The bail is the part that connects the pendant to the chain. Over time, it can loosen. Give it a gentle tug every now and then to make sure it’s secure. If it feels loose, a dab of resin or jewelry glue can fix it.
- Protect from Sunlight: Prolonged exposure to direct sunlight can cause some resins to yellow over time. I try to rotate my necklaces so they don’t get too much sun. UV resin is more resistant, but it’s still a good habit.
Frequently Asked Questions
Can I use any type of resin for crystal pendants?
Great question! You can use either UV resin or two-part epoxy resin. UV resin cures quickly under a UV lamp, which is great for small projects like pendants. It’s also very clear and doesn’t yellow as easily. Two-part resin takes longer to cure (usually 24-72 hours), but it’s more durable and can be poured in thicker layers. I use UV resin for most of my pendants because it’s faster, but I switch to two-part resin for larger pieces or when I need extra strength. Just make sure to follow the manufacturer’s instructions for mixing and curing times.
How do I prevent bubbles in my resin?
Bubbles are the bane of every resin artist’s existence! Here are my top tips: First, mix your resin slowly and gently to avoid introducing air. Second, after pouring, use a heat gun or a torch to pop any surface bubbles. Hold it a few inches away and move it in a sweeping motion. Third, let your resin sit for a few minutes before pouring to allow bubbles to rise. If you’re using UV resin, you can also pop bubbles with a toothpick. Finally, make sure your workspace is warm (around 70-75°F or 21-24°C), as cold resin is thicker and more prone to bubbles.
Can I use real flowers in my botanical pendants?
Absolutely, but there’s a catch! Real flowers need to be completely dried before you encapsulate them in resin. If they have any moisture, they can rot or discolor over time. I dry my flowers using silica gel, which preserves their color and shape. You can also press them between books for a few weeks. Once they’re dry, handle them gently—they’re fragile. I also recommend sealing them with a thin layer of mod podge or clear glue before placing them in resin. This prevents the resin from soaking into the petals and changing their color.
How long does a resin crystal necklace last?
With proper care, a resin crystal necklace can last for years and even decades! Resin is a durable material, but it’s not indestructible. It can scratch if you’re rough with it, and it can yellow over time if exposed to too much sunlight. However, I have pieces that are over five years old and still look great. The key is to treat it like any other piece of fine jewelry—avoid harsh chemicals, store it properly, and clean it gently. The crystals inside are usually very durable, especially if you’re using quartz or other hard stones. So, go ahead and enjoy your necklace for a long time!
Related Crystal Recommendations
If you’re looking to expand your collection or try new combinations, here are some of my favorite crystals to use in resin pendants. Each one has a unique look and feel that can change the entire vibe of your piece.
- Clear Quartz: This is my go-to crystal for almost any design. It’s clear, versatile, and catches the light beautifully. It works well in galaxy pendants, botanical designs, and even as a simple accent in druzy pieces.
- Amethyst: I love the deep purple hue of amethyst. It pairs wonderfully with silver or gold bezels and looks stunning in galaxy or rainbow pendants. The color adds a touch of royalty to any piece.
- Rose Quartz: For a softer, more romantic look, rose quartz is perfect. Its pale pink color is gentle and calming. I use it in botanical pendants and in designs with pastel resins.
- Labradorite: This crystal has a magical iridescence that shifts colors in the light. It’s a bit more expensive, but it’s worth it for the wow factor. I use it in geode slice pendants and in designs where I want a flash of color.
- Citrine: The sunny yellow of citrine is perfect for summer-inspired pendants. It pairs well with orange and gold resins. I love using it in rainbow layered pendants for a bright pop of color.
- Howlite: This white or gray crystal is often dyed to mimic other stones. I use natural howlite for a minimalist look. It’s also great for practicing new techniques because it’s affordable and easy to work with.
- Pyrite: Also known as fool’s gold, pyrite adds a metallic shimmer to your pendants. I use small pyrite chunks in galaxy or geode designs for a touch of sparkle. It’s a fun contrast to the smooth resin.
I hope this expanded guide has given you tons of ideas and inspiration. Remember, the best part of making resin crystal necklaces is experimenting. Don’t be afraid to try new combinations, make mistakes, and learn as you go. Every piece you create is a reflection of your unique style and creativity. Happy crafting, my friend!
Frequently Asked Questions
Can I wear my resin crystal necklace in the shower or while swimming?
We recommend removing your handcrafted SagStone resin crystal necklace before showering or swimming. While cured resin is generally water-resistant, prolonged exposure to hot water, soaps, and harsh pool chemicals can gradually dull the crystal's shine, degrade the resin's surface, and weaken the delicate cord or metal chain, shortening the lifespan of your beautiful artisan jewelry.


Comments