Ocean Resin Jewelry: Shells & Sea Glass Combos
June 9, 2026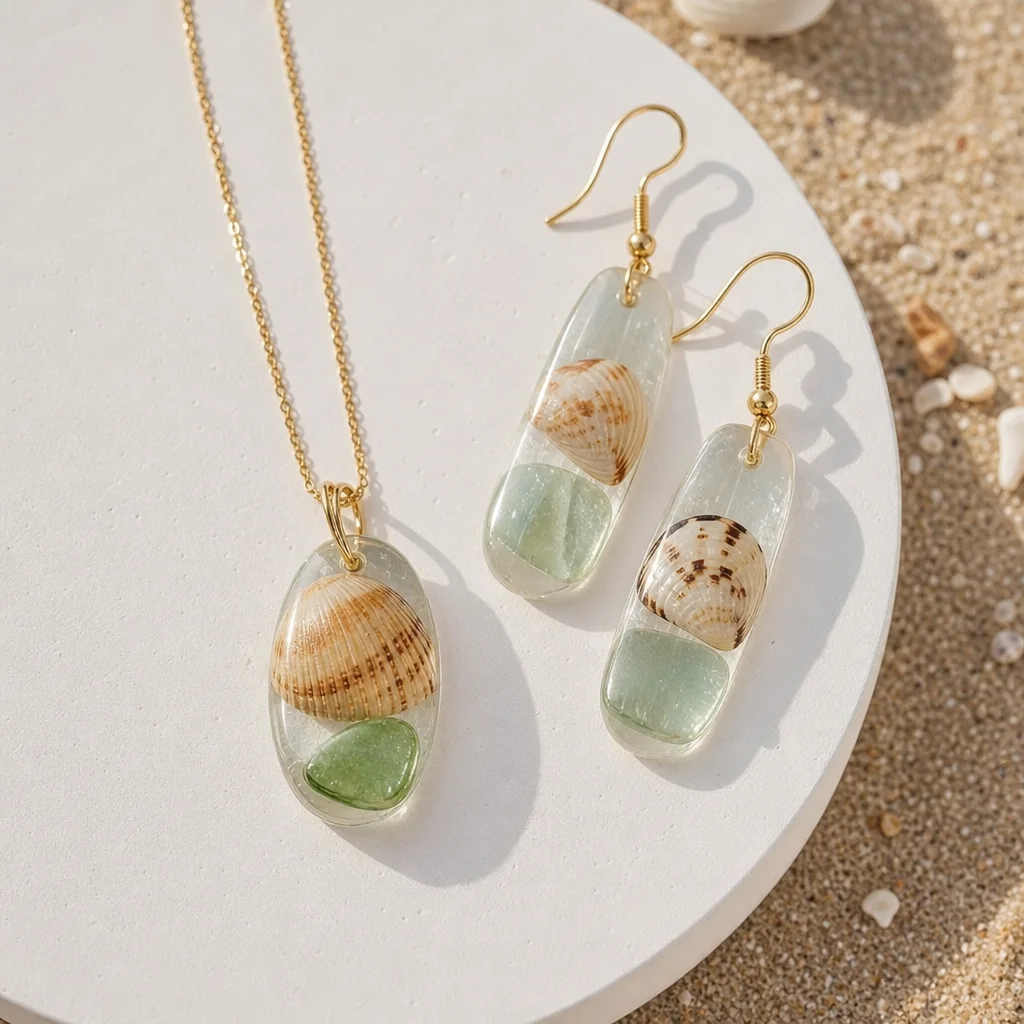
Oh, I just have to share, I'm totally obsessed with Ocean-Themed Resin Jewelry! Mixing shells and sea glass with crystals? It's like the ocean's essence got trapped in wearable art. When I wear these, I can't help but feel like I'm at the beach, even if I'm just lounging at home. The colors are so vivid and the way the light dances on the crystals, it's just so stunning. And hey, they make perfect gifts for friends who love the beach or anyone who's a water person, right? Plus, they're super durable – it's like a sturdy, crystal-y hug. I've been lusting over the "Shells & Sea Glass Crystal Combos" collection and can't wait to grab a couple for my collection. So, if you're into that ocean vibe, you should definitely check these out!
Oh, you gotta check out this Ocean-Themed Resin Jewelry, it's super unique! I've found what I love about it is the way the colors pop and the oceanic vibe. It's like wearing a tiny piece of the ocean on your wrist. 🌊💙Hey, I'm totally into making ocean-themed resin jewelry. There's just something so chill about wearing a piece that feels like the ocean's right there with you. You just toss in sea glass, shells, and all kinds of sea stuff, and bingo! You've got a necklace that makes you feel like you're walking along the beach whenever you put it on. Soothe-a and, honestly, a little magical, too.
Project 1: Sea Glass Ring (Bezel, Blue+White Layered)
OMG, this Sea Glass Ring is sooo stunning! The bezel is totally on point, and those blue and white layers are just dreamy. It's like wearing a little piece of the ocean. I've found this to be such a hit; it's seriously a head-turner. And the sea glass ring? Such a cutie! I'm head over heels for the design, the blue and white layers in that bezel are perfection. The colors are so eye-catching, they really make the ring pop and add so much character!Hey there, friendo! Ever wondered how we make those awesome Sea Glass Rings? Let me spill the beans!
Alright, so first up, snag that bezel. Make sure it's big enough to fit all that chunky sea glass.
And hey, don't forget to clean it properly—get rid of all that salt and grime.
Now, just lay those beautiful blue and white pieces in the bezel, keeping them nice and even with the edges.
Give the resin a light swipe, and let it sit—just follow the directions on the bottle.
Once the resin's all nice and hard, slap on a backing and add another thin layer to seal it.
And yeah, be patient, okay? Let the whole ring chill before you wear it or try to sell it. It's totally worth the wait!
Project 2: Shell+Crystal Earrings (Asymmetric Matching Pairs)
OMG, look at these Shell+Crystal Earrings! They're like the perfect pairing, but way cooler than what you'd find in any old store. The asymmetric matching pairs are so one-of-a-kind. I'm totally in love with how the crystals twinkle like little stars when the light hits them. And the shells? They add just the right amount of that chill, earthy vibe. So, if you're into something fresh and exciting, these earrings are a no-brainer!Hey, wanna try something different? Make some asymmetric shell and crystal earrings! They'll have these cool scallop or clam pieces mixed with all sorts of colorful crystals. It's like a pop of color against the natural texture of the shells. So fun!
Hey, let's shake things up! I'm all about these asymmetric shell and crystal earrings. They're like a rad mix of scallops, clams, and a whole bunch of colorful crystals. It's like a splash of color on top of the shell's texture. So much fun! And guess what? It's super easy! Just grab your favorite shell, pick your fave crystal colors, and let's go. I'm all about blues, whites, and clear crystals. Now, clean those shells real good and give 'em a quick spritz of clear nail polish. Just to keep 'em looking fresh. Then it's just a case of adding the crystals to the earring posts and jump rings. It's a total breeze, I promise! And don't be shy to get creative with the shell and crystal combos. If you're using resin, just let it chill for a sec before you attach it to the earring hooks. So much fun, I can't wait to see what you come up with!So, for Project 3, we're crafting the Sand Resin Cuff. The thing is, you gotta pop it in the oven at 200F/95C for 30 minutes. And definitely don't forget the blue pigment and the crystal point. It's a bit of a process, but trust me, it's totally worth the effort!
Hey, you know what? I've been trying this new project, the Sand Resin Cuff. It's super cool, but there's a little oven time involved. You just need to mix the sand and resin, add some blue pigment, and pop in a crystal point. It's a bit of a wait, but what I love about it is how it turns out. It's worth every minute!Here's How You Do It:
Alright, so first things first, you gotta rinse the sand real good. Just pour it through a fine mesh sieve to get rid of any yucky stuff. And then, you know, spread it out on a baking sheet and pop it in the oven at 200F/95C for 30 minutes. This is a big deal, 'cause you gotta get all the moisture outta there. Just make sure it's good and dry, okay?Alright, so next up, I just throw some blue pigment into the resin, following the instructions to a T. And then, the real fun starts—adding the dry sand. It's like building a sandcastle, but way cooler 'cause it's with resin!
Alright, go ahead and pour the sand-resin mix into the cuff mold. And definitely don't skimp on that crystal point, what I love about it is it's like the cherry on top of a sundae, just a little extra flair!
Okay, so once you let it chill for a bit, just follow the steps. Then, bingo! You'll see it popping right outta the mold. It's a breeze, really!
OMG, check out these colors! Ocean Blue, Turquoise, Seafoam, Sand Beige, Pearl, and Metallic Silver. They're so fresh and beachy, like, totally chill.
Hey, I'm totally digging these colors for the ocean-inspired resin jewelry. Ocean blue, turquoise, seafoam, that beige, pearl, and metallic silver—they all just go together like a beach day. What I love about it is how beachy and fresh they make you feel.Hey, curious about how to get the sand ready for resin jewelry? It's actually pretty laid-back!
Hey, so you wanna know how to prep the sand for your resin jewelry? It's pretty chill, actually. Just follow these steps:Here's How You Do It:
Alright, here's the deal:
- Alright, first things first, rinse the sand real good. Just pour it through a fine mesh sieve to get rid of any salt or yucky stuff.
- Next, spread the sand out on a baking sheet and pop it in the oven at 200F/95C for 30 minutes. It's like giving it a little sunbath to dry it out.
- Now, let it cool down completely before you use it in your resin project. You don't want to melt it, right?
- And lastly, keep that sand dry by storing it in an airtight container. It's like locking in the freshness!
Hey, wanna hear about how I seal shells for making those rad resin jewelry pieces? It's super chill and a total blast!
Sealing shells is a big deal, 'cause it keeps 'em from getting all gross and makes sure they stick like glue to the resin. Here's the scoop on how to do it:
Hey there, Crystal Fan!
Alright, let's make those shells super sparkly. First up, grab a clear nail polish that doesn't turn yellow on you. It's a lifesaver for tiny stuff, you know? Just give it a thin, even coat and let it dry. Usually, it's about an hour, but hey, no rush. And if your shells are super porous, like mine usually are, you might need to do it more than once. It's just one of those things. So, just keep slapping on coats until you're totally stoked on how they look.
Alright, so you've probably heard about UV curing and 2-part resin for making jewelry, but what's the difference, right? Honestly, I've found that the thing is, UV curing is like a quick flash of light that sets the resin hard as a rock. It's super cool and fast, but it can be a bit hit or miss sometimes. And then there's the 2-part resin, which is a bit of a slower process, but it's super reliable. You mix the two parts together, and it cures smoothly and evenly. So, it's all about what you're comfortable with and what works best for your style!So, there are two main ways to cure resin: UV curing and the 2-part resin system. Here's a quickie rundown:
- UV Curing:
- Instant curing: Once the resin is exposed to UV light, it hardens quickly.
- Shallow pours: Ideal for small, detailed projects.
- Not suitable for deep pours: UV light can't penetrate deeply into the resin.
- 2-Part Resin:
- 24-48-hour curing: Requires mixing a resin and a hardener in specific proportions, followed by a curing time of 24 to 48 hours.
- Deep pours: Suitable for large projects and deep pours because it cures from the inside out.
- May require more patience: The curing time is longer, but it results in a very strong and durable finished product.
How to Achieve a Beach Aesthetic in Resin Jewelry
Creating a beach aesthetic in your resin jewelry involves combining mixed textures and organic shapes. Here are some tips to help you achieve this look:
- Mixed textures: Mix different materials like sand, sea glass, and shells to create a varied and textured look.
- Organic shapes: Choose shells and sea glass with natural, irregular shapes to evoke the organic beauty of the beach.
- Contrasting colors: Use a color palette that includes ocean blue, turquoise, and seafoam to capture the essence of the ocean.
- Minimalist design: Keep the design simple to let the natural beauty of the materials shine through.
FAQ
Q: How do I clean sea glass before using it in my resin jewelry?
A: To clean sea glass, simply rinse it thoroughly under running water to remove any salt or debris. Use a fine mesh sieve to help trap any small pieces of sand or sediment.
Q: Can I use any type of shell for resin jewelry?
A: While any shell can be used for resin jewelry, it's best to choose shells that are sturdy and have a natural, organic shape. Avoid shells that are too thin or fragile, as they may break during the curing process.
Q: What's the best way to mix the sand and resin for a sand resin cuff?
A: To mix the sand and resin for a sand resin cuff, gently fold the dry sand into the resin using a palette knife or similar tool. Be careful not to overmix, as this can cause the sand to settle unevenly.
Q: How can I prevent my sea glass from fading over time?
A: To prevent sea glass from fading, you can seal it with a clear, protective coating before embedding it in resin. Also, using UV-resistant resin can help protect the sea glass from UV rays that can cause fading.
How to Care for Your Ocean Resin Jewelry
Once you've got your beautiful Ocean Resin Jewelry, it's important to take care of it to ensure it stays sparkling and vibrant for years to come. Here are a few tips:
- Keep it Dry: Ocean Resin is water-resistant, but it's not waterproof. Avoid submerging your jewelry in water for extended periods.
- Store Properly: Store your jewelry in a cool, dry place away from direct sunlight to prevent fading.
- Use a Soft Cloth: Wipe your jewelry with a soft, lint-free cloth to remove any dust or oils.
- Avoid Harsh Chemicals: Do not use any harsh chemicals or cleaning agents on your Ocean Resin Jewelry.
Common Mistakes to Avoid
When it comes to Ocean Resin Jewelry, there are a few common mistakes that can affect the longevity and appearance of your pieces:
- Not Knowing the Right Setting: Always know the right setting for your jewelry, especially if it has delicate components like shells or sea glass.
- Over-Cleaning: Avoid over-cleaning your Ocean Resin Jewelry, as it can strip away the protective layer.
- Exposure to Extreme Conditions: Be mindful of extreme temperatures or conditions that can damage the resin and its inclusions.
How to Use in Daily Life
Let your Ocean Resin Jewelry be a daily reminder of the ocean's beauty. Here are some ways to incorporate it into your daily life:
- Wear it as a Statement: Make a statement with your unique Ocean Resin Jewelry piece, whether it's a necklace, bracelet, or ring.
- Pair with Simple Outfits: Let your Ocean Resin Jewelry be the focal point of your outfit, complementing simple, everyday clothing.
- Gift it as a Keepsake: Give Ocean Resin Jewelry as a meaningful gift, whether for a special occasion or as a keepsake.
Where to Find Quality Specimens
For those who are interested in sourcing their own shells and sea glass for Ocean Resin Jewelry, here are some tips:
- Be Patient: Finding the perfect shells and sea glass can take time. Be patient and explore various locations.
- Local Beaches: Check out local beaches, as they can be a treasure trove of natural materials.
- Specialized Shops: Look for specialized shops that focus on selling materials for artisans and crafters.
- Online Marketplaces: Online marketplaces can be a great resource for sourcing unique and high-quality specimens.
Frequently Asked Questions
How long does it take to cure Ocean Resin?
How long does it take to cure Ocean Resin?
Answer: The curing time for Ocean Resin can vary, but it typically takes about 24 hours at room temperature. For best results, let it cure for a few days before using.
Can I use any type of shell for Ocean Resin Jewelry?
Can I use any type of shell for Ocean Resin Jewelry?
Answer: While most shells can be used, it's best to use shells that are naturally smooth and free of sharp edges. This ensures both the safety and aesthetic of your jewelry.
Are there any risks associated with handling sea glass?
Are there any risks associated with handling sea glass?
Answer: While sea glass is generally safe to handle, it can be sharp in some areas. Always wash your hands after handling and be cautious if you have sensitive skin.
Can I mix different types of oceanic materials in my Ocean Resin Jewelry?
Can I mix different types of oceanic materials in my Ocean Resin Jewelry?
Answer: Absolutely! Mixing different types of oceanic materials like shells, sea glass, and sand can create a unique and personalized piece.

Comments