Resin Jewelry Making: A Complete Beginner's Guide
A few months ago, I was doom-scrolling Instagram at 2 AM (as one does) when I stumbled onto a video of someone pouring clear resin into a silicone mold with tiny dried flowers suspended inside. The result was this luminous, glass-like pendant that caught the light in a way that made my jaw drop. I immediately ordered everything I could find on Amazon and announced to my roommate that I was now a resin jewelry artist.
That first batch was an unmitigated disaster. Sticky, cloudy, full of bubbles, and one piece literally fused to my kitchen counter. I almost quit on the spot.
But I kept at it, read everything I could find, made about fifty more mistakes, and eventually got to a place where my pieces actually look like the ones in those satisfying Instagram videos. This guide is everything I wish someone had handed me on day one — no fluff, no gatekeeping, just the real stuff about resin jewelry making that actually works.
What Is Resin Jewelry, Exactly?
Resin jewelry is any piece of wearable art made by pouring liquid resin into molds and letting it harden into a solid, durable shape. The magic of it is that you can embed almost anything — flowers, glitter, shells, coins, small photos — and the resin preserves them in this crystal-clear dome that looks professionally made even if you're working at your kitchen table.
There are two main types of resin used in jewelry making, and choosing the right one (or the right combo) will save you a lot of frustration.
Epoxy Resin
This is the stuff most people start with. Epoxy resin comes in two parts — a resin and a hardener — that you mix together in equal ratios (usually 1:1 by volume). Once mixed, it starts a chemical reaction that turns it from a sticky liquid into a hard, clear solid over 12 to 24 hours.
The pros: it's affordable, widely available, self-leveling (meaning it settles flat on its own), and you get a decent working time — usually 30 to 45 minutes before it starts getting thick. It's ideal for larger pieces like bangles or deep molds where you need time to layer things in.
The cons: longer cure time means more waiting around, and it can be temperamental about temperature and humidity.
UV Resin
UV resin is a one-part liquid that cures under ultraviolet light — either from a UV lamp or direct sunlight. No mixing ratios to worry about, no two-part chemistry to mess up.
The pros: cures in minutes (sometimes under 60 seconds with a strong UV lamp), super convenient for small pieces, and practically foolproof if you're doing thin layers. It's my go-to for earrings and small charms.
The cons: doesn't work well for thick pieces (it won't cure all the way through), more expensive per ounce, and it can yellow slightly faster than quality epoxy. You also need a UV lamp, which is an extra piece of equipment.
Epoxy vs. UV: Which Should You Pick?
Honestly, get both. I know that's not the answer you want, but here's the thing — they serve different purposes. Epoxy is your workhorse for pendants, bracelets, and anything with depth. UV resin is your quick-fix for thin earrings, coating surfaces, and projects where you need results fast.
If you're on a tight budget and can only pick one, start with a small epoxy kit. It's more versatile and gives you room to experiment without the clock ticking.
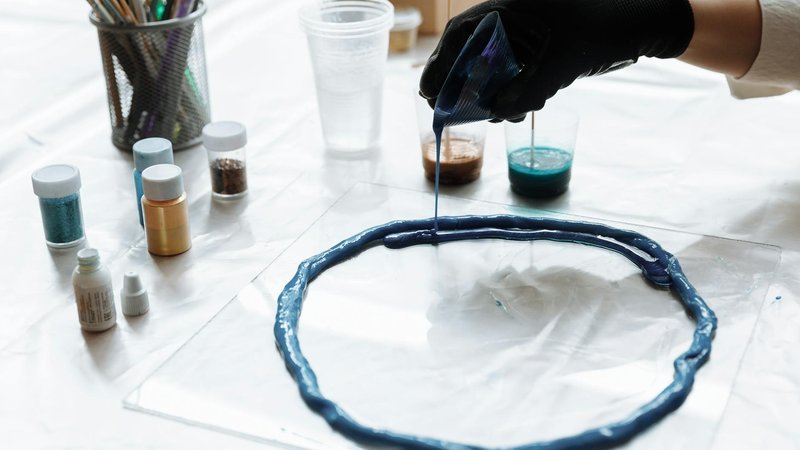
Tools and Materials You'll Actually Need
I wasted so much money buying things I didn't need in the beginning. Here's the stripped-down list of what matters:
The Essentials
Silicone molds: Get molds specifically made for jewelry — they'll be the right size and have clean release edges. Start with a variety pack that includes pendant, earring, and bangle shapes. Avoid cheap molds with blurry details; the mold quality directly shows in your finished piece.
Measuring cups: Accuracy matters more than you'd think. Get graduated mixing cups with milliliter markings. I use disposable plastic ones because cleaning cured resin is a nightmare.
Stirring sticks: Flat wooden craft sticks work better than round ones because they scrape the sides of your cup more effectively. Don't use metal — it can react with the resin.
Pigments and colorants: This is where it gets fun. Resin-specific pigments (not craft paint, not food coloring) are formulated to mix evenly and stay vibrant. Start with a few opaque colors, a translucent white, and maybe some mica powder for shimmer. Mica powder is incredible — a tiny amount gives you this gorgeous pearlescent effect.
Inclusions: This is the fancy word for "stuff you put inside the resin." Dried flowers, gold leaf flakes, glitter, small shells, beads, charms. Dried flowers are the crowd favorite and for good reason — a tiny pressed daisy under a dome of clear resin looks absolutely stunning.
Sandpaper: Get a variety pack from 400 to 2000 grit. You'll use this for cleaning up rough edges after demolding.
Resin polish or clear coat: This is the secret to getting that glass-like finish on pieces you've sanded. A thin layer of polish or a quick UV resin top coat makes everything look professional.
Safety First (No, Seriously)
I know, I know — safety warnings are boring. But resin is a chemical, and your lungs and skin will thank you for taking precautions.
Nitrile gloves: Not latex, not vinyl — nitrile. Latex can react with some resins, and vinyl is too thin. I buy them in bulk and change them between every pour.
Ventilation: Work in a well-ventilated area or, better yet, outside. If you're working indoors, open a window and point a fan to blow fumes away from your face. I learned this the hard way after getting a headache that lasted two days from working in my closed bathroom.
Mask: A basic disposable mask helps, especially when sanding cured pieces (resin dust is not something you want in your lungs).
Allergy test: Before you dive in, mix a tiny amount of resin and dab it on your inner forearm. Wait 24 hours. If you get redness, itching, or a rash, epoxy resin might not be for you — look into plant-based resins instead.
Protect your surfaces: Resin will ruin fabric, wood, and pretty much anything porous. Cover your workspace with a silicone mat or wax paper. Trust me on this one.
The Basic Process: Step by Step
1. Prepare Your Mold
Wipe the inside of your mold with a soft cloth or compressed air to remove any dust. Even a tiny speck of lint will be frozen in place forever once the resin cures, and you'll see it every time you look at the piece. I've thrown away more pieces over a single cat hair than I'd like to admit.
2. Mix Your Resin
Pour equal parts resin and hardener into your measuring cup. For epoxy, the ratio is critical — even being off by 10% can cause the resin to stay tacky forever. Stir slowly and deliberately for at least 3 minutes. Scrape the sides and bottom of the cup. Then scrape the stir stick on the rim of the cup to get every last bit.
Here's a tip I learned way too late: scrape your mixing cup with a second stir stick and pour that into your mold too. Resin sticks to cups like crazy, and you'll be surprised how much you'd otherwise waste.
3. Add Color
Add your pigment a tiny bit at a time. You can always add more; you can't take it out. For a translucent effect, use a tiny amount of opaque pigment — like, literally a toothpick tip's worth. Mix thoroughly between additions.
For layered effects (like a galaxy or ocean look), split your mixed resin into separate cups and color each one differently before pouring.
4. Pour and Arrange
Pour your resin into the mold slowly, from a low height, to minimize bubbles. If you're adding inclusions like flowers, place them with tweezers. You can pour in layers — a clear base, add your flowers, then a thin clear top to seal everything in.
For pieces with gold leaf, I like to sprinkle it in after the first pour has had a few minutes to settle, then add a second thin layer on top. This creates a beautiful floating effect.
5. Remove Bubbles
Bubbles are the enemy. After pouring, you have a few options. You can use a toothpick to gently pop visible bubbles. You can lightly tap the sides of the mold to encourage bubbles to rise to the surface. If you're serious about this craft, a small heat gun (or even a hair dryer on low, held at a distance) will pop bubbles like magic — but be careful not to blow the resin out of the mold.
Some people use a pressure pot, which essentially crushes all bubbles out of existence under pressure. It's amazing but overkill for beginners.
6. Cure
For epoxy: cover your mold with something to keep dust out (a cardboard box works great) and wait. Don't touch it. Don't peek. Just let it do its thing for 12 to 24 hours depending on the brand.
For UV resin: place it under your UV lamp for 2 to 4 minutes per thin layer. If the piece is thicker than 3mm, do multiple thin layers, curing each one before adding the next.
7. Demold
Once fully cured, gently peel the silicone mold away from the resin. Silicone is flexible, so you can usually push the piece out from the back. If it's stubborn, put the mold in the freezer for 10 minutes — the cold makes the resin contract slightly and pop right out.
8. Sand and Polish
Most pieces will have a rough edge or a small resin tab from the pour point. Start with 400-grit sandpaper and work your way up through 600, 800, 1000, and finally 2000 grit. Sand in one direction, rinse the piece between grits, and be patient. This is the most tedious part but it makes the difference between "homemade" and "handmade."
After sanding, apply a thin coat of resin polish or UV resin to restore the glossy surface. Let it cure, and you're done.
Three Beginner Projects to Try
Project 1: Clear Flower Pendant
This is the quintessential resin jewelry project, and it's where I recommend everyone starts. Mix clear resin, pour a thin layer into a round or teardrop mold, and let it sit for about 20 minutes until it gets slightly tacky. Use tweezers to place a small dried flower (or petals, or a tiny whole flower) face-down into the resin. Pour another thin layer of clear resin over the top to seal it. Cure, demold, drill a small hole at the top, and thread it onto a chain or jump ring.
The trick is using flowers that are completely, bone-dry. Any moisture at all will cloud the resin and eventually rot. You can buy pre-dried flowers, or press your own in a heavy book for two to three weeks.
Project 2: Galaxy Gradient Earrings
Mix three small batches of resin: one deep purple (almost black), one bright blue, and one white with fine glitter. Pour the purple into the bottom third of your earring mold, the blue into the middle, and the white/glitter on top. Use a toothpick to gently swirl the colors together where they meet — don't overmix or you'll get mud. Add a few tiny star-shaped sequins or fine silver glitter for sparkle. Cure and demold.
These look incredibly complex but are surprisingly easy. The key is using translucent pigments so the layers blend into each other naturally.
Project 3: Photo Bracelet
Print a small photo (or use a magazine clipping, a map, sheet music — whatever speaks to you) and seal it with a thin coat of clear glue or Mod Podge. Let it dry completely. Mix resin, pour a base layer into a rectangular or curved bracelet mold, place your sealed image face-up, then pour resin over the top to encapsulate it. Cure, demold, and attach bracelet findings.
This one makes an incredible personalized gift. I made one with a photo of my friend's dog and she literally cried.
Troubleshooting: Common Problems and Fixes
Bubbles
The most common complaint by far. Prevention is easier than cure: mix slowly, pour slowly, and use a heat gun after pouring. If bubbles appear after curing, there's no fix — you'll need to sand the surface and add a fresh resin top coat.
Sticky or Tacky Surface
This usually means your mix ratio was off, you didn't stir long enough, or the room temperature was too cold. Resin cures best between 70-80°F (21-27°C). If your piece is still tacky after 48 hours, wipe it with rubbing alcohol and pour a fresh thin layer on top — sometimes the new pour will kick-start the chemical reaction and cure the whole thing.
Cracking
Cracks usually happen when the resin cures too fast (too warm) or when there's a significant temperature change. Don't use a heat gun too close or for too long. Also, don't rush the cure — moving pieces or exposing them to temperature swings while they're still curing is a recipe for cracks.
Yellowing
All resin yellows over time, but UV exposure accelerates it dramatically. Keep finished pieces out of direct sunlight, and store them in a cool, dark place. Some brands are more UV-resistant than others — look for "non-yellowing" or "UV resistant" on the label. UV resin is generally more prone to yellowing than high-quality epoxy.
Mold Release Issues
If your piece won't come out of the mold, don't force it — you'll damage both the piece and the mold. Try the freezer trick, or wait another few hours for the resin to fully harden. Silicone molds should release easily; if they don't, the resin might not be fully cured.
Final Thoughts
Resin jewelry making is one of those crafts where the gap between "total beginner" and "making genuinely beautiful things" is surprisingly small. My first five attempts were terrible, but by my tenth piece, I had something I was genuinely proud to wear. By my thirtieth, friends were asking me to make pieces for them.
Start simple. Don't try to make a complex layered galaxy bangle on your first day. Make a clear pendant. Then make a colored one. Then add a flower. Build up your skills gradually, and you'll have a lot more fun (and a lot less wasted resin) than if you try to run before you can walk.
And keep your workspace covered. Trust me on that one.
Comments