Resin Crystal Pendant with Gold Foil: A Luxury..
June 2, 2026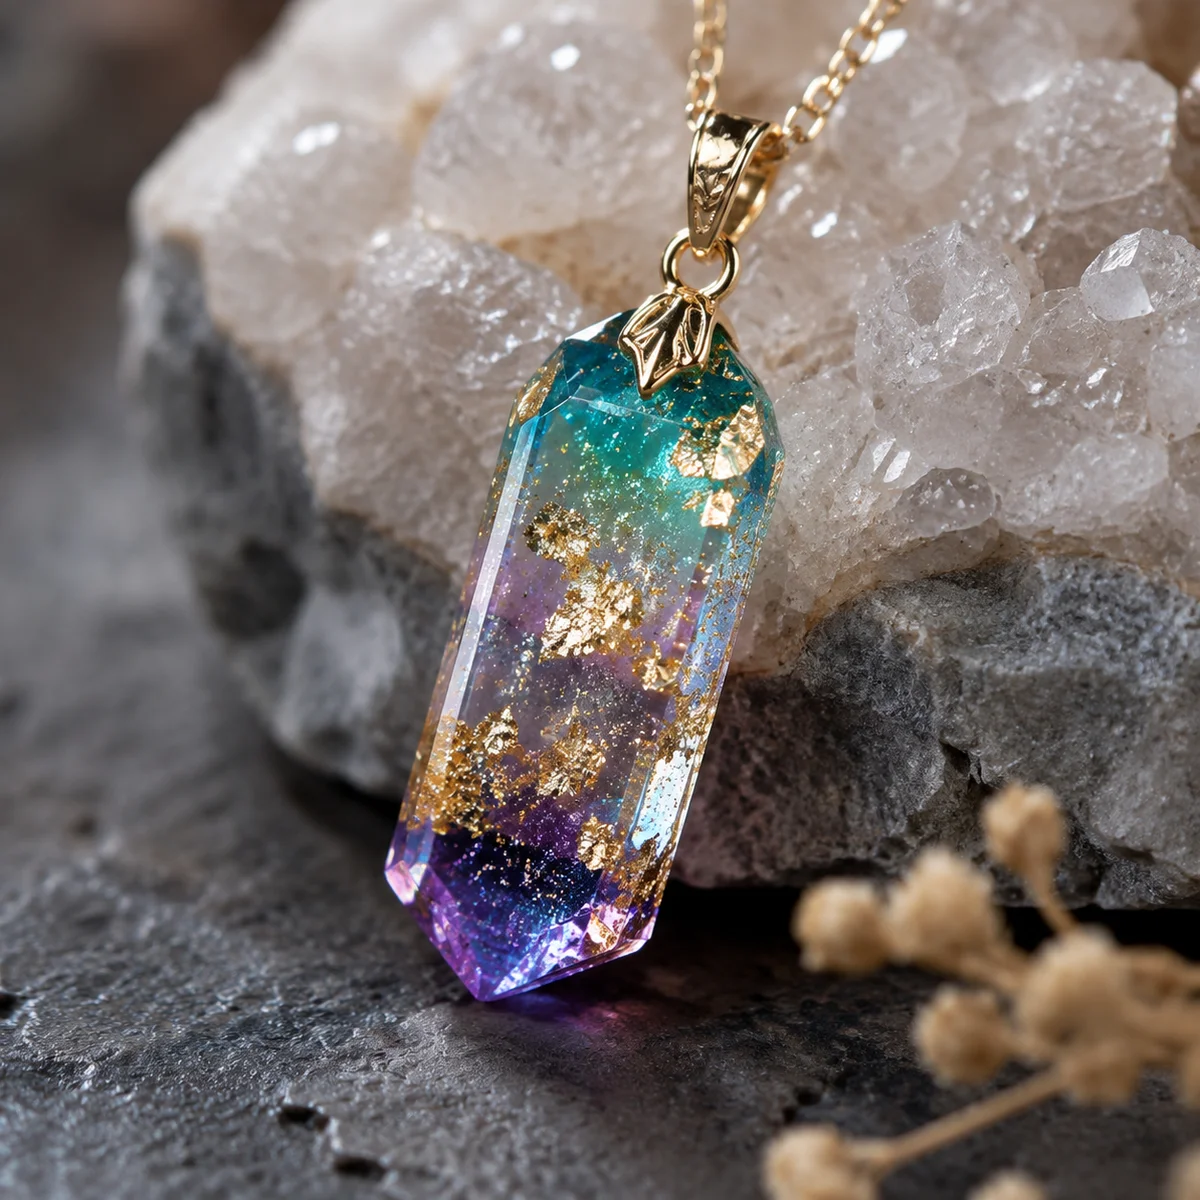
Why Gold Foil Elevates Resin Crystal Jewelry
Crystal pendants cast in clear resin already look beautiful — the stone suspended in transparent material catches light from every angle. Adding gold foil takes the visual impact up several levels. The metallic gold creates contrast against the crystal's natural colors, adds reflective surfaces that dance with movement, and gives the finished piece a designer quality that plain resin-and-crystal combos lack.
The technique is more accessible than it looks. Gold leaf and foil are inexpensive materials (a small package costs under $10 and makes dozens of pendants), and the application process doesn't require special skills beyond basic resin work. What separates amateur-looking results from professional ones is foil placement strategy, layering technique, and patience during the curing process.
Materials You'll Need
- Clear epoxy resin: Two-part epoxy (resin + hardener) for deeper pieces, or UV resin for thin pendants. Epoxy gives better depth and fewer bubbles for pendant work.
- Gold leaf or gold foil: Genuine gold leaf (various karats available), imitation gold leaf (copper/zinc alloy — most affordable), or gold transfer foil sheets. Each type behaves differently during application.
- Small crystal chips or tumbled stones: Amethyst, rose quartz, citrine, clear quartz — any stone that fits within your pendant mold. Chips and small rough pieces work better than large tumbled stones for most pendant sizes.
- Silicone pendant molds: Dome-shaped, teardrop, or rectangular — whatever shape you prefer. Flexible silicone makes demolding easy.
- Pendant bails: Pre-made loop bails in silver or gold plate. Choose bail style after deciding pendant shape.
- Tweezers: For positioning gold leaf and crystals in the mold.
- Toothpicks or craft sticks: For pushing resin into tight spots and positioning small elements.
- Isopropyl alcohol: For cleaning molds and removing fingerprints from finished pieces.
- Sanding paper: 400-grit wet/dry for smoothing pendant bottoms.
- Resin polish or clear nail polish: For final gloss on sanded surfaces.
Gold Leaf vs. Gold Foil vs. Transfer Foil
Understanding the differences saves frustration:
Genuine gold leaf: Real gold beaten extremely thin (about 0.1 micrometers). Available in various karats (12K, 18K, 22K, 24K). More expensive but doesn't tarnish. Handles like tissue paper — extremely fragile, difficult to work with but creates the most authentic gold effect. Comes between tissue paper sheets in booklets.
Imitation gold leaf: Made from a copper-zinc alloy that mimics gold color. Much less expensive ($5–8 for a pack vs. $20+ for genuine). The color is slightly more brassy than real gold and can tarnish over time, but for resin jewelry (where the foil is sealed inside), tarnishing isn't a concern. This is the practical choice for most makers.
Gold transfer foil: Thin plastic sheets coated with gold pigment. You apply it to the resin surface and peel away the plastic backing, leaving the gold pattern behind. This creates a different effect — more patterned and deliberate than the organic shapes you get with loose leaf. Good for geometric designs.
For crystal pendants, imitation gold leaf is the best balance of cost, ease of use, and visual result. Genuine gold leaf is for special pieces. Transfer foil creates a different aesthetic that doesn't pair as naturally with the organic look of embedded crystals.
Gold Foil Placement Strategies
How you arrange the gold foil dramatically affects the finished look. Three strategies work well with crystal pendants:
Strategy 1: Torn fragments (organic): Tear the gold leaf into irregular pieces (5–15mm) with slightly ragged edges. Arrange the fragments in the mold with gaps between them — the resin fills these gaps, creating a "floating gold" effect where metallic islands drift through clear resin alongside the crystal. This is the most natural-looking approach and works well with raw crystal chips.
Strategy 2: Background layer (framing): Place a single sheet of gold leaf across the bottom of the mold as a background, then position the crystal on top. The gold creates a reflective backdrop that enhances the crystal's colors and creates depth. The crystal appears to float above a gold surface. This works best with lighter-colored stones (clear quartz, rose quartz) that don't compete visually with the gold.
Strategy 3: Crinkle technique (texture): Lightly crumple a gold leaf sheet into a loose ball, then open it and flatten it partially. The crumpled texture creates lines and ridges that catch light differently from smooth foil. Place this textured foil in the mold and embed the crystal on top. The result has a more three-dimensional, almost fabric-like gold quality that adds textural interest to the pendant.
Step-by-Step Pendant Construction
Step 1: Prepare Your Mold
Clean the silicone mold with isopropyl alcohol and let it dry completely. Any dust, lint, or fingerprints will be permanently captured in the finished pendant. Work in a clean, dust-free area if possible. Place the mold on a level surface — resin is self-leveling, but if the surface isn't flat, the pendant will cure unevenly.
Step 2: First Resin Layer (Base)
Mix a small amount of resin and hardener according to the manufacturer's ratio. Pour just enough to cover the bottom of the mold cavity — about 2–3mm depth. This base layer will eventually hold the gold foil and crystal in place. Tap the mold gently against the table to release any bubbles that formed during pouring. Wait 20–30 minutes for this layer to become tacky but not fully cured — you want it sticky enough to hold the foil in place when you place it.
Step 3: Place Gold Foil
Using tweezers, carefully position your gold foil pieces in the mold according to your chosen strategy. If using torn fragments, arrange them with intentional gaps. If using a background sheet, press it gently into the tacky resin base. The tacky surface prevents the foil from floating when you add the next resin layer.
Important: Gold leaf is incredibly lightweight and easily displaced by air currents from your breath or movement. Work slowly and deliberately. If a piece lands in the wrong position, use a toothpick to gently reposition it — the tacky resin will hold it where you put it.
Step 4: Position the Crystal
Place your crystal chip or small stone on top of the gold foil, pressing gently to seat it in the tacky resin. The crystal should be positioned slightly off-center for the most dynamic visual balance, or centered for a symmetrical, classic look. Make sure the most attractive face of the crystal is pointing upward (toward what will be the front of the pendant).
If you're using multiple small chips, arrange them in a natural-looking cluster rather than a geometric pattern. The organic arrangement pairs better with the gold leaf's irregular shapes.
Step 5: Second Resin Layer (Fill)
Mix another batch of resin and pour it slowly into the mold, filling to about 2mm below the mold's rim. Pour slowly from one corner of the mold rather than directly onto the crystal — this minimizes disturbance to the gold foil and crystal positioning. The resin should flow around the crystal and over the gold foil, eventually covering everything.
Check that the crystal and foil haven't shifted. If they have, use a toothpick to gently push them back into position. Do this quickly — within the first few minutes while the resin is still very fluid.
Step 6: De-Bubble
Bubbles are the most common problem in resin pendant work. After pouring, use a toothpick to pop any visible bubbles on the surface. For stubborn bubbles trapped under the crystal, gently lift the crystal edge with a toothpick to let the bubble escape, then press the crystal back down.
Some resin workers use a heat gun or small kitchen torch to pop bubbles by briefly warming the resin surface. If you try this, keep the heat source moving constantly and never closer than 3–4 inches from the resin. Excessive heat can damage the gold leaf and even cause the resin to cure improperly.
Step 7: Cure
Cover the mold (plastic wrap works, or a dust cover if you have one) to prevent dust from landing on the surface. Let it cure for the manufacturer's recommended time — usually 24–48 hours for epoxy resin. Don't move or disturb the mold during curing. Temperature affects curing speed; most epoxy cures best at 65–75°F (18–24°C).
Step 8: Demold and Finish
Once fully cured, flex the silicone mold gently to release the pendant. It should pop out easily. Inspect the front surface — if it's smooth and glossy, you're nearly done. If there are rough spots or resin overflow at the mold edge, sand them smooth with 400-grit wet/dry sandpaper (use wet sanding). After sanding, apply a thin coat of clear resin or resin polish to restore the glossy finish on any sanded areas.
Step 9: Attach Bail
For a drilled-hole bail: Use a small drill bit (1–2mm) to create a hole at the top of the pendant, then insert a bail pin or jump ring. Drill slowly with light pressure — resin can crack if you force the bit.
For a glue-on bail: Apply a small amount of epoxy or strong jewelry adhesive to the bail's base and press it onto the pendant's back at the top edge. Hold in place for 60 seconds while the adhesive sets. Full strength develops over 24 hours.
Designing Matching Earrings
Once you've made a pendant, matching earrings are a natural extension. Use the same crystal type, gold foil technique, and mold shape (or a scaled-down version) for visual consistency. The earrings should be smaller than the pendant — roughly 60–70% of the pendant size works well as a set.
For earrings, consider using smaller crystal chips (2–4mm) rather than larger stones. Earrings move with the wearer, and lighter components are more comfortable for extended wear. UV resin works well for earrings since the pieces are smaller and cure in minutes under a UV lamp.
Common Problems and Solutions
Gold foil wrinkling or balling up: This happens when resin is too fluid when you place the foil — it doesn't have enough tack to hold the delicate leaf in position. Wait longer for the base layer to become tacky before placing foil. If the foil has already balled up, remove it, let the resin set a bit longer, and try again with fresh foil.
Bubbles trapped under crystals: This is common and frustrating. Minimize it by placing crystals with a gentle rocking motion — one edge first, then slowly lower the rest. This lets air escape through the gap. For stubborn trapped bubbles, use a fine needle (not a toothpick — too thick) to reach under the crystal and pop the bubble.
Gold foil discoloration: If the gold appears dull or tarnished in the finished piece, it's usually because the foil oxidized during the exothermic curing process (resin generates heat as it cures). Imitation gold leaf is most susceptible. Seal the foil with a thin clear resin coat before adding the fill layer — this creates a protective barrier between foil and curing resin.
Crystal sinking to the bottom: Your base resin layer wasn't tacky enough, or the crystal is too heavy for the resin viscosity. Use a higher-viscosity resin (or mix less hardener to create a slightly thicker consistency) for the base layer. Heavier crystals may need to be partially embedded in the base layer and allowed to set before adding the fill layer.
Frequently Asked Questions
Can I use silver or copper foil instead of gold?
Yes, and the results can be stunning. Silver leaf with amethyst creates a cool-toned, elegant look. Copper leaf with citrine creates a warm, harmonious palette. Silver leaf is slightly more expensive than imitation gold leaf but less than genuine gold. Copper leaf is the most affordable metallic option. All three tarnish eventually, but sealed inside resin, the tarnishing process is extremely slow.
How do I prevent the pendant from yellowing over time?
UV resistance varies by resin brand. Choose a resin specifically formulated for jewelry that includes UV stabilizers. Store finished pendants away from direct sunlight (a jewelry box is fine). If a pendant does yellow slightly over years, it's usually only visible on the clear areas — the gold foil and crystal distract the eye from subtle color shifts in the resin.
Can I add other elements besides crystals?
Absolutely. Dried flowers, tiny shells, glitter, mica powder, and small beads all work in resin pendants alongside crystals and gold foil. The key is not to overfill the mold — leave enough clear resin around each element so the pendant doesn't look crowded. One crystal, a few gold foil pieces, and one complementary element (a small shell or flower petal) is usually the right balance.
Is epoxy or UV resin better for pendants?
For pendants with embedded elements (crystals, foil), epoxy is generally better because it has lower viscosity, fewer bubbles, cures with more depth, and gives you time to position elements. UV resin cures almost instantly, which is great for flat designs but limiting when you need time to arrange gold leaf and crystals. Use epoxy for complex pendants and UV resin for simpler designs or earrings where speed matters more.
Frequently Asked Questions
Will the gold foil tarnish or fade inside the resin pendant?
Genuine gold foil and leaf will not tarnish or fade when properly sealed inside our handcrafted crystal resin jewelry. Because the resin acts as a protective barrier against oxygen and moisture, the luminous finish remains pristine. At SagStone, we carefully encase each delicate flake to ensure your luxurious gold-accented pendant maintains its brilliant, sun-catching sparkle for years of everyday wear.
Comments