Preserving Real Flowers in Resin Jewelry
May 14, 2026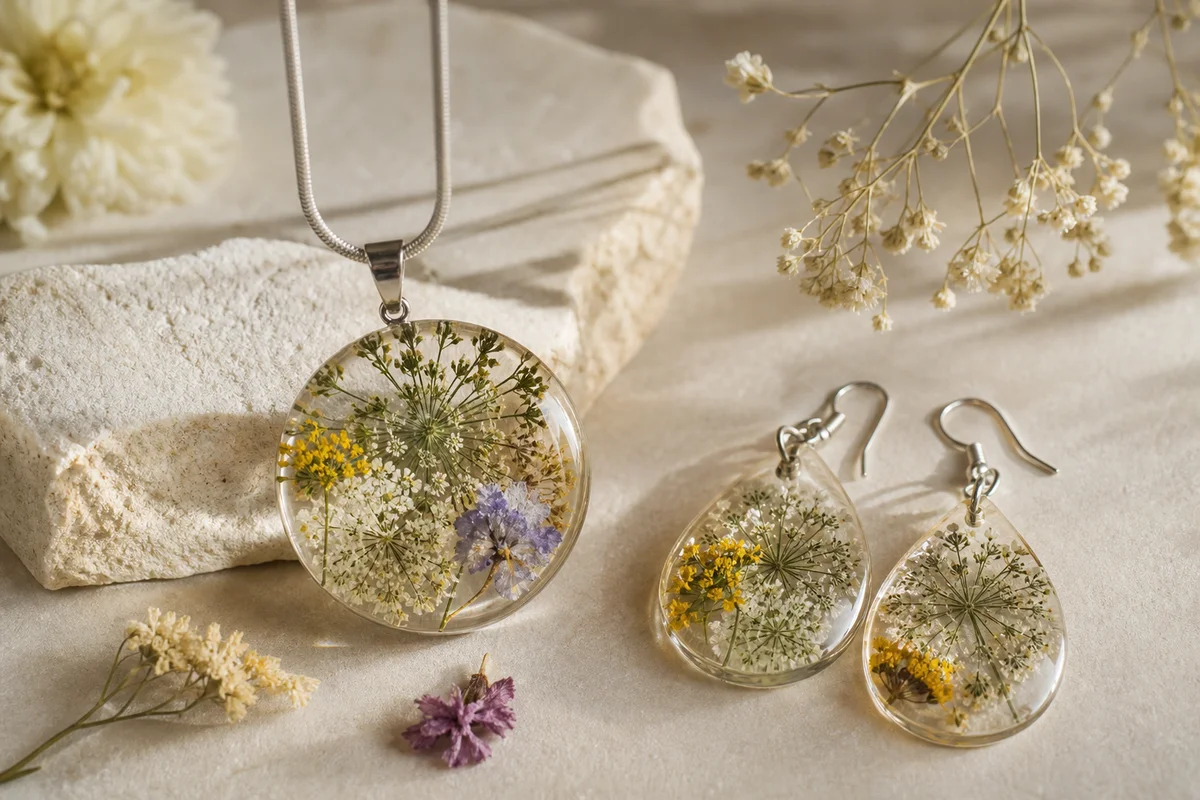
Preserving Real Flowers in Resin Jewelry: A Complete Beginner's Walkthrough
There's something irresistible about wearing a tiny garden around your neck. Dried flowers sealed in clear resin capture a moment — a bloom from a wedding bouquet, a wildflower from a hiking trail, or just something pretty from the farmer's market.
The process isn't complicated, but the details matter. Temperature, flower preparation, and pour technique separate cloudy failures from professional-looking results. This guide covers everything you need to know to make your first dried flower resin pendant, step by step.
Gathering Your Materials (No Specialty Shopping Required)
Resin and Mold
- Clear epoxy resin (two-part: resin + hardener). Buy the kind labeled "doming" or "casting" resin — it self-levels and cures glass-clear. A 4 oz kit runs $10–15 online and makes dozens of pendants.
- Silicone pendant mold (round, oval, or teardrop shape). A basic 10-cavity mold costs about $5.
- Small mixing cup — a paper cup or recycled yogurt container works fine.
- Wooden craft stick or plastic spoon for stirring.
Flowers and Drying Supplies
- Fresh flowers with small blooms: daisies, violets, baby's breath, small rosebuds, pansies, forget-me-nots, or tiny sprigs of greenery like fern fronds and thyme.
- A heavy book and parchment paper for pressing flowers flat.
Finishing Supplies
- Sandpaper (400 grit and 1000 grit) for smoothing edges.
- Jewelry bails (flat metal tabs with a loop) and strong glue (E6000 or two-part epoxy).
- A chain or cord.
Total cost for a first batch: under $25. Everything is available on Amazon or at a Michaels store.
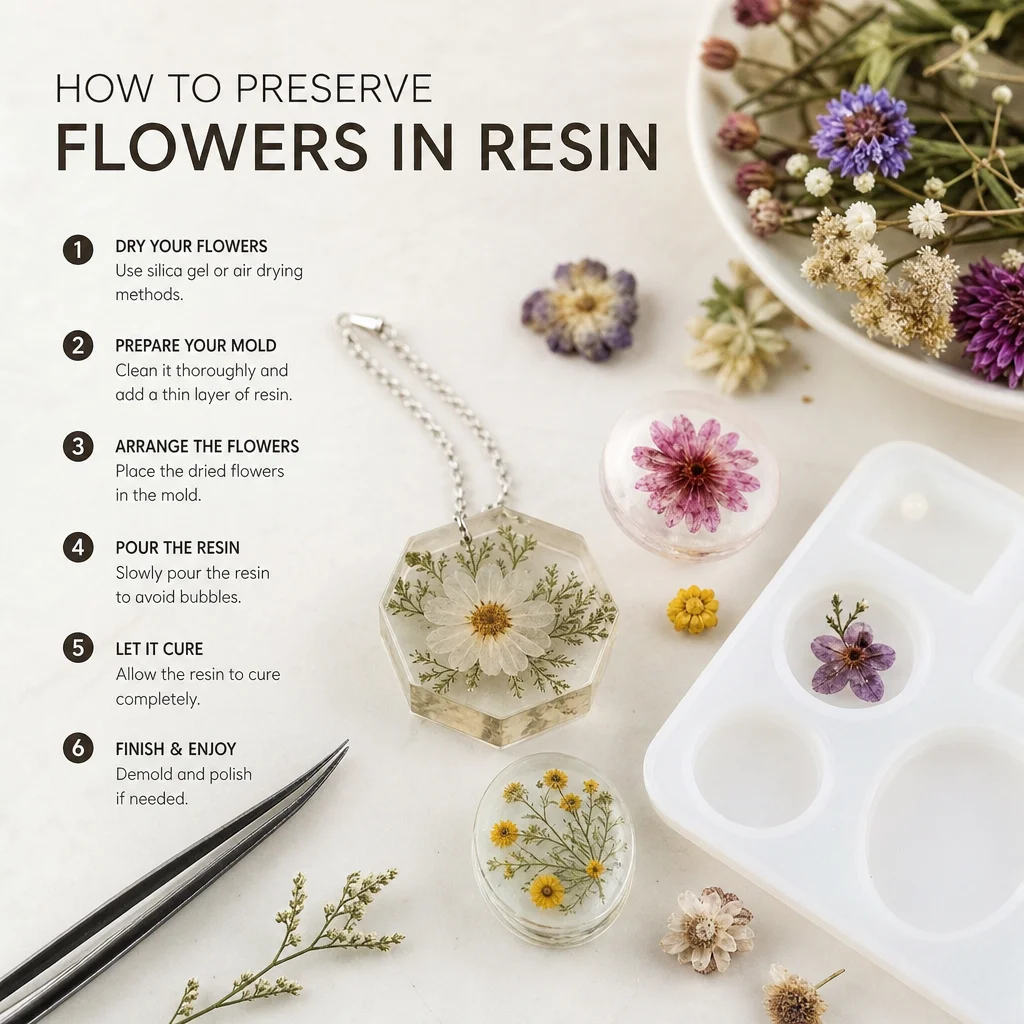
Step One: Pressing and Drying Your Flowers
This is the step most beginners rush, and it ruins more projects than anything else. Flowers must be completely dry before they go into resin. Any residual moisture creates cloudy patches, bubbles, and sometimes a yellowish tint that spreads through the whole piece.
The Book Press Method (7–10 Days)
Cut the flower head off the stem. Place it face-down on a sheet of parchment paper inside a heavy book. Close the book and stack two more books on top. Wait at least seven days. Thicker blooms like rosebuds need the full ten.
Press more flowers than you think you need. Some will break during handling, and it's frustrating to wait another week because you only pressed three.
The Microwave Shortcut (Same Day)
If you're impatient, sandwich the flower between two sheets of parchment paper, place it inside a heavy book, and microwave in 30-second bursts at medium power. Check after each burst. Most small flowers dry in 2–3 minutes. Let the book cool completely between bursts — the paper acts as a desiccant and needs time to absorb moisture.
Microwave-dried flowers are more brittle than book-pressed ones, so handle them with extra care during placement.
Step Two: Mixing and Pouring the Resin
Preparing Your Workspace
Work in a warm room (72–78°F / 22–26°C). Cold resin is thick, traps bubbles, and cures cloudy. Cover your table with wax paper or a silicone mat — resin peels right off both. Put on gloves. Resin on your skin isn't dangerous in small amounts, but it's sticky and annoying.
Mixing
Follow the ratio on your resin kit exactly. Most two-part epoxies use a 1:1 ratio by volume. Pour equal amounts of resin and hardener into your cup. Stir slowly with the craft stick for a full two minutes, scraping the sides and bottom constantly. Slow stirring is critical. Vigorous stirring whips bubbles into the mixture that you'll never fully remove.
The mixed resin will look slightly cloudy. That's normal — it clears as it sits. Let it rest for five minutes so bubbles rise and pop on their own.
The First Pour (Embedding the Flower)
Fill each mold cavity about one-third full with resin. Use the craft stick to drip it in rather than pouring — pouring from height creates bubbles.
Using tweezers or the tip of a toothpick, gently place a dried flower face-down into the resin. Position it carefully — once it's submerged, it's hard to move without creating bubbles. Use the toothpick to gently press the flower flat against the bottom of the mold.
Wait ten minutes. This lets the resin start to gel slightly, which keeps the flower from floating when you add the second pour.
The Second Pour (Encasing the Flower)
Slowly fill the rest of the mold cavity with resin, stopping just below the rim. The resin will dome slightly as it cures, so don't overfill.
If you see bubbles clinging to the flower, pop them with a toothpick or blow gently across the surface with a straw. Some people use a small kitchen torch for this, but a straw works surprisingly well for small pieces.
Step Three: Curing and Demolding
Cover the mold with a box or plastic container to keep dust out. Leave it undisturbed for 24 hours at room temperature. Resist the urge to poke it — even if the surface feels firm, the interior may still be soft.
After 24 hours, flex the silicone mold and press the pendant out from the back. It should release cleanly. If it feels tacky or bends, give it another 12 hours. Humid environments slow curing.
Fixing Imperfections
The back of the pendant (the side that was against the mold) will probably be flat and smooth. The top might have slight unevenness. Sand it with 400-grit sandpaper under running water until smooth, then polish with 1000-grit for a frosted-glass finish.
If you want a glass-like shine on top, mix a tiny amount of fresh resin and brush a thin "dome coat" over the sanded surface. Let it cure for another 24 hours. This single step takes a pendant from homemade to professional-looking.
Attaching the Bail and Finishing
Choose a flat metal bail that matches your pendant's shape. Apply a small drop of E6000 glue to the flat tab, press it firmly against the back top edge of the pendant, and let it set for 24 hours. E6000 takes a full day to reach full strength, though it's tacky within an hour.
Thread a chain through the bail. Done.
Common Mistakes and How to Avoid Them
Cloudy resin. Usually caused by moisture in the flowers, incorrect mixing ratio, or cold temperatures. Make sure flowers are completely dry, measure carefully, and warm the room.
Flower turns brown or translucent. The flower wasn't fully dried, or the resin generated too much heat during curing (some fast-cure epoxies get quite warm). Use a slow-cure resin for delicate flowers.
Bubbles everywhere. You stirred too fast. Next time, stir slowly and let the mixture rest before pouring. You can also warm the resin bottles in a bowl of hot water before mixing — warmer resin is thinner and releases bubbles more easily.
Flower floated to the surface. You didn't wait long enough between the first and second pour. That gel period is what anchors the flower to the bottom.
Flowers That Work (and Ones That Don't)
Not all dried flowers perform equally in resin. Here's what experience has taught me:
- Best results: Pansies, violas, daisies, baby's breath, small ferns, individual petals from larger flowers, pressed leaves (maple, ginkgo, eucalyptus).
- Good with care: Small rosebuds (split them in half to dry faster), lavender sprigs, clover flowers.
- Avoid: Succulents (too thick, trap moisture forever), lilies (petals are too fleshy), anything with visible dewdrops or sap.
Flat, thin, and completely dry — that's the formula for a flower that looks good in resin.
Beyond Pendants: Other Projects to Try
Once you've nailed the basic pendant, the same technique applies to:
- Keychains — use a larger mold and embed a keychain finding.
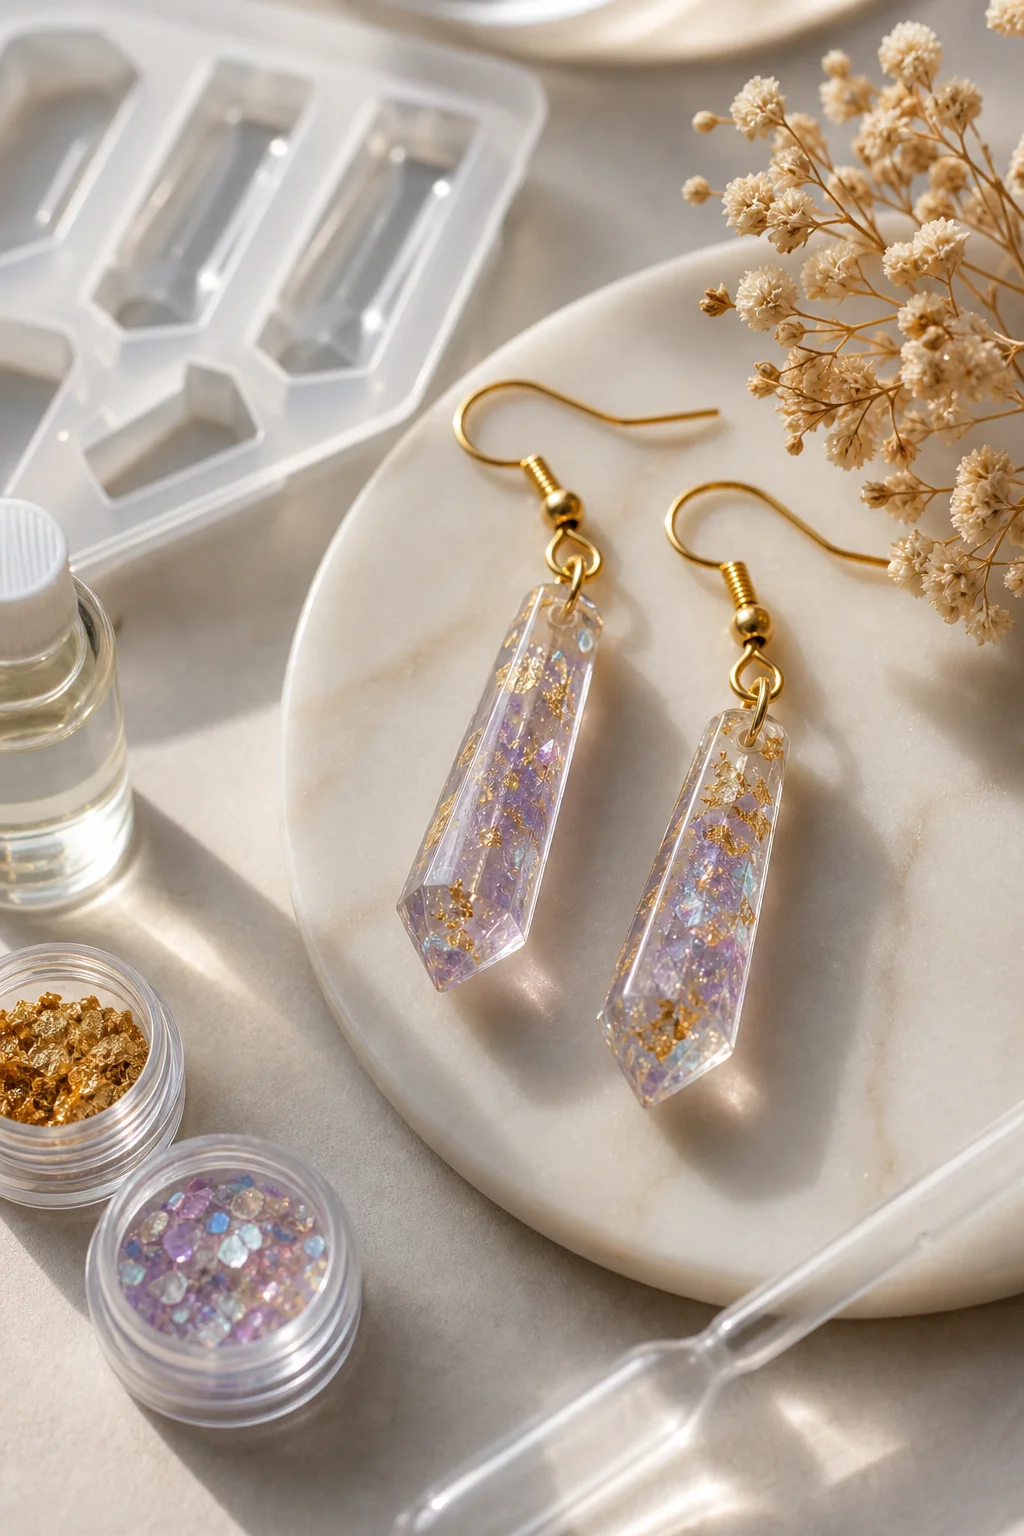
- Earrings — make two matching small pieces and attach earring hooks.
- Refrigerator magnets — glue a magnet disc to the back of any flat piece.
- Bookmarks — pour into a long rectangular mold with a tassel hole at one end.
Each project uses the exact same resin, the same drying process, and the same curing patience. The only variable is the mold shape.
Safety Basics
Epoxy resin is safe to use at home with a few basic precautions. Work in a ventilated room — open a window or run a fan. Wear gloves to keep resin off your skin. Don't eat or drink near your workspace until you've cleaned up. If you're sensitive to fumes, a basic paper mask rated for dust is sufficient; you don't need a respirator for the small quantities used in jewelry.
Uncured resin should go in the trash, not down the drain. It will harden in your pipes. Wipe mixing cups with paper towels before washing them. Cured resin scraps are inert and can go in regular garbage.
Keep resin and hardener bottles sealed when not in use. They last about six months once opened — after that, the resin yellows slightly and takes longer to cure. Date your bottles when you open them.
Building a Personal Collection
One of the quiet satisfactions of resin jewelry is building a collection that reflects the seasons. Press cherry blossoms in spring, daisies in summer, maple leaves in autumn, and small evergreen sprigs in winter. Each pendant becomes a timestamp of when it was made.
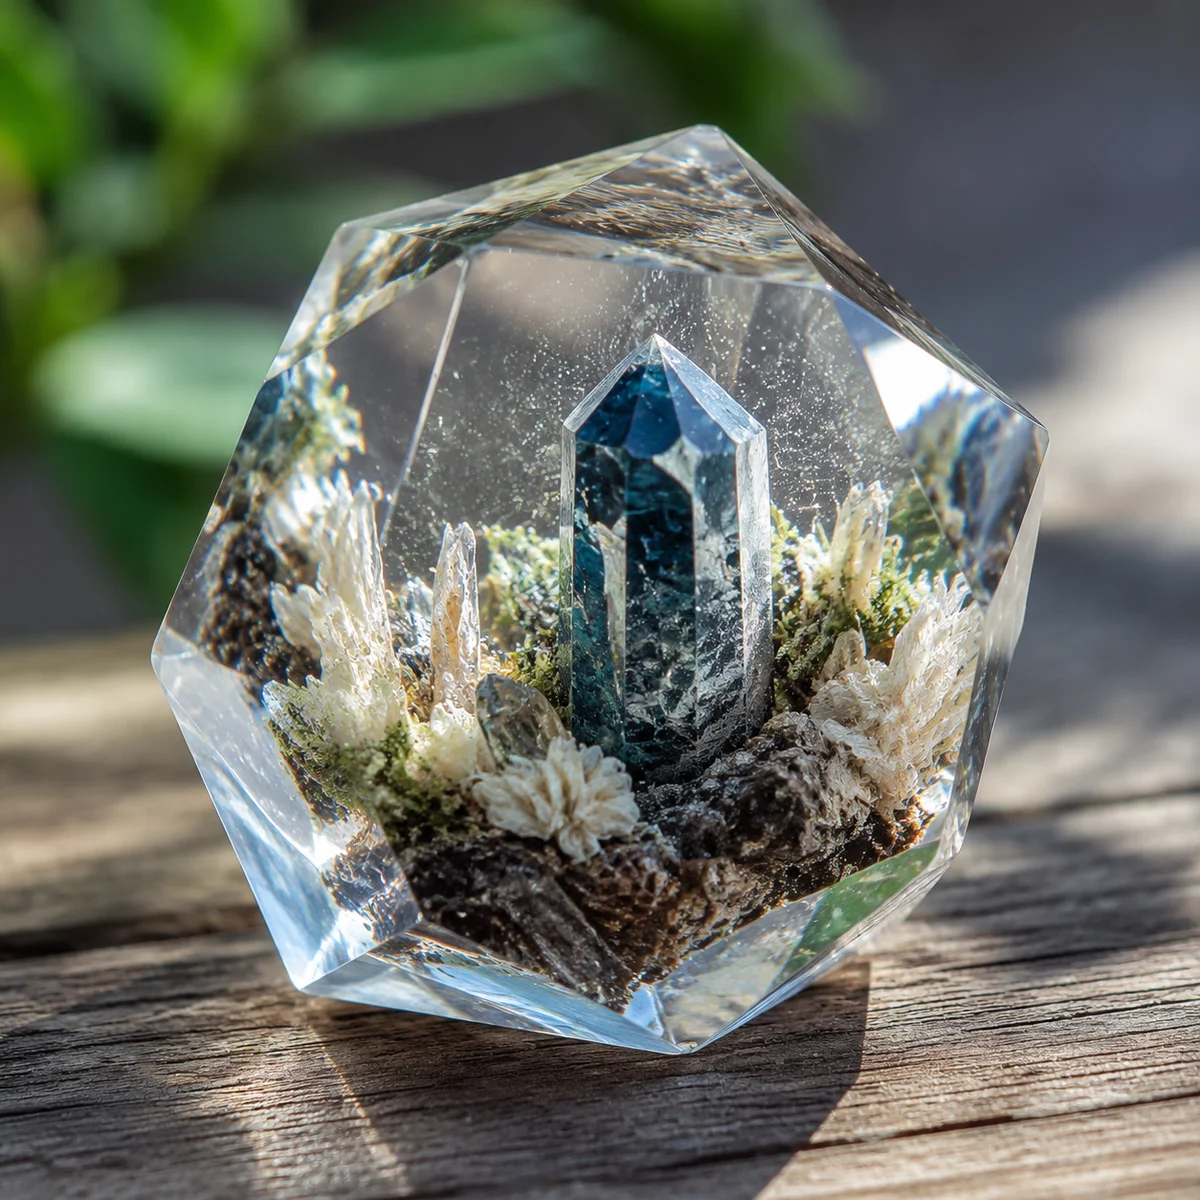
You can also embed other small items alongside flowers: a typed word on paper, a tiny photograph cut to size, a small feather, or even a pinch of glitter for a magical effect. The same embedding technique applies — first pour, place the item, wait, second pour.
Resin jewelry is one of those crafts where the first piece is genuinely usable. It might have a bubble or two, and the sanding might not be perfect, but you'll have a real, wearable thing that you made with your hands. And the second one will be better. By the fifth, you'll be giving them as gifts and having to explain that yes, those are real flowers.
Related Guides
- Colored Gemstones Buying Guide for Beginners
- Crystal Pricing: 7 Tricks Shops Use to Make You Overpay
- How to Clean Crystal Jewelry: A Complete Care Guide
- 15 Creative Ways to Display and Store Your Crystal Collection
- Crystal Shapes Explained: Tumbled, Raw, Points, Spheres
- Crystal Care 101: How to Clean, Store, and Protect Your Jewelry
- Complete Crystal Guide: Identification and Meanings
Frequently Asked Questions
How long do real flowers last inside resin jewelry?
Because epoxy resin seals the organic material away from air and moisture, your dried flowers will essentially last indefinitely inside the jewelry. As long as the resin piece remains intact and isn't exposed to prolonged direct sunlight or extreme heat, your beautiful floral captures will stay perfectly preserved and vibrant for generations.
Can you put fresh flowers directly into resin?
No, you should never put fresh flowers directly into resin. Fresh flowers contain natural moisture, which will react poorly with the resin and cause the pieces to rot from the inside out. You must thoroughly press and completely dry your botanicals for several weeks before encapsulating them to ensure a crystal-clear, long-lasting finish.
Why did my dried flowers turn brown in the resin?
Dried flowers typically turn brown when they retain too much hidden moisture or when the resin generates excessive heat during the curing process. To prevent this discoloration, ensure your flowers are completely dry before casting. Additionally, try pouring your resin in thinner layers to prevent the exothermic chemical reaction from burning the delicate petals.
Can I wear my resin flower jewelry in the shower?
While cured resin is technically water-resistant, it is highly recommended to remove your resin flower jewelry before showering or swimming. Prolonged exposure to hot water and harsh soaps can gradually degrade the jewelry's finish, making it look cloudy over time. Treat your handcrafted pieces with care to maintain their pristine, glass-like appearance.
How do you keep flowers from floating in resin?
To keep delicate dried flowers from floating to the top of your mold, try pouring your resin in two separate stages. Fill the mold halfway, let the resin cure until it reaches a thick, gel-like state, gently place your flower on top, and then pour the rest of the resin. This layering technique perfectly suspends your botanicals exactly where you want them.


Comments