How to Make Resin Jewelry at Home: A Complete Beginner's Guide
I still remember the first time I tried making resin jewelry. It was a rainy Saturday afternoon, and I'd just spent $40 on a "beginner kit" from a craft store. Three hours later, my kitchen table looked like a crime scene — sticky resin everywhere, bubbles in every piece, and a pendant that came out looking like a foggy window. I almost gave up. But something about the process hooked me. I watched a dozen YouTube videos, ordered better supplies, and tried again the next weekend. That second batch? Totally different story. Clean edges, crystal-clear pieces, and actually wearable pendants. Now, two years later, I've made hundreds of resin jewelry pieces — some for gifts, some I've sold at craft fairs, and a few I still wear every day. If you're reading this and feeling intimidated, trust me — I've already made every mistake for you. Let me walk you through how to make resin jewelry at home the right way, starting from scratch.
What You Actually Need (Not Just What the Kit Tells You)
Most beginner resin kits give you the bare minimum, and honestly, it's not enough to get good results. Here's what I recommend after a lot of trial and error:
The Resin Itself
Skip the craft store clearance stuff. After trying six different brands, I keep coming back to EasyCast Clear Casting Epoxy for beginners and ArtResin when I want a really crystal-clear finish. EasyCast is forgiving, cures in about 24 hours, and won't break the bank. ArtResin is pricier but gives you that glass-like clarity that makes jewelry look professional. For colored pieces, ProMarine Supplies makes a nice tinted resin that saves you a mixing step.
Molds
Silicone molds are non-negotiable. I use Let's Resin silicone molds — they're flexible, release easily, and come in shapes specifically designed for jewelry (pendants, earrings, bangles). Avoid hard plastic molds unless you enjoy prying stuck pieces out with a butter knife. If you want to make custom shapes, you can buy mold-making silicone and create your own from small objects — a shell from the beach, a vintage button, anything with an interesting shape.
Pigments and Inclusions
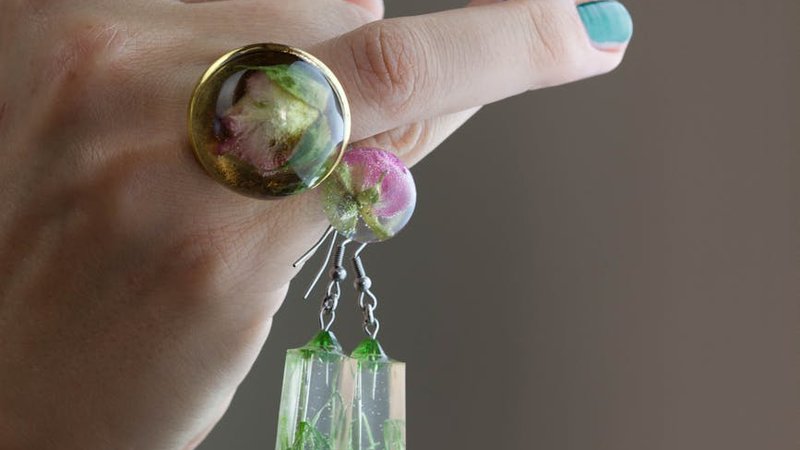
This is where the fun happens. For color, I love Mica powders from Eye Candy Pigments — a little goes a long way, and they create that gorgeous shimmer effect. Alcohol inks (I use Tim Holtz) give you transparent, watercolor-like washes. For inclusions — the little things you embed inside the resin — dried flowers from your garden work beautifully. So do small seashells, metal charms, glitter (the ultra-fine kind, not the chunky craft glitter), and even tiny printed photos sealed with Mod Podge. I once embedded a tiny four-leaf clover I found on a hike into a pendant, and it's still one of my favorites.
Tools You'll Thank Yourself for Buying
A kitchen scale (resin ratios need to be precise), silicone mixing cups (resin doesn't stick to them), wooden craft sticks for stirring, a heat gun or small butane torch for popping bubbles, nitrile gloves (latex can react with some resins), and wax paper to cover your work surface. Also grab some jump rings and jewelry findings — I get mine from a local bead shop, but Amazon has plenty of basic findings kits if you're just starting out.
Step-by-Step: Making Your First Piece
Step 1: Prep Your Workspace
Clear a table, cover it with wax paper, and open a window. Resin smells — not terrible, but you don't want to be breathing it in a closed room for an hour. Some people wear a respirator mask, and that's not a bad idea if you're sensitive to chemical smells. Lay out all your materials within arm's reach because once you start mixing, you're on the clock. Working time varies by brand, but you typically have 30–45 minutes before the resin starts getting thick.
Step 2: Measure and Mix
This is the step most beginners mess up. Read your resin's instructions carefully — the ratio matters. EasyCast is 1:1 by volume, which is forgiving. ArtResin is also 1:1. But some resins use different ratios (2:1, 3:1), and getting this wrong means your piece will either never cure or stay sticky forever. Use your kitchen scale for accuracy. Pour both parts into a silicone cup and stir slowly for at least 3 minutes. Scrape the sides and bottom. Don't rush this — thorough mixing is the difference between a piece that cures rock-hard and one that stays tacky in the center.
Step 3: Add Color
If you're using mica powder, add a tiny pinch and stir until fully dissolved. For alcohol ink, just a few drops — you can always add more, but you can't take it out. Want a marble effect? Add two colors and give a single gentle stir — don't overmix or you'll get mud. I like to do a test pour into a spare mold (or even a bottle cap) before committing to my actual piece, just to make sure the color looks right once it's in resin.
Step 4: Pour Into Molds
Pour slowly from a low height to minimize bubbles. Fill each mold about halfway if you're adding inclusions, place your dried flower or charm, then top it off. If you're doing a layered look — like ocean waves — pour one color, let it partially set for about 20 minutes, then pour the next layer on top. This creates that beautiful depth effect you see in high-end resin jewelry.
Step 5: Pop Those Bubbles
After pouring, you'll see tiny bubbles rise to the surface. Pass a heat gun or butane torch quickly over the surface — about 2–3 inches away, moving constantly. The heat makes the bubbles expand and pop. Don't hold it too close or too long in one spot, or you'll melt your silicone mold. Some people use a toothpick to manually pop stubborn bubbles, and that works too, just be careful not to disturb your design.
Step 6: Wait (The Hard Part)
Cover your molds with a cardboard box or plastic container to keep dust out, and leave them alone for at least 24 hours. Seriously, don't poke them. Don't pick them up to "check." Resin needs undisturbed time to cure properly. Temperature matters too — if your room is below 70°F (21°C), curing will take longer. I've had pieces take 48 hours in a cold garage during winter. Room temperature (72–78°F) is ideal.
Step 7: Demold and Finish
Once fully cured, gently flex the silicone mold and push the piece out from the back. If it sticks, pop it in the freezer for 10 minutes — the cold makes resin contract slightly and it'll pop right out. Sand any rough edges with fine-grit sandpaper (400 grit, then 800 grit for smoothness). If you want a super glossy finish, you can brush on a thin layer of clear resin as a top coat. Attach your jump ring with small pliers, add a chain or earring hook, and you're done.
Common Mistakes (And How to Fix Them)
In my first month of making resin jewelry, I probably ruined more pieces than I successfully finished. Here's what went wrong and what I learned:
Sticky, tacky resin that never fully cures. This is almost always a mixing ratio issue. Either you didn't measure precisely, or you didn't stir long enough. Unfortunately, there's no fix once it's poured — you'll need to scrape it out and start over. The good news is that uncured resin washes out of silicone molds with rubbing alcohol.
Bubbles everywhere. You didn't pop them after pouring, or you stirred too aggressively (whipping air into the mix). Fix: stir slowly, pour from low, and always use a heat gun. Also, if you're embedding porous materials like dried flowers, seal them first with Mod Podge or a spray sealer — they release tiny air bubbles into the resin as it cures.
Cloudy or yellowing resin. Cheap resin yellows over time, especially in sunlight. Using a UV-resistant resin like ArtResin helps. Also, store your finished pieces out of direct sunlight. If your resin is cloudy right after curing, it might be moisture — make sure your molds are completely dry before pouring, and work in a humidity-controlled environment if possible.
Resin stuck in the mold. Either your mold is too rigid, or you didn't use enough mold release spray. Quality silicone molds shouldn't need release spray, but if you're struggling, a light mist of Mann Ease Release spray works wonders. Don't use cooking spray — it leaves an oily residue on your finished piece.
Dome vs. flat surface. If you want a flat back on a pendant (so it sits nicely against skin), fill the mold slightly over-full and let it cure, then sand the back flat. Alternatively, pour resin into the mold, place a piece of clear acetate on top, and weight it down with something flat and clean. The acetate peels off easily once cured.
Leveling Up: Techniques That Look Professional
Once you've nailed the basics, here are some techniques that'll make your DIY resin jewelry look like it came from a boutique:
Petal and Flower Embedding
Pick small flowers, press them flat in a heavy book for 3–5 days, then seal both sides with Mod Podge before embedding. Without sealing, flowers can discolor or release moisture into the resin. I've found that pansies, daisies, and tiny rose petals hold their color the best. Avoid thick-stemmed flowers unless you're making chunky statement pieces.
Geode Effect
This is the trend that made resin jewelry explode on Instagram. Pour clear resin into a mold, let it set until it's the consistency of thick honey, then crush small crystals (amethyst, quartz — you can buy bags of chip stones cheap on Etsy) and press them along one edge. Fill the remaining space with tinted resin in a complementary color. The result looks like a tiny slice of crystal geode. It takes practice to get the timing right, but even imperfect attempts look stunning.
Alcohol Ink Swirling
Drop 2–3 colors of alcohol ink onto the surface of freshly poured clear resin, then use a toothpick or needle tool to create swirls. The inks spread and blend in unpredictable ways, so every piece is unique. Let the ink sit for about 30 seconds before swirling — this gives the colors time to develop and creates more interesting patterns. Seal with a thin top coat of clear resin once the ink layer is set.
Gold Leaf Accents
Real gold leaf (or imitation gold leaf, which is much cheaper and looks almost identical) adds an instant luxury feel. Tear small pieces and drop them onto the resin surface, then use a dry brush to gently press them into place. The irregular, organic edges of hand-torn gold leaf look way better than perfectly cut pieces. You can also use silver leaf, copper leaf, or variegated leaf for different effects.
Photo Jewelry
Print a tiny photo on regular paper (not photo paper — it's too thick), trim it to fit your mold, seal both sides with Mod Podge, let it dry completely, then embed in resin. I made a set of earrings with tiny photos of my cat and my mom absolutely lost her mind over them. It's a fantastic personalized gift idea.
Quick Tips I Wish Someone Told Me Earlier
Keep a dedicated set of tools just for resin work. Once resin cures on a mixing stick or cup, it's basically permanent — don't use your good kitchen stuff.
Work in thin layers rather than one thick pour. If your piece is deeper than half an inch, pour in two stages. Thick pours generate heat as they cure, which can cause cracking, warping, or even thermal shock (where the resin cracks from temperature differences between the surface and the center).
Save leftover resin in a separate cup. Once your main pieces are poured, use the leftovers to fill small molds — bottle caps, ice cube trays, anything small. You'll build up a collection of tiny pieces that are perfect for magnets, keychains, or mosaic-style jewelry.
Clean up spills immediately with rubbing alcohol and paper towels. Cured resin is a nightmare to remove from surfaces. I once got resin on my nice cutting board and spent an hour with sandpaper fixing it.
If you want to sell your pieces, photograph them in natural light on a clean white or light gray background. Good photos make a bigger difference than fancy packaging when it comes to selling handmade jewelry online.
Getting Started Is the Hardest Part
The truth about learning how to make resin jewelry at home is that the first few pieces will probably be imperfect. Mine were. Everyone's are. But resin is one of those crafts where you see dramatic improvement fast — like, within your first week of practice. The materials are affordable, the techniques are learnable, and the results are genuinely wearable art that you made with your own hands.
Start with a simple pendant. One color, one inclusion, one mold. Get comfortable with the mixing and curing process before you try geode effects or multi-layer designs. Build your skills one piece at a time, and before you know it, you'll have a jewelry box full of custom pieces and enough know-how to teach a friend.
If you're looking for more craft ideas and step-by-step project guides, explore our other resin jewelry tutorials and creative DIY projects. And if you make something you're proud of — share it. Some of the best techniques I've learned came from other makers posting their experiments online. The resin jewelry community is generous, creative, and always happy to help a beginner figure out why their piece turned out sticky (spoiler: it's the mixing ratio).
Now go cover that table, open that window, and start pouring. Your first piece is going to be imperfect, and that's exactly how it should be.
Comments