Resin Art Jewelry Projects: 5 Intermediate-Level Creations
After making probably two dozen basic resin pendants—clear, maybe a flower pressed in, maybe some glitter—I hit a wall. Everything started looking the same. My friends were polite about it, but I could tell they were thinking "oh, another one of those." I knew resin art jewelry had way more potential than what I was doing, but I had no idea where to start pushing past the beginner stage.
That's exactly what this article is about. Not your first resin coaster or your first simple pendant. This is for when you've got the basics down and you're staring at your supplies thinking "okay, now what?" I've been there, I made a lot of messes figuring it out, and I'm sharing everything I learned so you can skip the worst of the trial-and-error phase.
Upgrading Your Material Stash
The first thing that changed everything for me was realizing how much difference better materials make. When I started, I used the cheapest epoxy resin I could find on Amazon, and honestly, for basic stuff, that was fine. But once I started wanting to do layered effects, embed delicate items, and get crystal-clear results, I needed to rethink my supplies.
UV resin became my best friend for small pieces like earrings and rings. It cures in minutes under a UV lamp instead of 24 hours like epoxy, which means I can do multiple layers in a single afternoon. The trade-off is that it's thicker and slightly more expensive per volume, but for detailed work, the speed is worth it.
Then there's high-gloss UV resin, which cures with an almost glass-like finish. Regular resin can sometimes come out with a slightly matte look depending on your mold, but the high-gloss stuff is consistently shiny right out of the mold. I use it for pieces where I want that wet, dimensional look—especially for ocean-themed jewelry.
Colored UV resin saved me from the mess of mixing pigments. Pre-tinted resin in cobalt blue, emerald green, and ruby red gave me consistent colors without the guesswork. When I was mixing mica powder into clear resin, I'd inevitably add too much or too little. The pre-colored stuff is predictable.
Here's what else made it into my upgraded kit:
- Glow-in-the-dark powder — not the cheap craft store kind, but the strontium aluminate stuff that actually glows for hours
- Real metal leaf — gold, silver, and copper flakes that are thinner than tissue paper
- Dried flowers and botanicals — I buy these in bulk, specifically ones that are already flat and preserved
- Tiny seashells — like the ones you'd find in a craft store's wedding section
- Mica powder in unusual colors — aurora, duochrome, and interference pigments that shift color depending on the angle
Project 1: Ocean Wave Pendant
This was the first "next level" project I tried, and honestly it's still one of my favorites. The idea is simple—a pendant that looks like a tiny window into the ocean—but getting the layered effect right took some practice.
Start with a deep bezel pendant mold, the kind that's about 8mm deep. Mix a small amount of white resin and pour it into the bottom of the mold—this is your sandy base. While it's still liquid, sprinkle in a tiny pinch of fine sand (craft sand, not beach sand—beach sand has moisture and organic matter that can mess with curing). Let this layer cure completely.
Next, mix your blue gradient. I use three shades: a deep navy, a medium cobalt, and a light turquoise. The trick is to not fully mix them. Pour the navy first, then gently add the cobalt on top, and finish with turquoise at the surface. Use a toothpick to very lightly drag the colors together—you want soft transitions, not a fully mixed purple.
Before the blue layer fully sets, press in your tiny seashells and any dried seaweed or starfish you have. Position them so they look natural, like they settled onto the ocean floor. Then let everything cure.
The final layer is a thin coat of clear high-gloss resin over the top to create that "water surface" effect. This is what makes the pendant look three-dimensional, like you could reach in and touch the sand below. One mistake I made early on was making this top layer too thick—it distorted the view of everything underneath. Keep it at about 1-2mm max.
Pro tip: if you want whitecaps, wait until the top layer is partially cured (tacky but not wet) and use a toothpick to add tiny dots of white resin along the "wave" edges.
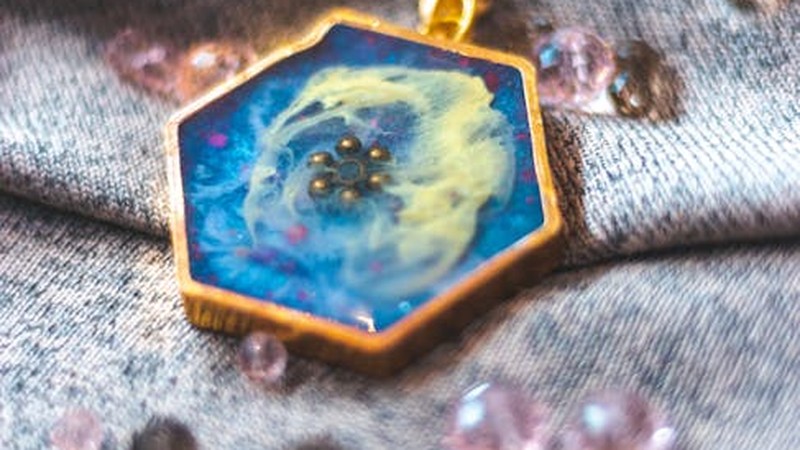
Project 2: Galaxy Earrings
Galaxy-themed resin art jewelry is everywhere online, and for good reason—it looks stunning when done right. The key that nobody mentions in most tutorials is that you need to work in very thin layers for this to work.
For galaxy earrings, I use small round or teardrop molds, about 15-20mm across. The base layer is deep purple—almost black with just enough purple pigment to show color. Let this cure fully. This dark background is what makes the galaxy elements pop.
For the "stars," I use two techniques simultaneously. First, I dust the surface with a tiny amount of glow-in-the-dark powder using a dry brush. Then I add scattered flakes of gold leaf. The combination of the glowing powder and the reflective gold creates a surprisingly realistic starfield effect.
Next comes the nebula effect. Mix a small amount of translucent blue resin and a small amount of translucent pink resin. Apply them in separate blobs across the surface, then use a toothpick to gently swirl them together. Don't overmix—you want distinct pink and blue areas with some blending at the edges, not a uniform lavender.
Here's where the glow powder really matters: after everything cures, charge the earrings under a bright light for a few minutes, then turn off the lights. The glow powder embedded in the dark base layer creates an actual glow effect that the translucent colored layers can't fully block. It's subtle but really beautiful.
Seal everything with a thin layer of clear resin. For earrings, I always add UV resin as the final coat because it cures hard and scratch-resistant, which matters a lot for something that's going to be worn daily.
Project 3: Photo Memory Bracelet
This one is personal. A friend asked me to make a bracelet using tiny photos of her grandmother, and I figured it was going to be straightforward. It wasn't. Getting clear, well-positioned images sealed in resin turned out to be one of the more technically demanding projects I've tried.
First, you need to print your photos at the right size. I use a regular inkjet printer on glossy photo paper, then cut them to fit inside my bezel bracelet blanks. The critical step that I learned the hard way: you have to seal the printed photos before embedding them in resin.
Why? Because resin can penetrate unsealed printer ink and make it bleed or blur. I seal each photo with two thin coats of clear acrylic spray, letting each coat dry completely. Then I apply a thin layer of Mod Podge or white glue on the back and press the photo into the bezel.
Once the photo is positioned and the glue is dry, pour a thin layer of clear resin over it. The first time I did this, I used too much resin and it lifted the photo off the bezel—ruining the piece. A thin layer, just enough to cover the surface, is all you need.
For the bracelet, I typically use 4-6 small bezels connected with jump rings. Each bezel can hold a different photo or a small keepsake item. I've done combinations where some bezels have photos and others have tiny dried flowers or a lock of hair—whatever is meaningful to the person.
The UV resin trick works well here too. After the epoxy layer cures, a thin UV resin topcoat gives the photos that domed, magnified look that makes custom photo jewelry look professional instead of homemade.
Project 4: Abstract Art Resin Rings
This project is where I started feeling like I was making actual art instead of just crafting. The concept is inspired by abstract paintings—layers of different colors that create depth and visual interest when viewed from different angles.
For rings, I use adjustable ring molds with a flat top surface about 10-12mm across. The process is entirely about layering and timing.
Start with a base color—let's say a solid crimson. Pour a thin layer and cure it. Then add a second color, maybe a gold or amber, but here's the technique: instead of pouring it evenly, apply it in a half-circle or crescent shape so part of the crimson base is still visible. Cure again.
Continue adding colors in partial layers. A streak of white. A splash of deep blue. Each layer should partially cover the previous one. After four or five layers, you'll have a miniature abstract composition that looks different from every angle.
One variation I love is adding a tiny drop of a contrasting color (like bright orange) on top of the final layer and using a needle to drag it into a thin line. This creates what looks like a brushstroke across the entire miniature canvas.
The curing time between layers is important. If the previous layer is still tacky, the new color will blend into it (which sometimes looks cool, but isn't what you want for sharp layers). If it's fully cured, you get clean separation. I aim for "firm but not rock hard"—usually about 3-4 hours with the epoxy I use, or you can speed this up with a warm desk lamp nearby.
Professional Techniques That Actually Matter
Layered Curing
Almost every advanced resin art jewelry project requires building up layers. The general rule I follow: each layer should be no more than 3mm thick. Thicker layers generate more heat during curing (exothermic reaction), which can cause warping, bubbles, or even cracking. Thin layers also give you more control over the final look.
Bubble Elimination
Bubbles ruined more of my early pieces than anything else. Here's what actually works, in order of effectiveness:
First, warm your resin before mixing. Cold resin is thick and holds bubbles. I sit my bottles in a bowl of warm (not hot) water for 10 minutes before I start. Second, mix slowly. Fast stirring whips air into the mixture. Fold the resin gently, scraping the sides and bottom, for at least 3 minutes. Third, after pouring, use a heat gun or kitchen torch on a low setting and pass it quickly over the surface. The heat causes bubbles to expand and pop. Be careful not to scorch the resin—a quick pass, not a sustained blast.
For UV resin specifically, a UV lamp with a built-in fan is worth the investment. The fan helps surface bubbles pop during curing.
Mold Release and Demolding
Nothing is more frustrating than a beautifully cured piece that won't come out of the mold. I use two approaches depending on the mold:
For silicone molds, I rarely use mold release—the flexibility of silicone usually allows clean demolding. I just wait until the resin is fully cured, then flex the mold gently while pushing from the back.
For hard plastic molds (which I actually prefer for rings because they give sharper edges), a light spray of mold release agent is essential. I've also heard of people using cooking spray in a pinch, and while it technically works, it can leave a greasy residue that affects how well subsequent resin layers adhere.
Sanding and Polishing
Raw demolded pieces almost always need some cleanup. I use wet sandpaper starting at 400 grit, working up through 800, 1200, 2000, and finally 3000. Each grit removes the scratches from the previous one. After 3000 grit, the surface should feel smooth but slightly cloudy.
For the final polish, I use a plastic polish compound (the kind meant for car headlights) applied with a soft cloth. Buff in circles for a few minutes and you'll get a glass-like shine. For small pieces like earrings and rings, this takes maybe 5 minutes per piece.
My Biggest Failures (So You Can Avoid Them)
The Mud Incident
Early on, I tried mixing blue and orange resin to create a sunset effect. Instead of getting a beautiful warm gradient, I got an ugly brownish-gray mud. What happened: complementary colors mixed together create muddy tones. The fix: never fully mix complementary colors. Either layer them without blending, or use an intermediary color (like yellow between orange and green) to bridge the transition.
Uneven Curing
I once made a thick bangle bracelet in a single pour. The outside cured fine, but the inside stayed sticky for days. This is because thick pours trap heat, and the outer layer cures first, sealing in the inner layer which then can't cure properly. The fix: pour in layers no thicker than 3mm, or use UV resin which cures uniformly regardless of thickness (within reason—still keep it under 5mm per pour).
The Stuck Mold Disaster
My worst moment was when I poured resin into a beautiful antique-style mold without any mold release. The piece cured perfectly... and would not come out. I tried freezing it, heating it, flexing it, prying it. Nothing worked. I ended up having to destroy the mold to get the piece out, and the piece itself was damaged in the process. Since then, I use mold release on every single pour, no exceptions.
Getting Started with Your Own Creative Resin Jewelry
If you're at that point where basic resin projects feel too easy, I'd suggest starting with the ocean pendant. It's forgiving, uses materials you might already have, and the result is genuinely impressive-looking. The galaxy earrings are a good second project because they teach you the importance of thin layers and background contrast.
Don't worry about having every fancy material right away. I built up my stash over months, picking up a new pigment or supply each time I ordered something else. The creative resin jewelry ideas you'll develop are more about technique than about having the most expensive materials. A well-executed two-color piece will always look better than a sloppy ten-color piece.
And keep your failures. Seriously. I have a small box of ruined pieces that I keep on my desk as reminders. Every one of them taught me something that I now do automatically. That's the real secret to moving beyond basics—you're not avoiding mistakes, you're just making them faster and learning from them sooner.
Comments