Essential Jewelry Storage Tips: How to Organize and Protect Your Collection
When I moved into my new apartment last year, I opened my suitcase and stared in horror. Every single necklace I owned had morphed into one giant, tangled mess. Three chains were knotted so badly I couldn't salvage them — I had to throw them out. My favorite pair of earrings? One was missing. A silver ring I'd barely worn had turned dark and spotty. That evening, instead of unpacking the rest of my boxes, I spent two hours researching how to actually store jewelry properly. I wish I'd done this years ago. Here's everything I've learned since then.
Why Jewelry Storage Actually Matters
Most people toss their jewelry into a drawer, a bowl, or the classic "everything box" and call it a day. I know I did. But here's what happens when you don't store things properly:
- Silver tarnishes fast — Exposure to air, humidity, and sulfur compounds turns silver dark and dull. The process accelerates dramatically when silver sits in a humid bathroom or an open drawer.
- Chains knot and break — Thin chains, especially delicate necklaces, tangle when they're piled together. The more they tangle, the more tension on the links, and eventually something snaps.
- Gemstones get scratched — Harder stones (diamonds, sapphires) will scratch softer ones (pearls, opals, turquoise) if they're all jumbled together. Even metal clasps and chains can scratch a polished gem surface.
- Stud earrings vanish — If there's no designated spot for them, they end up everywhere — on nightstands, in pockets, between couch cushions. And good luck finding the match once one disappears.
- Proper storage extends life significantly — I'm not exaggerating when I say good storage can add years to your jewelry. A silver necklace that would tarnish in weeks in an open dish can stay bright for months in a sealed bag with anti-tarnish paper.
The Golden Rule: Sort by Type and Frequency
Before buying any organizers, take everything out and sort it. I mean everything. Earrings from the junk drawer, the bracelet from your gym bag, the ring you took off to wash dishes and forgot about.
Sort by Type
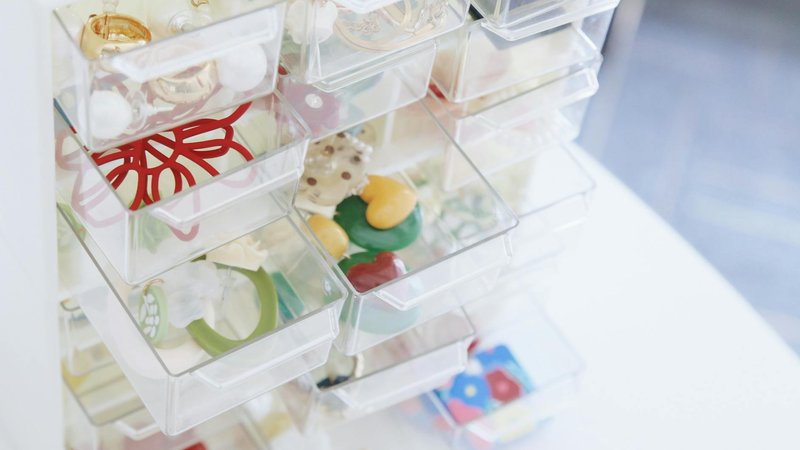
Separate into categories: necklaces, bracelets, rings, earrings, brooches, watches. Each type has different storage needs. Necklaces need to hang or lie flat individually. Rings do better standing up in slots. Earrings need paired storage where the two halves stay together.
Sort by How Often You Wear It
Within each category, create three groups:
- Daily wear — The pieces you grab almost every day. These should be the most accessible, ideally visible and easy to reach.
- Occasional — Things you wear once a week or for specific occasions. Still accessible but doesn't need prime real estate.
- Special occasion — Statement pieces, heirlooms, expensive items. Store these separately, ideally in their original boxes or padded cases. They need protection more than convenience.
Necklace Storage: The Tangle-Free Zone
Necklaces are the hardest thing to store well, and the easiest to ruin. Here's what actually works:
Hanging Is Everything
The single most important rule for necklaces: each one should hang independently. Hooks on a wall, a dedicated necklace tree, a pegboard — anything where chains don't touch each other. I installed a simple row of adhesive hooks inside my closet door, and it completely solved my tangling problem. Zero knots in over a year.
The Straw Trick
This one changed my life. Thread a necklace through a plastic drinking straw, then clasp it. The straw keeps the chain rigid and prevents it from tangling with anything else. This is especially brilliant for travel — I use this method every single trip now. Clear straws are ideal so you can see which necklace is inside.
Individual Zip Bags
For necklaces you don't wear often, put each one in a small zip-lock bag. Squeeze the air out and seal it. The bag protects against both tangling and tarnishing. It takes thirty seconds and saves so much frustration later.
What NOT to Do
Don't pile necklaces on top of each other. Don't hang them from a single hook where they'll intertwine. Don't toss them into a box "just for now." That "just for now" turns into a permanent tangled disaster every single time.
Ring Storage: Keep Them Standing
Rings are deceptively easy to lose and surprisingly hard to organize well.
Ring Trays with Compartments
A velvet or felt-lined ring tray with individual slots is the gold standard. Each ring gets its own space, and the soft lining prevents scratches. Look for one with enough depth — shallow slots mean rings can tip over and scratch each other.
Ring Stands and Trees
If you have a collection of rings you wear regularly, a ring tree or a tiered ring stand keeps them visible and accessible. These work best for rings without large gemstones that could snag on the posts.
Vertical Storage Beats Flat Storage
Standing rings up in individual slots is almost always better than laying them flat. When rings are flat, they slide around and can get scratched by neighboring pieces. Vertical storage keeps each one isolated.
Earring Storage: Never Lose a Pair Again
Stud earrings are the worst offenders for getting lost. Hoops get tangled. Drop earrings get bent. Here's how to handle all of them:
Earring Organizers with Pairs
Look for organizers specifically designed with paired holes or slots. This is non-negotiable if you wear studs. The two earrings need a designated shared space, or they will eventually get separated.
Ice Cube Trays
This is one of the best budget hacks I've found. A clean ice cube tray makes a perfect earring organizer — each compartment holds a pair, the tray is stackable, and you can see everything at a glance. A dollar store ice tray works just as well as a fancy organizer for this purpose.
Fabric Earring Holders
These are panels or rolls of fabric with rows of small slits. You push the earring post through the slit and secure it with the backing on the other side. Great for studs and small hoops, and they're visually appealing if you want to display your collection.
The Button Trick
Thread stud earrings through the buttonholes of large buttons to keep pairs together. It's free, it's simple, and it works surprisingly well for travel.
Bracelet and Bangle Storage
Bracelets are easier than necklaces but still benefit from individual storage.
Bangle Stands
Vertical stands with posts work beautifully for bangles. You slide them on and off the post, and they don't tangle because bangles are rigid. These also look great on a vanity or dresser.
Bracelet Bars
For chain bracelets, a horizontal bar or T-bar holder lets you drape each one separately. Simple, effective, and visually clean.
Repurpose a Paper Towel Roll
Slide bangles onto an empty paper towel or wrapping paper tube for storage or travel. It's ugly but incredibly functional, and you probably already have one lying around.
Travel Jewelry Storage
Travel is when jewelry damage happens most. Here's my tested system:
- Use a dedicated travel jewelry case — Not a Ziploc bag, not a sunglasses case, not your sock. Get something with compartments. Even a cheap roll-up organizer with a few pockets makes a huge difference.
- Pill organizers for studs — A weekly pill box with individual compartments is perfect for stud earrings. Each day slot holds one pair. They're cheap, secure, and keep pairs together.
- Straws for necklaces — I mentioned this already, but it bears repeating. Thread necklaces through straws for travel. Every time. No exceptions.
- Zip bags for everything else — Small individual zip bags for bracelets, larger ones for statement pieces.
- Never dump everything into one pouch — I've made this mistake and paid for it with ruined chains and scratched rings. Take the extra two minutes to separate things.
DIY Jewelry Storage Ideas
You don't need to spend a fortune. Some of the best organizers I've seen are homemade:
- Frame + hooks — Take an old picture frame, remove the glass, and attach small hooks or cup hooks to the inside. Hang necklaces from the hooks. It doubles as wall art and a functional organizer. You can add a piece of decorative fabric or lace behind the hooks for a finished look.
- Wine rack for bangles — A small wine rack with round bottle slots is basically a bangle organizer already. Slide bangles onto the pegs and you're done.
- Egg carton for rings — Clean out an egg carton and use each cup for a ring or small pair of earrings. It's not pretty, but it's free and works for temporary storage.
- Corkboard + pushpins — Mount a corkboard and use decorative pushpins to hang necklaces and bracelets. You can customize the layout however you want and add labels or paint sections for different categories.
Preventing Tarnish and Oxidation
Storage isn't just about organization — it's about preservation. Here's how to keep your pieces looking new:
Anti-Tarnish Paper
Anti-tarnish paper (also called anti-tarnish strips) absorbs sulfur compounds and moisture that cause silver to oxidize. Toss a small piece into each storage compartment or bag with your silver jewelry. Replace it every few months — they lose effectiveness over time. This single step has kept my silver pieces bright for months without any polishing.
Silica Gel Packets
Those little silica packets that come in shoe boxes and pill bottles? Keep them. Drop them into your jewelry boxes and storage bags to absorb excess moisture. They make a real difference, especially if you live in a humid climate.
Sealed Storage
Air is the enemy of silver and many other metals. The more you can limit air exposure, the slower tarnishing happens. Zip bags, airtight containers, and jewelry boxes with tight-fitting lids all help. For pieces you rarely wear, sealed storage is essential.
Keep Jewelry Out of the Bathroom
I know this is convenient — take off your jewelry before a shower, leave it on the counter. But bathrooms are humid, and humidity accelerates tarnishing, corrodes settings, and can damage certain gemstones. Move your jewelry storage to a bedroom or closet. Your pieces will last noticeably longer.
Special Care for Specific Materials
Not all jewelry can be stored the same way. Some materials have unique needs:
Pearls need to breathe. Never store pearls in airtight containers or plastic bags — they can crack and discolor without air circulation. Keep them in a soft pouch or a jewelry box with ventilation. Pearls also absorb moisture from your skin, so wear them regularly rather than storing them indefinitely.
Silver needs dry, airtight storage. Anti-tarnish paper in sealed bags is ideal. Polish regularly with a silver cloth — don't use toothpaste or baking soda, which are too abrasive and will scratch the surface over time.
Amber is sensitive to heat and chemicals. Store it away from direct sunlight and heat sources. Don't expose it to perfume, hairspray, or cleaning products. A soft cloth bag in a cool, dark drawer works well.
Opals contain water and can crack if they dry out completely. Store them in a slightly humid environment — not airtight and not bone dry. Some people keep a small piece of damp cotton near their opals (but not touching them directly) in the storage container.
Costume jewelry — plated metals and glued stones — degrades faster than fine jewelry. Keep it in separate compartments so the plating doesn't rub off and stones don't get knocked loose. Store pieces individually rather than stacking them.
Jewelry Storage by Budget
You can spend zero dollars or several hundred. Here's a realistic breakdown:
$0 — Pure DIY
Ice cube trays for earrings, pushpins in a corkboard for necklaces, egg cartons for rings, straws for travel. It's not glamorous, but it works. I used this system for six months before upgrading, and it solved 90% of my problems.
$10–$30 — Basic Organizers
At this price point, you can find felt-lined jewelry trays, small hanging organizers with clear pockets, simple necklace stands, and stackable earring organizers. Amazon has tons of options. Look for velvet-lined trays and acrylic organizers with individual compartments.
$50–$100 — Professional Jewelry Boxes
This is where you get lockable jewelry boxes with multiple drawers, ring rolls, necklace hooks built into the lid, and lined compartments for different types. If you have a medium-sized collection, this is the sweet spot. A good jewelry box in this range will last years and keep everything organized and protected.
$200+ — Custom Display Cabinets
Wall-mounted display cabinets with glass doors, LED lighting, velvet-lined drawers, and custom configurations. This is for serious collectors or people who want their jewelry to double as room decor. Beautiful, but overkill unless you have a large, valuable collection.
The System That Actually Sticks
Here's the thing about jewelry organization: the best system is the one you'll actually use. A $200 jewelry cabinet won't help if you keep tossing rings on the nightstand instead of putting them away. A free corkboard will work perfectly if you actually hang your necklaces on it every night.
My advice? Start simple. Use what you have — a few hooks, a small tray, some zip bags. Build the habit first, then upgrade the hardware. The habit of putting jewelry away properly, every single time, is worth more than any organizer you can buy. It took me losing three necklaces and watching my favorite silver ring turn black to learn this lesson. Don't wait for your own "tangled suitcase" moment.
Comments