Jewelry Soldering Basics: A Complete Beginner's Guide
The first time I tried to solder a simple silver ring, I melted through the entire piece. My silver turned into a blob, my solder flowed everywhere except where I wanted it, and I ended up with a $50 piece of scrap metal. I nearly gave up right then.
Soldering jewelry is one of the most intimidating techniques for beginners. The precision required, the heat, the tiny pieces — it seems like something only professional jewelers should attempt. But after thousands of hours of practice and teaching beginners, I've discovered that with the right setup, safety precautions, and understanding of the fundamentals, anyone can learn to solder jewelry.
Jewelry soldering isn't about being perfect. It's about understanding the physics of metal, heat, and flow. Once you grasp these basics, even your early attempts will be functional, and your skills will improve rapidly. Here's everything you need to know to get started with jewelry soldering.
Understanding Jewelry Soldering
Jewelry soldering is fundamentally different from other types of soldering. Unlike plumbing or electronics soldering, jewelry soldering:
- Uses tiny amounts of specialized silver solder
- Requires precise temperature control
- Works with precious metals like silver, gold, and platinum
- Demands clean, oxygen-free environments
- Requires specialized tools like torches, fluxes, and pickle solutions
Why Soldering Matters for Jewelry Making
Soldering allows you to:
- Connect multiple metal pieces into complex designs
- Repair broken jewelry without visible seams
- Add decorative elements to existing pieces
- Create hollow forms and bezels
- Set stones securely in place
- Join different metals and alloys
The Three Fundamental Types of Solder
Jewelry solder comes in three main types, classified by melting temperature:
- Hard solder: Highest melting temperature (around 1650°F/900°C). Used for the first soldering in multi-step processes. Creates strong, durable joints.
- Medium solder: Medium melting temperature (around 1325°F/720°C). Used for intermediate steps in multi-step soldering.
- Easy solder: Lowest melting temperature (around 1125°F/607°C). Used for the final soldering steps and repairs. Has the widest melting range, making it more forgiving for beginners.
Understanding these temperature ranges is crucial because you solder from hardest to easiest, working backwards through the melting points. This prevents earlier solders from re-melting when you apply heat for subsequent solders.
Essential Tools and Materials
Setting up your jewelry soldering station requires specific tools and materials:
Soldering Torch
Your torch is your most important investment:
- Butane torch: Portable, affordable, good for small pieces. The Cigar Master or similar micro-torches work well for beginners.
- Propane torch: More powerful, better for larger pieces and consistent heat. The Bernzomatic micro-torch is a popular choice.
- Oxygen/propane torch: Professional-grade, provides maximum control and temperature. Best for serious jewelers.
For beginners, a good butane torch is sufficient for most jewelry projects. Look for one with adjustable flame control and a stable base.
Heat-Resistant Surface
You need a surface that won't burn or reflect heat:
- Soldering bricks: Made from refractory materials, absorb heat well. Available in different sizes and thicknesses.
- Soldering blocks: Similar to bricks but with grooves for holding small pieces.
- Fiber blanket: Flexible heat-resistant material that can be shaped to hold pieces.
- Firebrick: Regular firebricks from hardware stores work well for beginners.
Never use wood, plastic, or thin metal surfaces for soldering. These can catch fire or reflect heat dangerously.
Flux
Flux is absolutely essential for successful soldering:
- Function: Prevents oxidation at high temperatures, helps solder flow evenly, and cleans metal surfaces.
- Types: Paste flux (most common for beginners), liquid flux, and flux pens. Paste flux is easiest to control and apply.
- Application: Apply a thin, even layer to all areas that will be soldered.
Never solder without flux. The metal will oxidize immediately at soldering temperatures, preventing proper solder adhesion.
Pickle Solution
Pickle removes oxidation and flux residue after soldering:
- Commercial pickle: Specialized solutions like Sparex or sodium bisulfate. Fast-acting and effective.
- DIY pickle: 1:1 ratio of vinegar and salt, with a dash of salt as a catalyst. Takes longer but works well for beginners.
- Copper pickle: Adding a copper wire to DIY pickle helps speed up the process.
Safety note: Always add pickle to water, never water to pickle. The reaction can be violent if done backwards.
Tweezers and Pick-up Tools
You need tools to handle hot metal:
- Soldering tweezers: Made from heat-resistant materials like stainless steel or brass. Regular tweezers will melt or conduct heat to your fingers.
- Crochet hooks or dental tools: Great for positioning small pieces and moving solder.
- Heat-resistant brushes: For cleaning flux and debris during soldering.
Safety Equipment
Safety is non-negotiable when soldering:
- Safety glasses: Must be worn at all times to protect from splashes and flying debris.
- Heat-resistant gloves: Leather or specialized gloves protect from burns and torch heat.
- Fire extinguisher: Class ABC fire extinguisher for general fire hazards.
- First aid kit: Including burn cream and sterile dressings.
- Good ventilation: Soldering creates fumes and can produce toxic gases.
Silver Solders
For sterling silver work, you'll need different types of solder:
- Silver hard solder: Contains more silver and copper, flows at higher temperatures.
- Silver medium solder: Balanced composition for general use.
- Silver easy solder: Contains more zinc, flows at lower temperatures, good for beginners.
- Wire solder: Comes in thin wire form for precise application.
- Solder sheets/pieces: Small cut pieces for larger soldering areas.
The Soldering Process: Step by Step
Step 1: Preparation
Before you even turn on the torch:
- Clean your metal: Polish all surfaces to be soldered with a fine abrasive or wire brush. Oil, dirt, or fingerprints prevent proper solder adhesion.
- Assemble your pieces: Fit pieces together precisely. If they don't match when cold, they won't match when hot.
- Apply flux: Use a small brush to apply flux to all soldering surfaces. Don't be stingy, but don't overdo it either.
- Set up your space: Have all tools within easy reach. Test your torch to ensure it's working properly.
- Check ventilation: Ensure good airflow in your workspace.
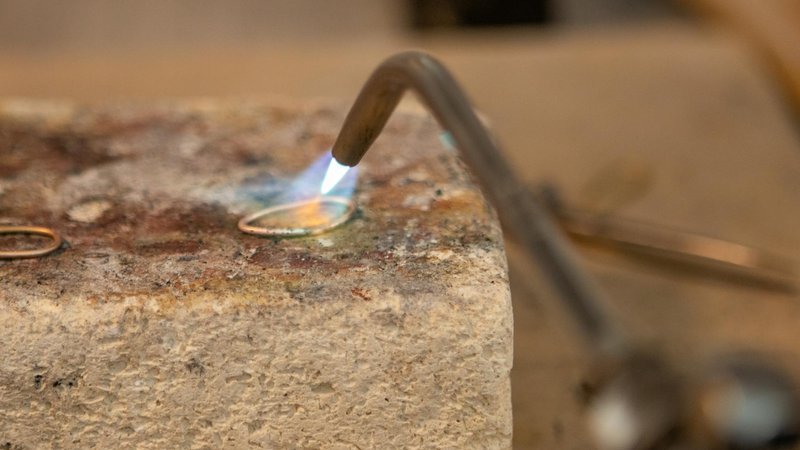
Step 2: Heat Management
Proper heating is the most critical skill:
- Keep moving: Move your torch in small circles rather than focusing on one spot. This prevents overheating.
- Heat the entire piece: Heat the surrounding metal as well as the joint area. The solder will flow toward heat, not just onto hot metal.
- Watch for color changes: As metal heats, it will change color through silver → straw → pink → red → orange → bright orange. The right temperature depends on your solder type.
- Use the pickle method: Occasionally dip pieces in pickle and observe where the flux stops bubbling. This shows you which areas are hot enough.
Step 3: Applying Solder
Once your pieces are heated:
- Position solder correctly: Place solder on the cooler side of the joint, not directly in the flame. The heat will draw the solder to the hottest point.
- Watch for flow: Solder should flow like water, not ball up. If it balls up, the metal isn't hot enough or the flux isn't working properly.
- Don't overheat: If the solder flows too quickly, you're applying too much heat. Move the torch away and let the piece cool slightly.
Step 4: Cooling and Cleaning
After soldering is complete:
- Let it cool naturally: Don't quench hot metal in water immediately. Let it cool to red-hot, then you can pickle it.
- Pickle the piece: Drop it in pickle solution for 5-15 minutes, depending on the amount of oxidation.
- Rinse thoroughly: After pickling, rinse with water to remove all pickle residue.
- Neutralize if needed: If using commercial pickle, neutralize with baking soda solution before final cleaning.
- Final clean and polish: Clean with a brass brush or ultrasonic cleaner if available.
Common Soldering Problems and Solutions
Solder Won't Flow
Causes and solutions:
- Metal not hot enough: Heat more thoroughly. Watch for the proper color changes.
- Dirty surfaces: Clean better before applying flux. Use fresh abrasive.
- Old solder: Use fresh solder. Solder can oxidize and lose effectiveness over time.
- Wrong flux: Ensure you're using jewelry-specific flux, not plumbing or electronics flux.
Solder Flows Everywhere
Causes and solutions:
- Overheating: Move torch away, let piece cool slightly. Use less heat.
- Too much solder: Use smaller pieces of solder. Apply it precisely where needed.
- Poor flux application: Apply flux more carefully to control solder flow.
- Dirty metal: Clean surfaces better to control exactly where solder goes.
Solder Balls Up
Causes and solutions:
- Metal too cold: Heat more thoroughly before applying solder.
- Solder touching flame: Position solder on cooler side, not in flame.
- Insufficient flux: Apply more flux to help solder flow properly.
Joint is Weak or Brittle
Causes and solutions:
- Incomplete solder penetration: Ensure solder flows completely through the joint.
- Wrong solder type: Use harder solder for structural joints, easier solder for decorative elements.
- Overheating: Excessive heat can make metal brittle. Heat just enough for solder to flow.
- Improper cleaning: Ensure surfaces are perfectly clean before soldering.
Specific Soldering Techniques
Joining Wire
Joining wire end-to-end is a fundamental skill:
- Cut wires perfectly square using a wire cutter or small saw 2. File ends smooth and flat 3. Apply flux to both ends 4. Heat both ends equally until they reach the right temperature 5. Touch solder to one end - it should flow to the hottest point 6. When solder flows, add a tiny bit more if needed 7. Let cool, pickle, and clean 8. File and sand the joint smooth
Sweat Soldering
Sweat soldering is used for setting stones and attaching decorative elements:
-
1. Cut bezel wire to length, file ends smooth
2. Solder bezel ends together using hard solder
3. File bezel smooth and check for roundness
4. Apply flux to bezel inside and stone setting area
5. Heat bezel until hot, apply solder to inside
6. Solder should flow along inside of bezel
7. Place stone inside, heat gently until solder flows around stone
8. Let cool, pickle, and clean
Tubular Soldering
Used for creating hollow forms and structural elements:
-
1. Cut sheet metal to desired shape
2. Bend into tube, leaving small gap
3. Apply flux to seam area
4. Heat evenly around seam
5. Apply solder to cooler end of seam
6. Heat until solder flows through entire seam
7. Let cool, pickle, and clean inside and out
8. File seam smooth
Multiple Soldering Steps
When doing complex pieces requiring multiple solders:
-
1. Plan your soldering order (hardest to easiest)
2. Use hard solder for first joints
3. Let each step cool completely before next
4. Clean flux residue between steps
5. Use medium solder for intermediate steps
6. Use easy solder for final details and repairs
7. Keep track of which solder type you're using
Safety Best Practices
Fire Safety
Soldering involves open flames and hot metal:
- Never leave torch unattended: Turn off torch when not in use, even briefly.
- Keep flammables away: Solvents, papers, and other flammables should be at least 10 feet from soldering area.
- Know your exits: Ensure clear paths to emergency exits.
- Have fire extinguisher handy: Place within easy reach of your workspace.
- Never use water on metal fires: Use Class D fire extinguisher for metal fires.
Burn Prevention
Hot metal and torches can cause serious burns:
- Always wear gloves: Use proper heat-resistant gloves when handling hot metal.
- Use proper tools: Never handle hot metal with bare hands or regular tools.
- Be aware of hot tools: Soldering tweezers, picks, and other tools get hot too.
- Work at proper height: Avoid reaching or straining, which can cause accidents.
- Have cool water ready: For immediate burn treatment.
Ventilation Health
Soldering fumes can be harmful:
- Work in well-ventilated area: Open windows or use exhaust fan.
- Never solder indoors without ventilation: Fumes from metal flux and solder can be toxic.
- Use respirator if needed: For frequent soldering or soldering with questionable metals.
- Know your materials: Some metals (especially lead-based) create toxic fumes when heated.
Beginner Projects to Practice
Simple Ring
Perfect for learning basic skills:
-
1. Measure and cut wire for ring size
2. File ends perfectly square
3. Apply flux to joint area
4. Heat until proper color appears
5. Apply solder, watch it flow
6. Shape ring on mandrel
7. File and sand smooth
8. Polish or finish as desired
Basic Pendant
Learn sweat soldering and decorative techniques:
-
1. Cut base metal to pendant shape
2. Cut decorative element to fit
3. Apply flux to both pieces
4. Heat base piece until hot
5. Apply solder to base piece
6. Place decorative element on solder
7. Heat until solder flows
8. Cool, pickle, clean
9. File edges smooth
10. Add bail for hanging
Simple Chain Making
Practice precision soldering:
-
1. Cut many jump rings to exact same size
2. Close most rings, leave one open
3. Apply flux to open ring and adjacent closed rings
4. Heat gently until solder flows
5. Repeat for each connection
6. When complete, pickle and clean thoroughly
7. Check each joint for strength
8. Polish final chain
Stone Setting Practice
Learn bezel making and stone setting:
-
1. Choose small, inexpensive stone for practice
2. Cut bezel wire to fit stone circumference
3. Solder bezel ends together with hard solder
4. File bezel smooth and check roundness
5. Solder bezel to base metal
6. Place stone in bezel, sweat solder in place
7. Clean bezel inside around stone
8. Polish and finish
Advancing Your Skills
Practice Regularly
Soldering is a skill that improves with practice:
- Start small: Practice with simple projects before attempting complex ones.
- Keep a journal: Record what worked and what didn't for future reference.
- Join communities: Online forums and local jewelry groups provide support and advice.
- Take classes: Local jewelry schools offer hands-on instruction and feedback.
Invest in Better Equipment
As you advance:
- Upgrade torch: Move from butane to propane for better temperature control.
- Add kiln: For annealing and heat-treating metals.
- Get pickle pot: Dedicated pickle pot with heater for faster cleaning.
- Add ultrasonic cleaner: For thorough cleaning of complex pieces.
Experiment with Different Metals
Expand your skills beyond silver:
- Gold soldering: Similar principles but requires higher temperatures.
- Base metal soldering: Copper, brass, and bronze have different requirements.
- Precious metal clay: Different techniques for working with metal clay.
- Alternative materials: Titanium, niobium, and other non-traditional metals.
Develop Your Style
Once you master the basics, develop your signature style:
- Experiment with textures: Use different soldering techniques to create textures.
- Try unconventional designs: Push boundaries while maintaining structural integrity.
- Combine techniques: Integrate soldering with other jewelry-making techniques.
- Focus on specific types: Specialize in certain styles like chains, rings, or art jewelry.
Troubleshooting Guide
Quick Reference Chart
Common problems and quick solutions:
| Problem | Quick Fix |
|---|---|
| Solder won't flow | Heat more, clean better, use fresh solder |
| Solder balls up | Heat more before applying solder |
| Joint is weak | Use harder solder, ensure full flow |
| Solder flows everywhere | Use less heat, more precise flux |
| Joint is discolored | Heat more evenly, avoid overheating |
| Solder doesn't stick | Clean surfaces better, apply flux properly |
Emergency Procedures
Be prepared for accidents:
- Small fire: Use fire extinguisher or baking soda. Never use water on metal fires.
- Burn: Run under cool water for 10-15 minutes, seek medical attention for serious burns.
- Inhaled fumes: Move to fresh air, seek medical attention if symptoms persist.
- Solder in eye: Flush with water, seek immediate medical attention.
Conclusion
Jewelry soldering is a challenging but incredibly rewarding skill. The first few attempts may be frustrating, but each solder joint teaches you something new about metal, heat, and patience. Remember that even professional jewelers have pieces that don't work out perfectly.
The key to success is understanding that soldering is a physical skill as much as a technical one. Your hands need to learn the feel of proper heating, your eyes need to recognize the right color changes, and your intuition needs to develop through experience.
Start with simple projects, practice regularly, don't be afraid to make mistakes, and gradually work your way up to more complex pieces. Within months, you'll be creating jewelry with strong, beautiful solder joints that would make any jeweler proud.
The beauty of soldering is that it transforms individual pieces into unified creations. Each solder joint represents not just metal joining, but skill, patience, and the alchemy of heat transforming raw materials into something new and beautiful. That's the magic of jewelry making.

Comments