Jewelry Packaging Ideas — How to Create an Unboxing Experience Customers Love
Full disclosure: I wrote this article with help from AI. The ideas and experiences shared here are my own, but AI helped me organize and polish the final version. That said, everything I'm about to share comes from real packaging experiments, real customer feedback, and way too many late nights cutting ribbon in my kitchen.
Why I Stopped Treating Packaging Like an Afterthought
When I first started selling jewelry on Etsy, I shoved everything into plain bubble mailers. Ring in a tiny ziplock, necklace coiled up with a twist tie, toss it in, seal it, ship it. Done. I thought the product was what mattered. The jewelry speaks for itself, right?
Then I started reading my reviews. Not the four and five-star ones where people say "beautiful!" — those are great, but they don't teach you much. I mean the ones where people specifically mentioned the packaging. Some said the box felt "special." Others said they loved the little thank-you note. One buyer even posted a photo on Instagram of her unboxing, and that post brought me twelve new followers in a week.
That's when it clicked. Packaging isn't just protection. It's your first physical conversation with a customer who's never met you. It's a marketing opportunity that costs almost nothing and reaches people you'd never find through ads.
I started paying attention to what other sellers were doing. I ordered jewelry from shops I admired just to see how they packaged things. I took notes. I made mistakes. I spent too much on fancy boxes that ate into my profit margin. I went too cheap and had customers complain their earrings arrived tangled. Eventually I landed on a system that works, costs me between $1.50 and $5 per package depending on what I'm sending, and consistently gets me compliments.
Here's exactly how I do it.
The Six-Layer System I Use for Every Order
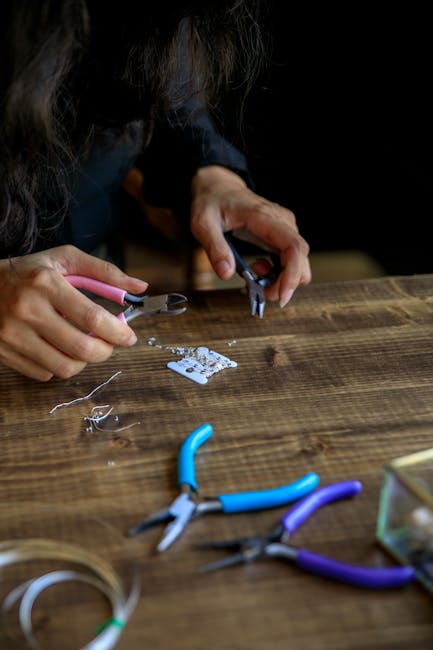
Layer 1: The Protection Layer
Before anything else goes into any box, every piece of jewelry gets slipped into a clear self-sealing poly bag. These cost almost nothing — maybe two cents each when you buy in bulk. But they serve a critical purpose: they keep tarnish away. Sterling silver, brass, even gold-plated pieces all oxidize when exposed to air and moisture over time. A sealed bag buys your customer weeks or months before any discoloration starts.
I buy anti-tarnish ziplock bags in three sizes: small for rings, medium for earrings and pendants, large for chunky necklaces. Nothing fancy. Just functional.
Layer 2: The Inner Box
This is where the experience starts to feel intentional. The sealed jewelry goes into something the customer actually opens — a small kraft paper box or a velvet pouch. I use both, depending on the piece. Rings and earrings get boxes. Necklaces and bracelets get pouches because they're easier to stuff into.
The boxes run me about $0.50 to $2 each depending on size and finish. Kraft paper boxes are cheapest. Black matte boxes with magnetic closures look premium but cost more. Velvet pouches with drawstrings sit somewhere in the middle. I chose a deep navy blue as my brand color, so most of my boxes and pouches are either navy or white with a navy ribbon tied around them.
Pick one or two colors and stick with them. Consistency is what makes people remember you.
Layer 3: The Filler
Ever opened a package and heard everything rattling around inside? That feeling instantly cheapens the product. I use colored paper shred or tissue paper to fill the empty space in the box so the jewelry sits snugly. No rattling, no sliding around, no damaged pieces.
Paper shred costs me about $0.10 to $0.30 per order depending on how much I need. I buy it in bulk from Amazon — just search "paper shred filler" and pick a color that matches your brand. I went with gold and white shred for contrast against the navy boxes. Looks clean and intentional.
Some sellers use crinkle cut paper, some use excelsior wood wool (the stuff that looks like tiny twigs), some use cotton. Whatever you pick, the goal is the same: keep the product from moving and make the box look full and considered.
Layer 4: The Thank-You Card
This is the cheapest layer and possibly the most impactful. I print small cards — about 2 by 3.5 inches, standard business card size — with a handwritten-style font that says something like "Thank you for supporting my small workshop. Every order means the world to me." On the back, I include a discount code for 10% off the next purchase.
The cards cost me around $0.10 to $0.20 each. I design them in Canva and print them at home on heavy cardstock. The handwritten font matters more than you'd think. It makes the card feel personal even though it's printed. Customers assume I sat down and wrote each one by hand. I won't tell them otherwise.
The discount code is the real hook, though. My return rate from repeat customers went from about 8% to 22% after I started including these cards. People see the code, think "I'll save that for later," and a surprising number of them actually come back and use it.
Layer 5: The Outer Box
The inner box (or pouch) gets placed inside a slightly larger rigid mailer box. This is your shipping container, and it serves two purposes: it protects everything inside from getting crushed, and it gives you another surface for branding.
I use rigid cardboard mailer boxes that cost $0.30 to $1 each. White boxes with a custom sticker on the outside. The sticker has my logo, my shop name, and sometimes a small tagline like "handmade with care." It costs me about $0.05 per sticker when I order 500 at a time.
If you're watching your budget, plain kraft boxes work fine. Just slap a sticker on it and call it a day. The rigid structure is what matters — you don't want the post office squishing your package flat.
Layer 6: The Outermost Layer
Finally, the whole thing goes into a poly mailer or a small corrugated box for the actual shipment. This is the layer the postal service sees, not the customer. I use white poly mailers with my return address printed on them. Cost is about $0.50 to $1.50 each.
For higher-value orders — anything over $80 — I upgrade to a corrugated box for extra protection. Fragile stickers on the outside, insurance on the shipping label. Better safe than explaining to a customer why their $150 bracelet arrived in pieces.
What This Actually Costs Me
Let me break down the per-order cost for a typical ring shipment:
Anti-tarnish bag: $0.02. Small kraft box: $0.50. Paper shred: $0.10. Thank-you card with discount code: $0.15. Outer mailer box: $0.35. Poly mailer for shipping: $0.50. Logo sticker: $0.05. Total: around $1.67.
For a premium necklace order, it goes higher. Velvet pouch instead of kraft box ($1.20), more filler ($0.25), larger outer box ($0.80), corrugated shipper instead of poly mailer ($1.20). That pushes it closer to $3.60.
Even at the top end, I've never spent more than $5 on packaging for a single order. When you're selling handmade jewelry at $25 to $100+ per piece, spending $2 to $5 on packaging that boosts your perceived value, generates social media posts, and drives repeat purchases is a no-brainer.
Three Things That Made My Packaging Feel "Branded"
Pick a Color Palette and Never Deviate
When I started, I used whatever boxes and ribbon I had on hand. Sometimes pink tissue, sometimes green, sometimes plain white. Nothing matched. My packaging looked like it came from three different shops.
I picked navy blue and gold. Everything — boxes, pouches, tissue paper, ribbon, stickers, thank-you cards — follows that palette. It sounds simple, but the effect is real. Customers started recognizing my packages before they even opened them. "Oh, I got a navy box, it must be from your shop!" That kind of recognition is worth more than any Facebook ad.
Custom Logo Stickers
I ordered 500 custom die-cut stickers with my logo for about $25 on Sticker Mule. That's five cents per sticker. I put one on every outer box, and sometimes an extra one loose inside the package as a little bonus. People love stickers. Some of them stick them on their laptops, their water bottles, their phone cases. Free advertising.
If Sticker Mule feels pricey, AliExpress has custom stickers for even less. The quality won't be quite as good, but for something that's going on a shipping box, it doesn't need to be museum-quality.
Ribbon or Twine on the Inner Box
A simple satin ribbon tied around the inner box in your brand color makes it feel like a gift. I buy spools of ribbon — 100 yards for about $8 — and cut a small piece for each order. Takes me maybe ten seconds per package. The visual payoff is huge.
Baker's twine works too, especially if your brand aesthetic is more rustic or natural. Jute twine costs even less. The point is to add one small tactile detail that makes the customer pause and think "someone put effort into this."
Where I Actually Buy My Packaging Supplies
Amazon is my go-to for small quantities. Search "jewelry packaging set" and you'll find bundled kits that include boxes, pouches, and filler all in matching colors. Good for starting out. Prices are reasonable but not the lowest.
For bulk orders, Uline is hard to beat on rigid mailer boxes and corrugated shippers. Their prices drop fast when you buy cases instead of individual packs. Shipping is fast if you're in the US. The downside is their website looks like it hasn't been updated since 2003.
AliExpress is where I go for the cheapest options. Velvet pouches, organza bags, small kraft boxes — you can get these for a fraction of Amazon prices if you're willing to wait two to three weeks for shipping. I usually order from AliExpress when I'm restocking non-urgent supplies and have some lead time.
Two Packaging Mistakes That Cost Me Sales
Over-Packaging
Early on, I went through a phase where I wrapped everything in tissue paper, then put it in a box, then put that box in another box, then tied a ribbon around the whole thing, then put it in a mailer. One customer left a review saying she felt guilty throwing away so much packaging. Another said the shipping cost seemed high because the package was bulky (it was — three nested boxes add up).
There's a line between "thoughtful" and "wasteful." Cross it and you annoy people. Keep your layers functional, not decorative for the sake of decoration.
Under-Packaging
The opposite mistake. I once shipped a pair of dangling earrings in just a regular envelope with a piece of cardboard for stiffness. They arrived bent. The customer was understanding but disappointed, and I had to send a replacement. Two shipping costs, one angry-ish review, zero profit on that order.
If someone pays $40 for a pair of earrings, they expect the packaging to reflect that value. A flimsy envelope doesn't say "handmade quality." It says "I didn't think this through."
The Bottom Line
Good packaging doesn't require a big budget. It requires consistency and intention. Spend $2 on a system that looks cohesive, includes a personal touch, and protects your work. You'll recoup that cost through repeat customers, better reviews, and the occasional social media post that does your marketing for you.
The first time a customer tags you in an unboxing photo, you'll understand exactly why this matters.
Comments