Jewelry Making for Beginners: Everything You Need to Know
I stumbled into jewelry making completely by accident. It was one of those late-night YouTube rabbit holes — you know, the kind where you start watching someone restore a vintage watch and two hours later you're watching a woman in her garage turn a pile of random beads into a stunning turquoise necklace. I was hooked. The next weekend I drove to Michaels with a vague idea and a $50 budget, and I walked out with a bag of supplies that I had absolutely no idea what to do with. That first "necklace" I made was genuinely terrible — uneven loops, tangled wire, a clasp that fell off the first time I wore it. But something about taking raw materials and turning them into something wearable just clicked with me. Five years later, I've made hundreds of pieces, sold at craft fairs, and even started a small Etsy shop. None of that would've happened if I'd known how overwhelming starting out can feel. So here's the guide I wish I'd had back then.
What You Actually Need to Start
The biggest mistake I see beginners make is buying too much stuff right away. You do not need a $300 toolkit, a soldering station, or a jeweler's bench to make your first piece of jewelry. You need maybe $40–50 worth of basic supplies and a clean section of your kitchen table.
Essential Tools
A good pair of round-nose pliers is non-negotiable. These are the pliers with tapered, cone-shaped jaws, and they're what you use to make loops in wire and headpins. Get a pair that feels comfortable in your hand — the cheap ones that come in craft store multipacks work, but they'll start hurting your fingers after an hour of use. Mid-range pliers from a brand like Beadalon or Wubbers are usually around $10–15 and worth every penny.
Chain-nose pliers (also called flat-nose pliers) are your second essential. These have flat jaws that taper to a point, and you'll use them for gripping wire, opening and closing jump rings, and flattening crimps. Same advice on quality — spend a little more upfront.
A pair of wire cutters rounds out the basic toolkit. Flush cutters are ideal because they cut wire flat on one side, leaving a smooth edge rather than a sharp point that'll snag on everything.
Beyond those three, grab a bead mat (a flocked surface that keeps beads from rolling away — around $5), some crimping pliers if you plan to make strung jewelry ($8), and maybe a small ruler with millimeter markings. That's genuinely it for tools.
Materials to Start With
For your first projects, buy a mixed pack of beads. Fire Mountain Gems and Rings & Things both sell beginner bead assortments for $10–15 that give you a nice variety of colors, sizes, and materials. Get one pack of glass or gemstone beads — avoid plastic beads, as they look cheap and won't teach you good technique since they're so lightweight.
You'll also need some beading wire (49-strand flexible beading wire in .018" diameter is a solid all-purpose choice), a package of crimp beads or crimp tubes, a clasp or two (lobster clasps are easiest for beginners), and some jump rings. A spool of 20-gauge craft wire is useful too — copper is cheap and great for practicing wire wrapping.
Total material cost: roughly $25–30. Add the tools and you're at about $50 for everything you need to make dozens of pieces. You do not need to spend more than this to get started. Seriously.
Three First Projects That Actually Turn Out Good
Don't start with something complicated. The goal of your first few projects isn't to make museum-quality art — it's to practice basic techniques and get a win that keeps you motivated. These three projects are forgiving, look great when finished, and teach you foundational skills.
Project 1: Beaded Stretch Bracelet
I know, I know — stretch bracelets sound like kid stuff. But hear me out. A well-made beaded stretch bracelet using 8mm gemstone beads is genuinely beautiful, comfortable to wear, and sells well at craft fairs. More importantly, it teaches you the most fundamental skill in jewelry making: consistent bead selection and pattern design.
Here's the process: cut a piece of elastic cord (1mm stretch cord is ideal) about 10 inches long. Tape one end to your bead mat so beads don't slide off. String your beads in a pattern you like — alternating colors, graduating sizes, or a simple repeating sequence. Wrap it around your wrist to check the fit. You want it snug but not tight — the beads should touch your skin but not indent it. Tie a surgeon's knot (basically a double overhand knot where you pass the cord through the loop twice), pull it tight, add a tiny drop of superglue on the knot, and snip the excess cord once the glue dries.
The whole thing takes maybe 15 minutes once you get the hang of it. Make five of these in an evening and you'll have gifts for half your family.
Project 2: Wire-Wrapped Ring
Wire wrapping is where jewelry making starts to feel like a real craft, and a simple wire-wrapped ring is the perfect introduction. You need a 20-gauge craft wire (copper or silver-plated), a bead with a hole large enough for the wire to pass through twice (a 6mm or 8mm round bead works great), and your round-nose and chain-nose pliers.
Cut about 12 inches of wire. Thread the bead onto the center of the wire. Hold the bead against the wire about two-thirds of the way from one end — this is the top of your ring, where the bead will sit. Wrap the long end of the wire around your ring mandrel (or any round object close to your ring size — a marker, a thick dowel, even a chapstick tube in a pinch) three times to form the ring band. Bring the wire back up through the bead. Wrap the short end of the wire around the base of the bead a few times to secure it. Trim and tuck in the wire ends with your chain-nose pliers.
Your first one will probably look a little wobbly. That's fine. Make five more and you'll see dramatic improvement. By the tenth one, you'll be making rings that people genuinely compliment.
Project 3: Drop Earrings
Earrings are fantastic beginner projects because they're small, quick, and don't require a lot of materials. A simple pair of drop earrings teaches you how to make wrapped loops — one of the most important and frequently used techniques in all of jewelry making.
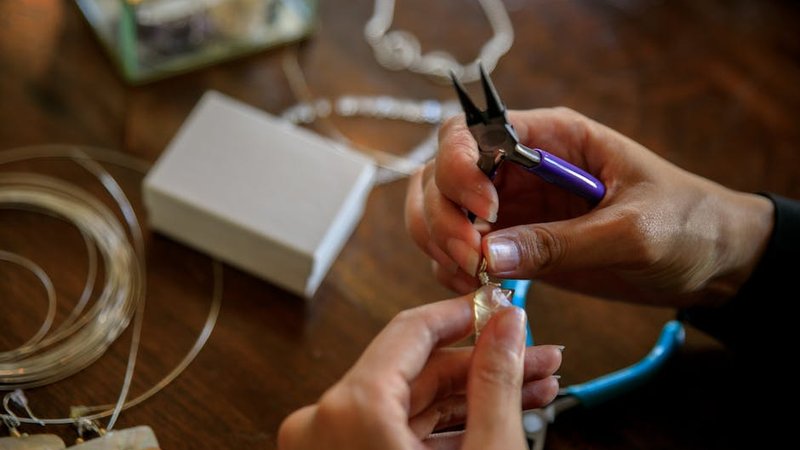
You need two headpins (thin wire with a flat end), two ear wires, and two small beads. Slide a bead onto each headpin. Grab the wire just above the bead with your round-nose pliers and bend it to a 90-degree angle. Reposition the pliers so the bend sits in the jaws, then wrap the wire over the top jaw to form a loop. Wrap the tail of the wire around the neck (the straight section between the loop and the bead) two or three times. Snip the excess and use your chain-nose pliers to tuck in the sharp end. Open the loop of an ear wire, attach your beaded drop, and close it.
Wrapped loops are genuinely tricky at first. The wire wants to be awkward, the loops come out different sizes, and you'll probably mangle a few headpins. Push through it. Once you can make a clean wrapped loop, a huge portion of jewelry making opens up to you — pendants, charms, chain tassels, rosary-style designs. It's a foundational technique that pays off forever.
Where to Learn (For Free)
You don't need to pay for classes to get started. There's an incredible amount of free instruction available online, and honestly, some of it is better than what you'd get in a paid beginner workshop.
YouTube is your best friend here. Channels like "Potomac Beads," "Wyatt White," and "Made by Mommy" have hundreds of free tutorials ranging from absolute beginner to advanced. Search for "beginner wire wrapping tutorial" or "basic beaded necklace" and you'll find dozens of well-produced, step-by-step videos. Watch them at 0.75x speed the first time through so you can follow along.
Pinterest is surprisingly useful for project inspiration. Search "easy jewelry DIY" and you'll find thousands of photo tutorials. The quality varies wildly, but it's great for getting ideas and seeing what's possible with basic techniques.
For written instruction, Fire Mountain Gems has an extensive free resource library on their website. Their "Gallery of Designs" section includes free patterns with detailed instructions and supply lists. Rings & Things has a similar resource section. Both are much more reliable than random blog posts.
If you want something more structured, check your local library. Most public libraries carry at least a few jewelry making books, and the fundamentals haven't changed much — a book from 2010 is still perfectly relevant for basic techniques.
Common Beginner Mistakes (I Made All of Them)
Buying too many supplies at once. I spent $200 on my first trip to the bead store and half of that stuff sat in a drawer for two years. Start with the basics I listed above. Add tools and materials as you need them for specific projects. Your toolkit will grow naturally.
Using the wrong wire gauge. This one caused me so much frustration. Wire gauge numbers are counterintuitive — a higher number means thinner wire. For most beginner projects, you want 20-gauge or 22-gauge wire. Thinner wire (24-gauge, 26-gauge) is too delicate for structural elements and will bend out of shape. Thicker wire (18-gauge, 16-gauge) is harder to work with and requires better tools. Stick with 20-gauge until you're comfortable.
Not using a bead mat. Sounds minor, but trying to work beads on a bare table or, worse, a plate or towel, is a nightmare. Beads roll everywhere. The $5 bead mat is one of the best investments you'll make.
Skipping the practice. Everyone wants to make a beautiful finished piece on their first try. That almost never happens. Make ugly practice pieces first. Use cheap copper wire and glass beads to practice loops, wraps, and knots. Once the technique feels natural, switch to better materials for your "real" pieces.
Not finishing properly. The difference between amateur and professional-looking jewelry often comes down to the little details — tucking in wire ends so they don't scratch the wearer, using crimp covers to hide crimp beads, giving pieces a final wipe with a jewelry polishing cloth. These 30-second finishing steps make a huge difference in how your work looks and feels.
From Hobby to Side Hustle
If you've been making jewelry for a few months and your friends keep asking where you bought your earrings, you might be ready to start selling. The barrier to entry for a small jewelry business is remarkably low.
Start locally before going online. Craft fairs, farmers' markets, and holiday bazaars are the easiest way to start selling. Booth fees are usually $25–75, and you get immediate feedback from real customers. Price your work at 2x–3x your material cost to start — this accounts for labor and leaves room for show fees and occasional discounts.
When you're ready to sell online, Etsy is still the most accessible platform for handmade jewelry. The listing fees are low (20 cents per listing), the audience is already there, and the setup process is straightforward. Take good photos — natural light, a plain background, and a sense of scale so buyers can see the actual size. Write honest descriptions that mention the materials you used and the dimensions.
Instagram is the best free marketing tool for jewelry makers. Post photos of your work, behind-the-scenes process shots, and short videos of you making pieces. Use relevant hashtags and engage with other jewelry makers in the community. It takes time to build an audience, but it costs nothing beyond your time.
Keep your day job expectations reasonable. Most jewelry side hustles make a few hundred dollars a month at first, not thousands. But if you enjoy the process, keep improving your skills, and consistently put your work out there, it can grow into something genuinely significant. I know makers who started exactly where I did — kitchen table, $50 in supplies, zero experience — and now run full-time jewelry businesses with six-figure revenue. It doesn't happen overnight, but it absolutely happens.
The most important thing is to just start. You're going to make ugly jewelry at first. Everyone does. The gap between "beginner who just started" and "person making things they're proud of" is maybe 20–30 hours of practice. That's a couple of weekends. Grab some pliers, some beads, and give yourself permission to make something imperfect. The beautiful stuff comes later, and it comes faster than you'd think.

Comments