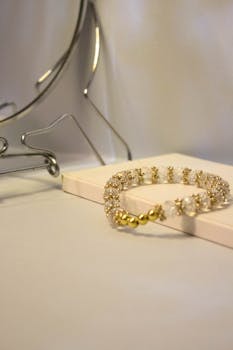
How to String a Beaded Crystal Bracelet
I made my first beaded bracelet in about 15 minutes and wore it for exactly two days before the elastic snapped and beads scattered across my kitchen floor. That's the most common outcome for first-timers who skip a few critical steps. The good news: once you learn the right technique — specifically the knot and the glue application — a well-made elastic bracelet lasts months to years of daily wear. I've had one on my wrist continuously for eight months now with zero issues. Here's the full process.
Materials and where to buy them
You don't need much. The total cost for a single bracelet runs $3 to $8 depending on the beads you choose.
Elastic cord: This is the stretchy string that holds everything together. Use 0.5mm to 0.8mm diameter — 0.7mm is the sweet spot for most 8mm bead bracelets. Thinner cord breaks. Thicker cord won't fit through small bead holes. Stretch Magic (clear) and Powercord (black or clear) are the two most reliable brands. Both cost about $4 to $6 for a spool that makes 20 to 30 bracelets. Avoid cheap unbranded elastic from dollar stores — the stretch recovery is terrible and it snaps within days.
Stone beads: 8mm round beads are the standard size for adult bracelets. They produce a bracelet with roughly 20 to 22 beads for an average wrist. Stone beads (made from actual quartz, amethyst, tiger's eye, etc.) are heavier than glass or acrylic beads, which matters for how the bracelet drapes on your wrist. A 100-bead strand of 8mm natural stone beads costs $8 to $25 depending on the material. Agate and quartz are on the cheaper end. Larimar, sugilite, and high-grade turquoise are on the expensive end.
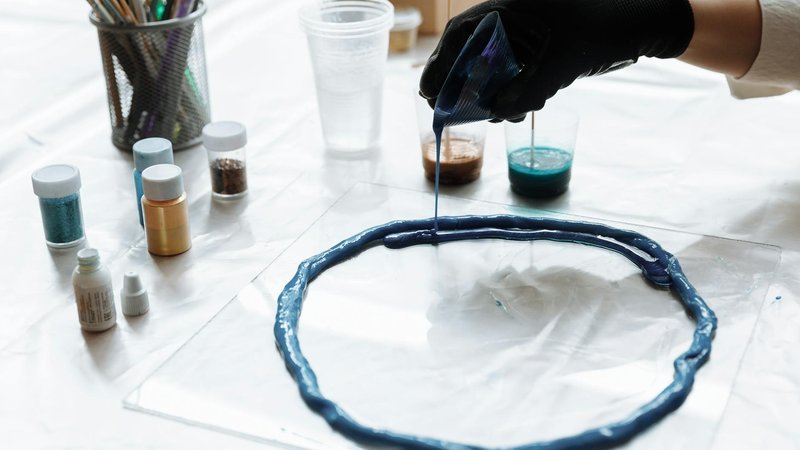
Glue: You need a tiny amount of superglue or jeweler's cement to secure the knot. G-S Hypo Cement is the gold standard for jewelry — it has a precision tip and doesn't cloud or discord beads. Super Glue Gel also works but is harder to apply precisely. Whatever you use, make sure it dries clear. Avoid krazy glue formulations that turn white or yellow over time.
Other tools: A bead mat ($3 to $5) keeps beads from rolling away while you work. Small scissors or nail clippers for trimming cord. A beading needle (optional but helpful if bead holes are tight). Tape — regular scotch tape — to hold one end of the cord while you string.
Measuring your wrist
Wrap a flexible measuring tape snugly around your wrist bone — the bony bump on the inside of your wrist. Note the measurement, then add roughly 1 inch (2.5cm) of ease. This accounts for the fact that the beads need to stretch slightly to slide over your hand.
For example: my wrist measures 6.5 inches. I add 1 inch for ease, giving me a target bracelet length of 7.5 inches. With 8mm beads, that's about 23 to 24 beads. I usually string 24 and adjust by removing one if it feels too loose.
For a tighter fit (bracelets that don't spin around on your wrist), add 0.75 inches instead of a full inch. For a looser, relaxed fit, add 1.25 inches. The standard 1 inch works for most people.
If you're making bracelets as gifts and can't measure the recipient's wrist, 7 to 7.5 inches fits most adult women, and 8 to 8.5 inches fits most adult men. These are rough averages — there's no substitute for an actual measurement.
Stringing technique
Cut a length of elastic cord about 8 to 10 inches long — substantially longer than the finished bracelet. You need the extra length to work with when tying the knot at the end.
Tape one end of the cord to your work surface (a table, or the edge of your bead mat) with the sticky side of the tape facing up so it holds the cord flat. This prevents beads from sliding off the bottom end while you're threading from the top. Some people use a binder clip instead of tape. Either works.
Start threading beads onto the loose end of the cord. Slide each bead all the way down to the taped end. Take your time here — the stringing process is where you decide the visual pattern of the bracelet.
Bead arrangement ideas
Random mix: Dump 3 to 4 different bead types into a bowl and string them in whatever order you pull them out. This creates a casual, organic look that's hard to mess up. It's the fastest method and the most forgiving of imperfect bead selection.
Gradient: Arrange beads from light to dark (or one color transitioning to another). This requires sorting your beads first but produces a polished, intentional result. Works well when you have multiple shades of the same stone type.
Pattern repeat: Alternate between two or three bead types in a fixed sequence — A-B-A-B-A-B, or A-B-C-A-B-C. This creates a structured, geometric look. It's the most time-consuming to set up but the most visually consistent when done right.
Accent placement: String mostly one type of bead (say, matte black onyx) with a single contrasting bead (like a gold spacer or a bright carnelian) placed at specific intervals — every 5th bead, for example. This draws the eye to those accent positions.
After stringing all your beads, hold both ends of the cord and gently stretch the bracelet a few times. This pre-stretches the elastic so it doesn't loosen up excessively after the first few days of wear. Don't pull hard enough to break anything — just a gentle, even tension.
The knot — this is the part that matters most
Remove the tape from the first end. Hold both cord ends together so the bracelet forms a complete circle with no slack. You're going to tie a surgeon's knot, which is more secure than a regular square knot and resists slipping under tension.
A surgeon's knot is essentially a square knot with an extra wrap on the first throw. Here's how to tie it:
Cross the right cord over the left cord, then wrap the right cord around the left cord twice (instead of once, like a regular knot). Pull tight. Then cross the left cord over the right cord and wrap it around once. Pull tight again. The double wrap on the first throw is what makes this knot resistant to slipping — the extra friction keeps it locked in place even when the elastic is stretched.
After tying the knot, pull both cord ends firmly to cinch it down. The knot should sit between two beads, not on top of one. If the knot lands on a bead hole, the bracelet will have a weak point where the cord is visible and exposed.
Now apply a tiny drop of glue directly onto the knot. "Tiny" is critical — a drop the size of a pinhead. Too much glue spreads onto the adjacent beads and makes a visible, crusty mess. Use the precision tip of G-S Hypo Cement or the fine point of a toothpick to apply the glue. Let it dry for at least 5 to 10 minutes (follow the glue manufacturer's recommendation).
After the glue dries completely, trim the cord ends with scissors or nail clippers. Cut as close to the knot as possible — leave about 2mm of tail. If you cut too close, you risk cutting into the knot itself. If you leave too much tail, the ends stick out visibly between beads.
Work the trimmed knot through the hole of the nearest bead by gently pushing it with your fingernail or a beading needle. The knot should disappear inside the bead hole, hidden from view. This is why you want to tie the knot between two beads that have slightly larger drill holes — it's easier to tuck the knot away.
Bead size guide
6mm beads produce a delicate, understated bracelet with roughly 28 to 30 beads for a 7-inch wrist. They work well for small wrists, children's sizes, or when you want a subtle look. The smaller bead size means more individual stones are visible, which can look busy with too many different stone types.
8mm beads are the default for adult crystal bracelets. They're chunky enough to show stone detail but not so large that the bracelet feels cumbersome. About 22 to 24 beads per 7-inch bracelet.
10mm beads create a bold, chunky statement piece. Only 16 to 18 beads needed per bracelet. These work best with single-stone designs or two-stone combinations. With too many different bead types at 10mm, the bracelet looks cluttered. Note that 10mm stone beads are significantly heavier — the bracelet will have noticeable weight on your wrist.
Troubleshooting common problems
The cord snapped while stretching: Your cord is too thin for the bead weight, or it's old and degraded. Stone beads are heavy — 8mm quartz beads weigh about 3 to 4 grams each, so a 22-bead bracelet carries 66 to 88 grams. That's real weight pulling on the elastic every time you stretch it over your hand. Upgrade to 0.8mm cord for heavy stone beads.
Bead holes are too small to thread: This is maddeningly common with some stone beads. Try using a beading needle (a thin flexible wire with a collapsible eye) — thread the elastic through the needle eye, then use the needle to pierce through the bead. Alternatively, ream the bead holes slightly wider with a bead reamer tool ($5 to $10). Some people also report success dipping the cord end in clear nail polish, letting it dry into a stiff point, and using that as a self-made needle.
The knot keeps slipping: You're tying a regular square knot, not a surgeon's knot. Or you're not pulling it tight enough before gluing. The double-wrap on the first throw is essential — without it, the knot will gradually loosen as the elastic stretches and contracts during daily wear. Also, make sure you're using enough glue and letting it fully cure before wearing.
The bracelet is too loose after a few days: Elastic cord stretches permanently with use. Pre-stretching (mentioned above) helps, but some stretching is inevitable. If you find your bracelets getting loose over time, make the next one 0.25 inches shorter than your target length. The tension will be slightly snug when you first put it on but will settle into a comfortable fit after a day or two.
Beads are cracking or chipping: This happens with brittle stones (like turquoise, malachite, or some quartz varieties) when the bead holes are drilled too close to the surface. Not much you can do about it — it's a manufacturing defect in the beads. Buy from suppliers who specifically mention "quality drilled" or "full-drilled" beads, which have holes centered in the bead with adequate wall thickness.
Making beaded crystal bracelets is genuinely one of the most accessible jewelry crafts. The startup cost is under $20, the learning curve is maybe 2 to 3 bracelets, and the results are wearable from day one. Once you nail the surgeon's knot and the glue application, you can produce consistent, durable bracelets in about 10 minutes each. I've made over 50 at this point, and the process is almost meditative — pick your colors, find a pattern, string them up, tie the knot. Simple, repetitive, and satisfying.
Comments