How to set a cabochon in a bezel setting
A bezel setting is a thin strip of metal folded over the edge of a cabochon stone, holding it in place. It is one of the oldest stone-setting methods in jewelry making — goldsmiths were doing this before soldering irons existed, using nothing but heat and hammers. The modern version is not much more complicated: you form a metal collar, solder it shut, seat the stone, and push the collar over the edge.
This guide walks through the process for a basic cabochon pendant. I am assuming you have basic soldering skills — you can light a torch, heat metal until solder flows, and not burn your house down. If you have never soldered before, practice on scrap copper wire before attempting this with your actual stone and silver.
Materials you need
The cabochon. A flat-backed, domed-top stone. Oval is the easiest shape for beginners because it has no sharp corners to negotiate. Round works too. Start with a stone between 10mm and 18mm across. Larger stones cost more and leave more room for error. Smaller stones are fiddly and require finer control than beginners usually have.
Bezel strip or bezel cup. You have two options. A bezel cup is a pre-formed metal collar, sold by size. You drop the stone in, push the edges over, and you are done. Easy, but limited to standard sizes and shapes. A bezel strip is a flat piece of metal (usually fine silver, 0.3mm thick) that you cut, bend, and solder into a custom collar. More work, but it fits any stone exactly.
I recommend starting with a bezel strip. The pre-formed cups skip the learning part, and the learning part is where you actually develop the skill. Fine silver bezel strip costs about $15-20 for a 6-inch length, enough for several settings. Fine silver is softer than sterling and pushes over the stone more easily.
Solder and flux. Easy or medium solder (the lower the number, the lower the melting temperature). Easy solder flows at around 1325°F (718°C). You want it to flow before your bezel strip melts. Flux is the paste that keeps the joint clean during heating. I use Handy Flux, which comes in a small tub for about $8 and lasts months.
Backing plate. A flat piece of metal that forms the back of the pendant. 20-gauge (0.8mm) sterling silver sheet is standard. You need a piece slightly larger than the bezel — about 2mm extra on each side. This gets soldered to the bottom of the bezel collar.
Tools. Fine-tip tweezers, chain nose pliers, flat needle file, jeweler's saw (or tin snips in a pinch), a bezel pusher or a flat burnishing tool, and a torch setup. A small butane micro-torch ($20-30) works for silver pieces under an inch. For larger work, you want a propane or oxy-propane torch.
Measuring the stone
This step matters. Get the measurement wrong and the bezel will be too loose (stone falls out) or too tight (you cannot fit the stone in at all).
Wrap a thin, flexible measuring tape around the widest part of the cabochon. A cloth tailor's tape works. So does a strip of paper — wrap it around, mark where it overlaps, and measure the paper strip. This gives you the circumference.
Write the number down. Subtract 0.5mm. That is your bezel strip length.
The subtraction is important. If you cut the strip to the exact circumference, the bezel will be too loose. The 0.5mm overlap allows the strip ends to meet when you form it into a circle, creating a tight seam for soldering. If you are nervous, subtract 0.3mm instead. A slightly tight bezel is easier to fix than a loose one — you can stretch the metal a tiny bit. You cannot shrink it.
Also measure the height of the cabochon from the table (the flat back) to the top of the dome. Add 1mm to this number. That is the width of bezel strip you need. Standard bezel strip widths are 3mm, 4mm, 5mm, and 6mm. Pick the closest size that is at least 1mm taller than your stone. The extra millimeter is what you fold over the edge to lock the stone in.
Cutting and filing the bezel strip
Mark your measured length on the bezel strip with a scribe or fine marker. Cut it with jeweler's snips or a saw. The cut should be clean and square — angled cuts will not meet properly when you form the circle.
File both cut ends flat and smooth. Hold the strip against a flat file and check that the ends are perpendicular to the length. If the ends are angled, the seam will have a gap on one side when you bend it into a circle, and solder will not fill that gap. Take your time here. Five minutes of careful filing prevents a bad solder joint.
Use fine sandpaper (400-600 grit) to smooth any burrs along the cut edges. The smoother the seam, the better the solder will flow into it.
Forming the bezel into a collar
Grip one end of the strip in parallel jaw pliers (chain nose pliers work). Bend the strip into a curve. Continue bending incrementally, working the metal evenly, until you can bring both ends together to form a closed circle. The ends should meet with no gap, or a gap so thin you can barely see light through it.
Test the fit by placing the cabochon inside the circle. The stone should drop in about three-quarters of the way and stop. If it drops all the way through, the bezel is too big. If you cannot get the stone in at all, the bezel is too small. Adjust by trimming a sliver more from the strip or stretching the circle slightly on a mandrel.
Soldering the seam
Brush flux on the seam where the two ends meet. Apply tiny chips of solder (about 1mm squares) to the outside of the seam. The amount of solder you need is roughly equal to the volume of the gap — a hairline gap needs very little.
Heat the bezel with your torch, moving the flame around the piece evenly. Do not concentrate heat on the solder itself. Heat the metal, and the metal will draw the solder into the seam by capillary action. When the solder flows, you will see it flash silver and run into the joint. Remove the heat immediately.
Let it cool. Do not quench hot silver in water — the thermal shock can crack the metal or cause fire scale. Air-cool for at least 30 seconds, then drop it in a pickle pot (mild acid solution) to remove oxidation and flux residue.
Check the seam. The solder should have filled the entire joint. If there are gaps, re-flux and reheat. If there are blobs of excess solder, file them flush. The inside of the bezel must be smooth where the stone will sit.
Soldering to the backing plate
File the bottom edge of the bezel collar flat. Sand the area of the backing plate where the bezel will sit. Both surfaces must be clean and flat for solder to bond.
Place the bezel collar on the backing plate. Flux the joint where they meet. Apply solder chips around the outside base of the bezel. Heat from below if possible (this draws the solder up into the joint). When the solder flows, the bezel should be firmly attached to the plate.
Pickle, rinse, dry. File any visible solder seams smooth. The inside of the bezel should be clean and free of bumps that would prevent the stone from sitting flat.
Drill or saw an opening (optional)
Some people leave the backing plate solid. Others cut an opening behind the stone to let light through, which makes translucent cabochons look better. If you want an open back, drill a pilot hole through the backing plate inside the bezel, thread a jeweler's saw blade through, and cut out the center. File the edges smooth.
Seating the stone
Place the cabochon flat-side-down into the bezel. It should sit on the backing plate with the dome facing up. If the stone rocks or sits at an angle, the backing plate or bezel base is not flat. Remove the stone and file the problem area until it sits level.
The stone should be slightly below the top edge of the bezel — the bezel wall should extend about 0.5-1mm above the dome of the stone. This is the material you will push over to lock the stone in. If the stone sits higher than the bezel wall, there is nothing to push over and you need a taller bezel strip. Start over.
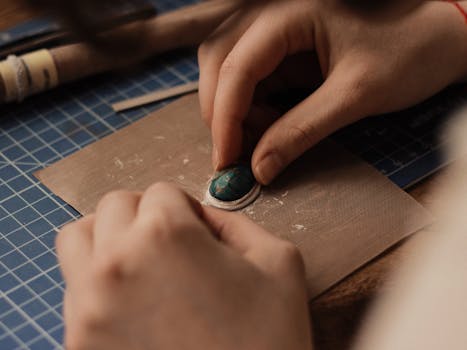
Pushing the bezel over the stone
This is the moment that determines whether your pendant looks professional or like a school craft project.
A bezel pusher is a small steel tool with a flat, polished tip. It is designed to push the bezel wall over the stone edge without scratching the stone. They cost $8-15. If you do not have one, the back of a spoon or a flat-ended burnisher will work in a pinch, but a real bezel pusher makes a noticeable difference in the finish.
Start at one point on the bezel wall. Place the pusher against the inside wall, just above the stone's edge. Apply firm, steady pressure, pushing the wall inward and down over the stone. Move around the bezel in small increments — push, rotate 5-10 degrees, push again. Work your way around the entire circumference.
Do not try to fold the whole wall over in one go. Work in stages. First pass: push the wall to about 45 degrees. Second pass: fold it to about 70 degrees. Final pass: lay it flat against the stone. This gradual approach produces a smoother, more even fold and reduces the risk of cracking the stone or distorting the bezel.
Check your progress frequently. The bezel should sit snugly against the stone with no gaps. If there is a gap, you may need to push more firmly in that area or use a slightly different angle with the pusher.
Finishing
File any rough spots on the bezel edge with a fine needle file. Use 400-grit sandpaper, then 600, then 1000 to smooth the metal. Polish with a polishing cloth or a buffing wheel. The bezel should be smooth to the touch — if you can feel a ridge or a sharp edge, keep filing.
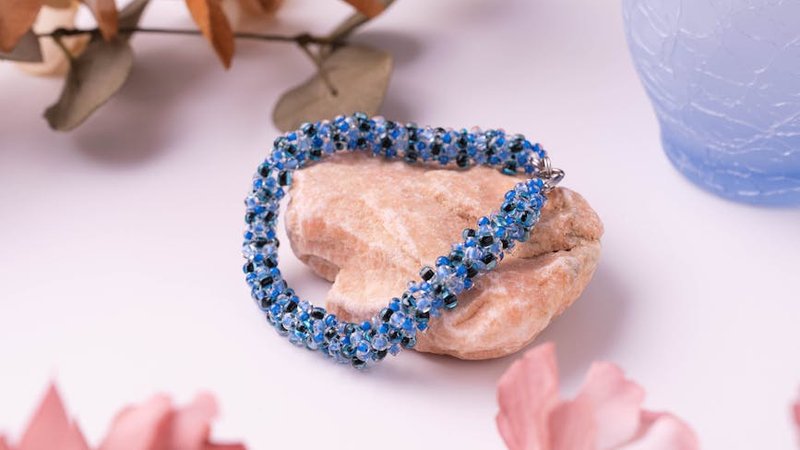
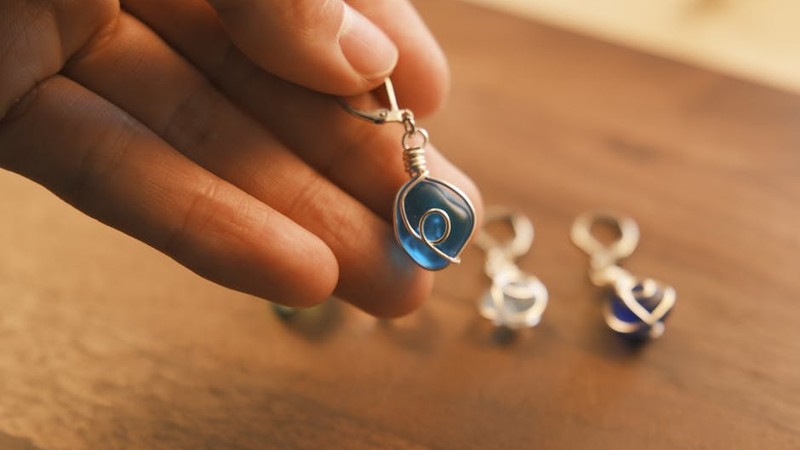
Attach a jump ring or bail to the top of the backing plate for hanging. Solder it on or use a pre-made soldered jump ring. Add a chain, and you have a finished pendant.
Mistakes are normal
Your first bezel setting will probably look rough. The bezel edge might be uneven. There might be a small gap on one side. The solder joint might be visible. That is expected. The skills involved — measuring precisely, filing flat surfaces, controlling solder flow, pushing metal smoothly — all take practice to develop.
I ruined three cabochons and five bezels before I made one I was happy with. The cabochons cracked from uneven pressure. The bezels had gaps in the solder joint, or the wall folded unevenly and left the stone loose. Each failure taught me something specific: file more carefully, use less solder, work the bezel in smaller increments. You will have your own list of lessons.
Buy cheap cabochons for practice. Agate and jasper cabochons cost $2-5 each. Practice on those until your bezels look clean. Then move on to nicer stones. The technique is the same regardless of the stone — you are just less nervous when the stone costs $3 instead of $30.
Comments