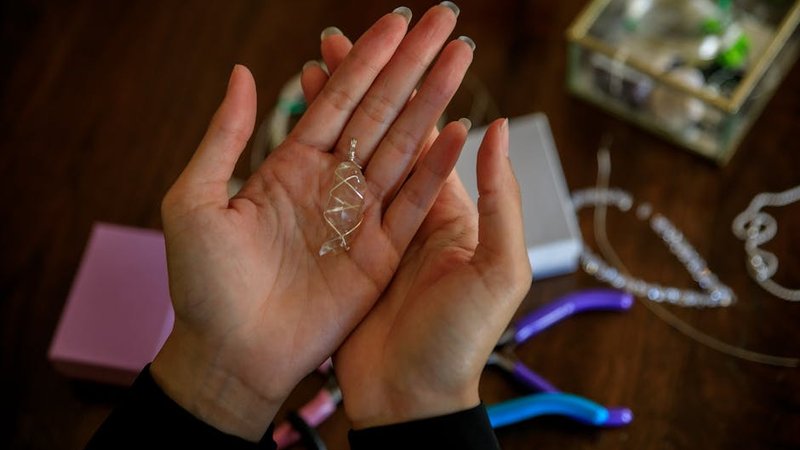
How to Make Resin Jewelry With Dried Flowers and Crystals
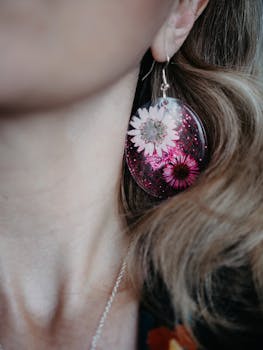
Resin jewelry sits at the intersection of crafting and fine art. A single pendant can trap a tiny rosebud beside a chip of amethyst, suspended in crystal-clear plastic that hardens into something you can wear every day. I made my first resin piece in 2019 and it came out cloudy, full of bubbles, and stuck to the mold. It took about six attempts before I produced something I'd actually wear in public. Here's what I wish someone had told me on attempt one.
Two types of resin — pick the right one
You'll encounter two main options at any craft store: two-part epoxy resin and UV resin. They behave very differently, and choosing wrong for your project is the fastest way to waste money.
Two-part epoxy (the kind that comes in two bottles — resin and hardener) cures over 24 to 72 hours at room temperature. It's the standard for larger pieces like pendants, coasters, and paperweights. The working time ranges from 30 to 45 minutes depending on the brand, which gives you plenty of room to arrange flowers and position crystals without panicking. Brands like ArtResin, ProMarine, and EasyCast all work well for jewelry. Expect to pay $20 to $30 for a 16-ounce kit, which yields roughly 20 to 30 pendants.
UV resin comes in a single bottle and cures under a UV lamp (or direct sunlight) in 2 to 15 minutes. It's convenient for tiny pieces — earrings, small charms — where you want rapid results. The catch: UV resin yellows faster than epoxy when exposed to sunlight over time, and the working window is narrow. You've got maybe 3 to 5 minutes before it starts getting tacky. At $12 to $18 for 4 ounces, it's also more expensive per volume.
My take: use two-part epoxy for anything you care about longevity on. UV resin is fine for quick experiments and small batch production, but the yellowing issue is real. I've seen UV-cured pendants from two years ago that look like they've been soaked in tea.
Materials you actually need
Beyond resin and hardener, here's the real shopping list:
Silicone molds. Buy molds specifically labeled for resin — not chocolate molds, not ice cube trays. Resin silicone is non-porous and releases cleanly. Expect to pay $8 to $15 for a set of pendant molds. Flexible molds are better than rigid ones for demolding.
Dried flowers. You cannot use fresh flowers. The moisture content causes the resin to stay soft or turn milky. Buy pre-dried flowers online (pressed flower packs on Etsy or Amazon run $6 to $12) or dry your own by pressing them between book pages for two to three weeks with silica gel packets. Pansies, baby's breath, daisies, and tiny rosebuds work best. Avoid thick-stemmed flowers — they create air pockets.
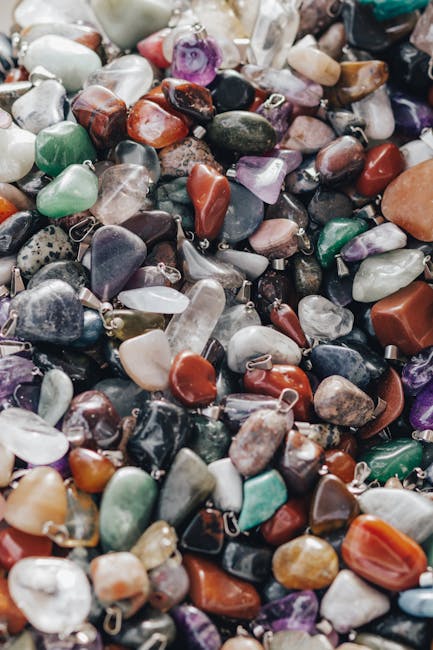
Crystal chips. Small tumbled pieces of quartz, amethyst, rose quartz, or citrine. You want chips in the 3mm to 8mm range — anything larger crowds the mold. A 1-ounce bag of mixed crystal chips costs about $8 to $15. Make sure they're actually tumbled smooth, not raw rough pieces with sharp edges that can puncture the mold.
Mixing cups. Disposable plastic cups with measurement lines. Don't reuse them — residue throws off ratios in future batches.
Stir sticks. Wooden craft sticks work. Some people use silicone spatulas for easier scraping.
A heat gun or kitchen torch. This is not optional. You need it to pop bubbles after pouring. A $15 craft heat gun does the job.
Sandpaper. 400, 600, 1000, and 2000 grit for polishing edges after demolding.
Measuring and mixing — where most people mess up
Get the ratio wrong and you'll end up with a sticky, never-fully-hardened mess that you have to throw away. Most epoxy resins use a 2:1 ratio (two parts resin to one part hardener by volume), but some brands use 1:1. Read the bottle. Then read it again. The ratio is not negotiable.
Pour both parts into your mixing cup, then stir slowly for at least 2 to 3 minutes. "Slowly" is the key word here. Fast stirring whips air into the mixture and creates hundreds of tiny bubbles that are nearly impossible to remove later. Scrape the sides and bottom of the cup as you stir — unmixed resin clinging to the cup walls is the #1 cause of tacky spots in finished pieces.
The mixture will look slightly cloudy at first. It clears up as the chemical reaction progresses. If it's still cloudy after 3 minutes of stirring, keep going. Properly mixed resin has a uniform, glossy appearance.
One thing nobody mentions: temperature matters. Resin mixes and cures best between 70°F and 80°F (21°C to 27°C). If your workspace is cold, the resin thickens and traps more bubbles. I've resorted to sitting the resin bottles in a bowl of warm water for 10 minutes before mixing during winter months. It makes a real difference.
Layering technique for embedded flowers and crystals
Don't dump everything into the mold at once. The layered approach produces cleaner results and gives you control over where elements sit.
First layer (base coat): Pour a thin layer of resin into the mold — just enough to cover the bottom, roughly 1mm to 2mm deep. This creates a smooth backing. Let it sit for 15 to 20 minutes until it thickens slightly (the "gel stage"). If you skip this step, your flowers and crystals will sink to the bottom and press against the mold surface, which looks amateurish.
Place your elements: Use tweezers to position dried flowers and crystal chips on the semi-cured base layer. Arrange them how you want — this is the creative part. Work quickly though, because the resin is still curing. For a natural look, cluster 2 to 3 flower pieces together and scatter a few crystal chips around them. Don't overcrowd the mold; leave about 30% of the space as clear resin so the design can breathe.
Second layer (encapsulation): Pour resin gently over the arranged elements. Pour slowly from a low height — dropping resin from high up creates bubbles and can dislodge your carefully placed flowers. Fill the mold to just below the rim. Overfilling creates a lip on the edge that you'll have to sand off later.
Removing bubbles
After each pour, grab your heat gun and pass it over the mold surface at a distance of about 3 to 4 inches. Move steadily — don't hover in one spot or you'll cook the resin. Bubbles rise to the surface and pop within seconds under the heat. You'll hear tiny popping sounds if you listen closely. Go over the entire surface 2 to 3 times.
Alternative method: exhale (yes, your breath) over the resin surface. The CO2 in your breath helps release surface bubbles. It sounds weird but it actually works for small bubbles the heat gun misses.
If you see a stubborn bubble deep inside the resin near a flower, there's not much you can do about it. Deep bubbles are the price of imperfect mixing or rushing the pour. Accept it as character, or throw the piece away and try again. I keep a "learning pile" of imperfect pieces that I study to figure out what went wrong.
Curing time — patience is the hardest part
Two-part epoxy needs 24 hours minimum to reach initial cure. It continues hardening over 72 hours. Don't touch the mold during this time. Don't pick it up to "check." Don't stack things on it. Just leave it alone on a level surface where dust won't settle on the open molds.
If you're using UV resin, cure under a 9W UV lamp for 60 to 90 seconds per side. For thick pieces, cure each side separately — UV light doesn't penetrate deeply. Even with UV resin, I recommend letting pieces rest for an additional hour before handling, because the surface can still be slightly tacky immediately after curing.
Demolding and finishing
After 24 hours (or after UV curing), flex the silicone mold gently and push from the back to release the piece. Most pieces pop out cleanly. If a piece sticks, put the mold in the freezer for 10 minutes — the cold makes the resin contract slightly and release from the silicone.
Inspect the edges. They'll probably have a thin resin flash — a rough edge where resin seeped into the mold seam. Start with 400-grit sandpaper and work through 600, 1000, and 2000 grit in sequence. Wet sanding (dipping the sandpaper in water) produces a smoother finish and keeps resin dust out of your lungs. The progression from 400 to 2000 grit should take about 5 to 10 minutes per piece if the flash is minimal.
For a glass-like finish on the back, you can brush on a thin coat of resin after sanding. Let it cure flat on a piece of plastic wrap (resin won't stick to it). This fills in any sanding marks and creates a perfectly smooth surface.
Common problems and what actually causes them
Sticky surface that never fully cures: Wrong mixing ratio, almost certainly. Even being off by 10% can cause problems. Another possibility: you used a cup that had residue from a previous batch. Throw away the cups. Start fresh.
Bubbles throughout the piece: You stirred too fast, poured from too high, or didn't use the heat gun. Also check that your resin isn't cold — cold resin is thicker and traps more air during mixing.
Yellowing over time: UV exposure. Two-part epoxy resists yellowing better than UV resin, but nothing is immune. Keep finished pieces out of direct sunlight and store them in a box or drawer. A UV-resistant clear coat (spray polyurethane) adds another layer of protection, but it slightly reduces the crystal-clarity of the resin.
Flowers turning brown inside the resin: This happens when flowers weren't fully dried before embedding. Even a small amount of moisture causes oxidation over weeks. Always use completely dry flowers. If you're pressing your own, wait at least 3 weeks and check that petals feel papery and brittle with no soft spots.
Mold tearing or losing detail: Cheap molds. Silicone quality varies enormously. A $3 mold from a discount store will degrade after 5 to 10 uses. A $12 mold from a reputable resin supply company can last 50+ pours. The investment is worth it.
A note on safety
Epoxy resin is a sensitizer — repeated skin contact can cause allergic reactions that get worse over time. Wear nitrile gloves (not latex, which some resins penetrate). Work in a ventilated area. The fumes aren't toxic at room temperature, but they can cause headaches in enclosed spaces. If you're doing this regularly, consider a respirator with organic vapor cartridges.
UV resin is slightly more hazardous because uncured resin can cause skin irritation and the UV light is hard on your eyes. Wear UV-blocking glasses if you're curing pieces under a lamp for extended periods.
Resin crafting is one of those hobbies where the first few pieces will probably look terrible. That's normal. By piece five or six, you'll develop a feel for the resin's behavior — how it flows, how long you have before it sets, how thick a layer you can pour without issues. The learning curve is steep but short. And when a piece comes out right — clear as glass, with a tiny garden frozen inside — it's genuinely satisfying in a way that few other crafts match.
Comments