How to Make Beaded Bracelets That Last: A Complete Beginner's Guide
The first beaded bracelet I ever made was on a rainy afternoon with a pack of seed beads from a craft store and some elastic cord. It took me an hour to string 40 beads, I tied a terrible knot, and it broke the next day when I reached for a coffee cup. I was hooked anyway.
Stringing beads is deceptively simple. The basic concept — put beads on a cord — takes about 30 seconds to understand. But making a bracelet that's comfortable to wear, durable enough for daily use, and beautiful enough to get compliments? That requires knowing a few things that most beginner tutorials don't mention.
Here's everything I've learned about making beaded bracelets that actually last, from choosing materials to finishing techniques that won't fail.
Choosing Your Beading Method
Before you buy anything, decide how you'll put the bracelet together. There are three main approaches, and each works best for different situations.
Elastic Cord (Stretch Bracelets)
The easiest method. No clasp needed — the bracelet stretches over your hand. Great for beginners, casual jewelry, and stacking. The downside: elastic degrades over time and eventually breaks. A well-made elastic bracelet lasts 6-18 months depending on wear.
Best for: casual everyday wear, gifts, kids' jewelry, quick projects
Beading Wire with Crimps
A flexible wire (usually 49-strand stainless steel coated in nylon) holds the beads, and small metal tubes called crimps secure the wire to a clasp. This is the most durable method and the standard for professional beaded jewelry. It takes a bit more practice and requires crimping pliers, but the result is a bracelet that can last for years.
Best for: jewelry you intend to sell, gemstone bracelets, any piece you want to last
Thread with Needle (Off-Loom Weaving)
Using a beading needle and thread to create patterns like peyote stitch, right-angle weave, or brick stitch. This produces intricate, fabric-like pieces. It's an art form in itself and significantly more time-consuming than simple stringing.
Best for: decorative statement pieces, beaded cuffs, advanced crafters
This guide focuses on the first two methods — elastic and beading wire — since they cover 90% of what most jewelry makers need.
Materials: What to Buy and What to Avoid
Elastic Cord
Not all elastic is created equal. The cheap clear elastic you find in craft stores (sometimes called "stretch magic") is frustrating to work with and breaks easily. Spend a little more on quality elastic.
- 1mm round elastic (clear or black): Good for seed beads and small stones (4-6mm). 0.7mm is too thin for anything you want to last.
- 1.5mm round elastic: The sweet spot for most bracelets. Works with beads from 4mm to 10mm and feels substantial without being bulky.
- 2mm round elastic: For large-hole beads (8mm+) or chunky styles. Overkill for small beads.
Buy it on a spool rather than pre-cut. You'll go through it faster than you expect. A 50-meter spool costs about $5-8 and makes dozens of bracelets.
Beading Wire
If you're using the crimp method, get flexible beading wire. The industry standard is 49-strand stainless steel wire. Brand names include Beadalon, Soft Flex, and Accu-Flex.
- 0.015 inch (0.38mm): For seed beads and pearls with small holes
- 0.018 inch (0.46mm): For most 4-8mm beads — this is the most versatile size
- 0.024 inch (0.61mm): For heavier beads, large gemstones, or abrasive materials
The strand count matters: 7-strand wire is cheaper but kinks easily. 19-strand is okay for casual pieces. 49-strand is the professional choice — it's flexible, strong, and drapes naturally. Spend the extra $2.
Findings (Clasps and Connectors)
- Lobster clasp: The most popular and secure option. Easy to use one-handed. Available in gold-fill, sterling silver, gold-plated, and base metal.
- Toggle clasp: A bar that fits through a ring. Easier to put on than a lobster, slightly less secure. Looks more decorative.
- Magnetic clasp: Convenient for people with limited dexterity. Not recommended for heavy bracelets — strong magnets can pull open unexpectedly.
- Spring ring: Small and neat but fiddly to open. Better for delicate pieces.
Match your clasp material to your beads. If you're using gold-fill beads, a gold-fill clasp looks intentional. Mixing gold and silver is a design choice — just make it deliberate, not accidental.
Crimp Beads and Covers
Crimp beads are tiny metal tubes that you flatten onto the wire to secure it. Crimp covers are half-round metal domes that hide the flattened crimp, making it look like a small metal bead.
- Crimp tubes (2×2mm): The standard size for 0.018 wire. Use crimping pliers (not flat-nose pliers) to fold them into a neat shape.
- Crimp covers (3-4mm): Slip one over each crimp for a professional finish. They make a visible difference in perceived quality.
Beads
The fun part. Your options are nearly unlimited, but here are the most popular categories for bracelets:
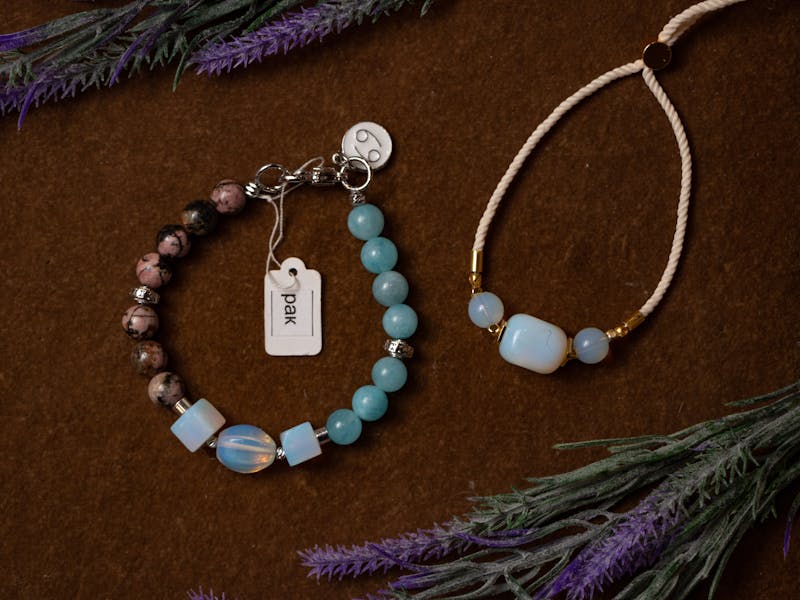
- Gemstone chips and rounds: Amethyst, rose quartz, turquoise, labradorite, tiger's eye. Natural variation makes each bracelet unique. 4-8mm rounds are the most versatile size.
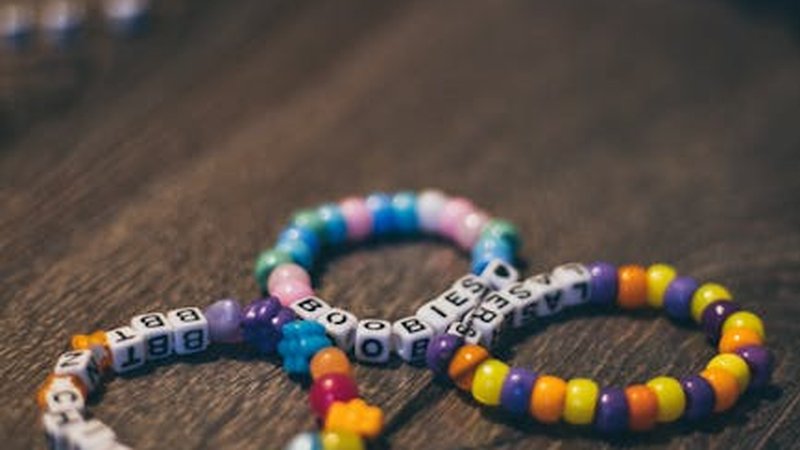
- Glass beads: Czech glass, lampwork, seed beads. Enormous variety of colors and finishes. Good for colorful, playful designs.
- Pearls: Freshwater pearls (round or baroque) add elegance. They're softer than gemstones, so use a smooth beading wire to avoid scratching.
- Wood and bone: Lightweight and casual. Great for layered stacks and men's bracelets.
- Metal spacer beads: Small gold-fill or sterling silver beads placed between stone beads. They add visual rhythm and a polished look. 3-4mm rounds or 5-6mm rondelles work well.
- Seed beads (Miyuki Delica or Toho): Tiny cylindrical beads for detailed patterns. Used in woven designs or as accents between larger beads.
Elastic Bracelet: Step-by-Step
Step 1: Measure and Cut the Elastic
Wrap the elastic around your wrist, leaving enough slack to comfortably slide the bracelet over your hand. Add about 10cm (4 inches) of extra length for tying knots. For an average adult wrist, you'll need about 25-30cm of elastic total.
Pro tip: pre-stretch the elastic by pulling it firmly several times before cutting. This prevents your finished bracelet from stretching and loosening over time.
Step 2: Plan Your Design
Lay out your beads in the order you want them on a bead board, towel, or flat surface. This is called a "layout" and it's worth spending 5-10 minutes on. Move beads around until the pattern, color distribution, and size variation feel right.
A common beginner mistake is stringing beads randomly as you pick them up. The result usually looks chaotic. A planned layout looks intentional and professional, even with simple patterns.
Step 3: String the Beads
Use a bead stopper or a binder clip on one end of the elastic so beads don't slide off. String your beads in the order you planned. Periodically wrap the strung section around your wrist to check the fit.
The bracelet should be snug but not tight. You should be able to slide one finger between the bracelet and your wrist. Too loose and it'll spin around; too tight and it's uncomfortable.
Step 4: Tie the Knot
This is the critical step. A bad knot is why most elastic bracelets break. Here's the method that works:
- Hold both ends of the elastic so the beads are snug against each other — no gaps.
- Tie a basic overhand knot, pulling it tight against the last bead on each side.
- Tie a second overhand knot on top of the first, in the same direction.
- Tie a third overhand knot, this time in the opposite direction.
- Stretch the elastic slightly and pull all three knots as tight as possible.
Three knots, alternating direction, create a knot that's much harder to slip or untie. A single knot will eventually work loose under the tension of daily wear.
Step 5: Secure the Knot
Apply a tiny drop of superglue (cyanoacrylate gel, not liquid — gel doesn't spread as much) directly onto the knot. Let it dry completely — at least 5 minutes, preferably 10-15. The glue prevents the knot from working loose over time.
Use a toothpick or a pin to apply the glue precisely. You want it on the knot, not on the beads. Superglue on gemstone surfaces can leave a visible shiny spot.
Step 6: Hide the Knot
There are two approaches:
- Slide into a bead: If your knot is small enough, use a bead with a large hole (like a 6-8mm round wood bead or a metal spacer) as the last bead on one end. After tying the knot, slide this bead over the knot to hide it.
- Crimp cover: Place a crimp cover over the elastic knot and use flat-nose pliers to gently close it around the knot. This looks like a small metal bead and is the most professional option.
Step 7: Trim the Ends
Cut the elastic tails to about 3mm (1/8 inch) from the knot. Any longer and the ends will poke out and be visible. Use sharp scissors or flush cutters — dull scissors leave frayed ends.
Beading Wire Bracelet: Step-by-Step
Step 1: Cut the Wire
Cut the beading wire about 8-10cm (3-4 inches) longer than your finished bracelet size. For a 7-inch bracelet, cut about 25cm of wire. This gives you enough length to work with when attaching the clasp.
Step 2: String a Crimp Tube
Thread one crimp tube onto the wire, then thread one half of your clasp. Pass the wire back through the crimp tube, creating a small loop that the clasp hangs from. Leave about 2-3cm of tail wire.
Step 3: Crimp the Tube
Use crimping pliers to secure the crimp tube. Crimping pliers have two notches: the back notch creates a U-shape, and the front notch folds the U into a neat tube shape. This is different from simply flattening the crimp with flat-nose pliers, which makes a weak, ugly connection.
Position the crimp tube in the back notch and squeeze firmly. Then rotate it 90 degrees and place it in the front notch and squeeze again. The result should be a small, neat tube that holds the wire securely.
Thread the tail wire through the first 2-3 beads of your design. This hides the tail and adds strength.
Step 4: String Your Beads
String your beads in the planned order. Periodically check the length by holding the bracelet up with the clasp attached. You want the finished bracelet to be about 0.5cm shorter than your wrist measurement — the clasp adds a little length.
Step 5: Finish the Second End
Thread a second crimp tube, then the other half of the clasp. Pass the wire back through the crimp tube and then back through the last 3-4 beads of the design. Pull the wire so the beads are snug against each other — no gaps — but not so tight that the bracelet is rigid.
The bracelet should have a gentle drape, not be strung like a rod.
Step 6: Secure the Second Crimp
Use your crimping pliers to crimp the second tube the same way as the first. Check that the clasp hangs freely and the wire doesn't show.
Step 7: Trim and Tuck
Cut the tail wire as close to the last bead as possible. Use flat-nose pliers to gently press the cut end into the hole of the nearest bead. This prevents the sharp wire end from scratching the wearer.
Optional: slip a crimp cover over each crimp tube for a polished finish.
Design Patterns That Always Look Good
Simple Alternating
Alternate between two bead types: gemstone A, metal spacer, gemstone B, metal spacer, repeat. This is the most foolproof pattern. Example: 6mm amethyst round, 3mm gold-fill spacer, 6mm rose quartz round, 3mm gold-fill spacer.
Graduated Size
Use the same type of bead in different sizes: 4mm, 6mm, 8mm, 6mm, 4mm, creating a diamond or wave shape. This adds visual interest without complexity.
Color Blocking
Group beads by color in sections: 5 beads of color A, 5 beads of color B, 5 beads of color C. The transition between sections can be marked with a metal bead or a contrasting bead.
Random with Intention
Choose a color palette of 3-4 colors and a metal accent. String beads in a random-looking sequence, but maintain roughly equal distribution of colors and place metal accents at regular intervals. It should look effortless, but actually requires planning.
Charm Bracelet
A simple beaded bracelet with 2-3 small charms (a tiny star, a heart, a letter bead) evenly spaced. The charms add personality and make it feel personal. Use jump rings to attach charms — don't string them directly on the wire.
Common Problems and Solutions
Bracelet Is Too Stiff
This means you strung the beads too tightly. The wire should have some flexibility. Untie (or re-crimp) and restring with slightly more slack. A good test: the bracelet should drape naturally when held at both ends, not stand up like a stick.
Elastic Keeps Breaking
Three possible causes: cheap elastic (switch to 1mm or 1.5mm quality elastic), beads with sharp internal edges (file or ream the holes, or switch to smoother beads), or an insecure knot (use the three-knot method with glue).
Wire Shows at the Ends
The tail wire isn't threaded back through enough beads. Always pass the tail through at least 2-3 beads before trimming. If it's already cut, you can sometimes use a beading awl to push the wire end into a bead hole.
Crimp Slides Off the Wire
This happens when the crimp isn't compressed enough, or when the wire is too thin for the crimp size. Make sure you're using the right crimp size for your wire diameter, and squeeze firmly with proper crimping pliers.
Bead Holes Are Too Small for the Wire
Use a bead reamer (a small pointed file, about $5) to enlarge the holes. Twirl it gently inside the bead hole. This also smooths any rough edges that might cut or fray your stringing material.
Caring for Beaded Bracelets
- Elastic bracelets: Roll them off your wrist instead of pulling. Pulling stretches the elastic over time. Remove before showering, swimming, or sleeping. Store flat, not hanging.
- Wire bracelets: More durable, but still avoid crushing or bending. Store in a jewelry box or pouch to prevent tangling with other pieces.
- Gemstone beads: Some stones (pearls, turquoise, opals) are porous and can be damaged by perfume, lotion, or water. Put your jewelry on after applying products, not before.
- Cleaning: Wipe with a soft, damp cloth. For metal components, a jewelry polishing cloth restores shine. Never use chemical cleaners on porous stones.
Scaling Up: Making Bracelets for Sale
Once you've made a few and are happy with the quality, you might consider selling. Beaded bracelets are excellent sellers because they're relatively quick to make, use affordable materials, and have good margins.
A typical 4mm gemstone bracelet with gold-fill accents costs $3-6 in materials and takes 15-25 minutes. At a retail price of $22-35, that's a solid margin. At craft shows and markets, $25-45 is common depending on the stone type and clasp quality.
The key to selling beaded bracelets at volume is developing a recognizable style — a signature color palette, a consistent use of spacer beads, or a particular stone combination that people associate with your brand. Consistency across your collection looks professional and builds customer trust.
Package each bracelet in a small box or pouch with a card describing the stone properties. People love the idea that amethyst promotes calm, rose quartz attracts love, or tiger's eye builds confidence — even if the science is debatable, the story adds value to the purchase.
Start with a dozen designs, test them at a local market or online, and pay attention to which ones sell fastest. Double down on what works. That's the whole business, really — make things people want, make them well, and make enough of them.
Comments