How to Make a Beaded Bracelet for Beginners

My best friend's birthday was coming up, and I was broke. Like, "checking my bank account makes me physically flinch" broke. I'd already used up my good gift ideas on previous birthdays — the custom photo book, the concert tickets, the hand-lettered card that took me four hours. I needed something that felt personal and thoughtful without costing a fortune.
That's when I remembered seeing a beaded bracelet tutorial on Pinterest weeks earlier. I'd bookmarked it thinking "I should try that someday," and suddenly someday was right now. The whole project cost me about $15, took maybe 45 minutes once I had my materials sorted, and my friend actually teared up when she opened it. Not because it was the most beautiful bracelet in the world — because I made it with my hands, for her, specifically.
So if you're here because you want to make something meaningful (or you're also broke and need a gift idea), let me walk you through everything I learned. No experience required — I promise I had zero jewelry-making skills when I started.
What You Need to Get Started
The materials list for a basic beaded bracelet is refreshingly short. Here's exactly what I bought and what each thing does:
Beading Cord or Elastic String
This is what holds everything together. You have two main options:
Elastic cord (also called stretch cord or elasticity) — This is what most beginners should use. It's forgiving, easy to work with, and you don't need any clasps or tools. Just stretch it, thread your beads, tie a knot, and you're done. The most popular brand is Stretch Magic, which comes in different thicknesses. For most bead sizes, 0.5mm or 0.7mm works great. Clear is the standard choice, but it also comes in black and colors if you want the string itself to be part of the design.
Beading wire (like Beadalon or Soft Flex) — This is for more "professional" looking bracelets that use clasps. It's a thin, flexible wire coated in nylon. It doesn't stretch, which means your bracelet will hold its shape better over time, but you'll also need crimp beads, jump rings, and a clasp to finish it. I'd recommend starting with elastic and graduating to wire once you're comfortable.
Beads
The fun part. Beads come in literally every material, size, color, and shape you can imagine. For your first bracelet, I'd suggest sticking with one or two types of beads to keep things manageable. Here are some good beginner options:
Glass seed beads — Tiny, cheap, and come in hundreds of colors. Perfect for colorful, stackable bracelets. A tube of 100+ beads usually costs $2-4.
Gemstone chip beads — Small, irregularly shaped chips of amethyst, rose quartz, turquoise, etc. They give a natural, earthy look and are surprisingly affordable at $5-8 per strand.
Wooden beads — Lightweight, warm-toned, and great for boho or casual styles. Usually $3-6 for a pack.
Pearl beads (glass-based or genuine freshwater) — Instantly elevates any design. Faux pearl beads start at about $3 per strand.
Alphabet or charm beads — Metal beads with letters, numbers, or small charms. Great for personalized bracelets. These run $5-15 depending on the material.
Jump Rings and Clasps (for wire bracelets)
If you go the beading wire route instead of elastic, you'll need a few metal findings to finish your bracelet. A lobster clasp is the most secure and common option — it's that little claw-looking thing you squeeze to open. You'll also need a few jump rings (small metal circles that open and close) to connect the clasp to your bracelet. And crimp beads — tiny metal tubes that you squash flat to secure the wire in place. A pack of basic findings costs about $5-8.
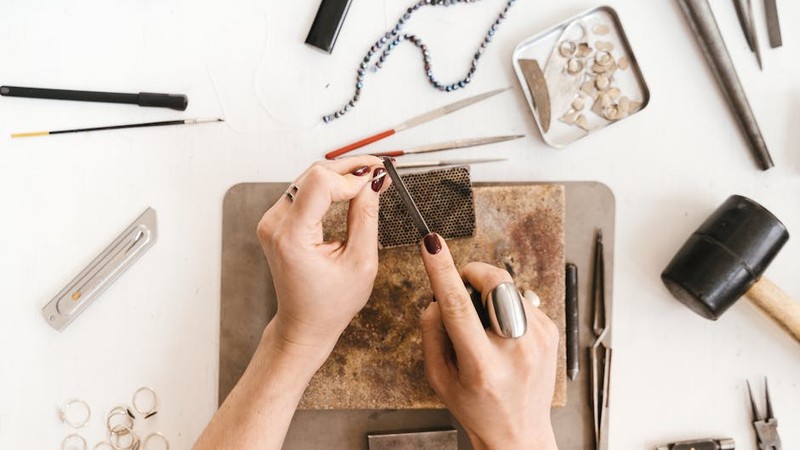
Basic Tools
For elastic bracelets, you barely need anything — just scissors and maybe a pair of tweezers for pulling knots tight. For wire bracelets, invest in a pair of round-nose pliers (for making loops), chain-nose pliers (flat, for crimping and opening jump rings), and a wire cutter. A beginner tool kit runs about $10-15 and will last you years.
Bead Mat or Tray
Not strictly necessary, but a bead mat (a fuzzy fabric mat) keeps your beads from rolling everywhere while you design. A bead board has little channels and measurements printed on it so you can lay out your design and see exactly how long your bracelet will be. Both are under $10.
Where to Buy Beading Supplies
I've tried a bunch of places, and here's my honest ranking:
Local craft stores (Michaels, Joann, Hobby Lobby if you're in the US) — Good for emergency supplies and browsing in person. Prices are higher than online, but they almost always have coupons. I never buy full price at Michaels — there's always a 40% off coupon in their app.
Amazon — Honestly great for basics. Elastic cord, basic tool kits, and bulk seed beads are all cheaper here than craft stores. The quality is fine for beginners. Just read reviews — some of the no-name bead sellers ship questionable quality.
Etsy — Best for unique beads, gemstone strands, and artisan findings. You'll pay more, but the quality and selection are on another level. I buy most of my gemstone beads from Etsy shops that specialize in natural stones.
Specialty bead shops online — Sites like Fire Mountain Gems (US) or Beads.co.uk (UK) have enormous selections and good prices when you buy in bulk. Worth bookmarking once you're hooked.
AliExpress — I know, I know. But for glass seed beads in bulk? It's unbeatable. A tube of 200+ Miyuki-style seed beads for $1.50. Shipping takes 2-3 weeks, so plan ahead. Avoid buying gemstone beads here unless you don't mind if they're dyed or synthetic.
5 Easy Bracelet Designs for Beginners
Before I give you the step-by-step instructions, let me share five design ideas that are almost impossible to mess up. I made all of these for my first few attempts and they turned out great.
Design 1: The Classic Single-Strand
One type of bead, evenly spaced, on elastic cord. Pick any bead you like — wooden rounds, glass pearls, gemstone chips — and string enough to wrap comfortably around your wrist. The beauty is in the simplicity. My go-to is 6mm rose quartz beads with one larger focal bead in the center. Takes 10 minutes.
Design 2: The Three-Color Gradient
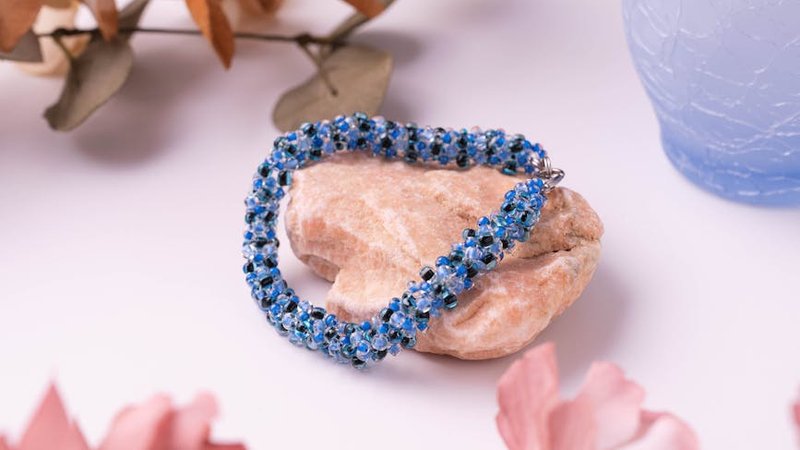
Choose three colors that blend nicely — I did light blue, medium blue, and dark blue glass seed beads. String them in order: all the light ones first, then medium, then dark. The result is a smooth ombre effect that looks way more impressive than the effort it takes. Use a bead board to lay this out first so you can adjust the color distribution.
Design 3: The Gemstone and Metal Mix
Alternate between small gemstone beads and tiny metal spacer beads. The metal breaks up the stone pattern and adds a polished, professional look. I used 4mm amethyst rounds with 2mm gold-plated spacer beads. The gold against the purple is gorgeous and it looks like something you'd buy at a boutique.
Design 4: The Word Bracelet
Use alphabet beads to spell out a name, a word, or a short message, surrounded by simple spacer beads on either side. "LOVE," "DREAM," someone's name — you get the idea. This is the design I used for my friend's birthday, spelling her nickname with gold letter beads between small white pearl beads. Simple, personal, and she loved it.
Design 5: The Chunky Statement
Use larger beads (10-12mm) with fewer of them. Think big wooden beads, large gemstone rounds, or oversized glass pearls. A chunky bracelet with just 12-15 large beads has a bold, fashion-forward look. This is the fastest design to make since you're threading fewer beads, and it's hard to go wrong when each bead is the star.
Step-by-Step: Making Your First Elastic Bracelet
Let's walk through making a basic single-strand elastic bracelet from start to finish. I'll use the gemstone and metal mix design as the example, but the technique is the same for any bead type.
Step 1: Measure Your Wrist
Wrap a flexible measuring tape around your wrist where you want the bracelet to sit. Add about 1 inch (2.5cm) to that measurement for comfort — you want the bracelet to be able to slide over your hand but not flop around. The average woman's wrist is 6-7 inches, so a finished bracelet of 7-8 inches is typical. Write this number down.
Step 2: Cut Your Elastic
Cut a length of elastic cord about 8-10 inches longer than your target bracelet length. The extra length gives you room to tie knots. So if your bracelet needs to be 7.5 inches, cut about 16-18 inches of elastic. Trust me — it's way better to have too much and trim later than to cut it too short and have to start over.
Step 3: Plan Your Design
Lay your beads out on a bead mat or a flat surface in the order you want them. This is where a bead board is really helpful because it has channels the exact width of a bracelet. Arrange your beads, step back, look at the pattern, and adjust until you're happy. This is the creative part — take your time with it.
Step 4: Add a Bead Stopper
Put a small piece of tape around one end of the elastic, or tie a temporary knot, or use a binder clip — anything to stop beads from sliding off the end while you thread them. This seems obvious but I definitely dumped an entire tray of beads onto the floor once because I forgot this step.
Step 5: Start Threading
Thread your beads onto the elastic one by one, following your planned design. If you're using a needle, thread it onto the elastic first (most elastic cords come with a built-in needle-like tip, or you can use a collapsible eye needle). Take your time and enjoy the process — there's something weirdly satisfying about watching a design come together bead by bead.
Step 6: Check the Fit
Once all your beads are on, wrap the bracelet around your wrist (without tying it yet) and check the fit. It should be snug enough to stay on but loose enough to be comfortable. If it's too tight, remove a bead or two. Too loose, add a bead. This is why you laid out your design first — you can adjust before committing.
Step 7: Tie the Knot
This is the part that stresses most beginners out, but it's actually simple once you know the trick. Bring both ends of the elastic together and tie a basic overhand knot. Pull it tight. Then tie a second overhand knot right on top of the first one — this makes it much more secure. For extra security, add a tiny drop of superglue or clear nail polish on the knot and let it dry completely.
The key is getting the knot to sit inside one of the beads if possible. When you tighten the knot, gently pull the elastic so the knot slips into the hole of the nearest bead. This hides the knot completely and makes the bracelet look seamless.
Step 8: Trim and Done
Use scissors to trim the excess elastic, leaving about 1/4 inch (6mm) of tail. Tuck the tail into the nearest bead with the tip of your scissors or a needle. And that's it — you just made a bracelet.
3 Ways to Level Up Your Bracelet
Once you've made a few basic elastic bracelets, you might get the itch to try something a little more interesting. Here are three techniques that look impressive but are still totally doable for beginners.
Multi-Strand Bracelet
Instead of one string of beads, make two or three thin strands and wear them stacked together. You can use the same bead type in different sizes (like 4mm, 6mm, and 8mm pearls) or different colors in the same size. Make each strand slightly different in length — maybe 7 inches, 7.25 inches, and 7.5 inches — so they cascade nicely on your wrist. This looks like a layered bracelet from a fancy jewelry brand but it's just three simple single-strand bracelets made together.
Charm Bracelet
Make a basic beaded bracelet, but add small charms at regular intervals. You can use jump rings to attach small metal charms — hearts, stars, initials, tiny crystals — between groups of beads. The easiest way is to thread a few beads, add a charm on a jump ring, thread a few more beads, add another charm, and so on. This works best on beading wire with a clasp rather than elastic, since the charms add weight.
Wrapped Wire Bracelet
Once you're comfortable with basic tools, try using beading wire instead of elastic. String your beads on wire, use crimp beads to secure each end, and attach a lobster clasp with jump rings. The technique is a little more involved — you'll need to learn how to flatten crimp beads properly — but the result is a more durable, professional-looking bracelet. There are hundreds of YouTube tutorials on crimping if you're a visual learner. The whole thing takes maybe 20 minutes once you know what you're doing.
How to Package Your Bracelet as a Gift
Since I originally started making bracelets as gifts, I figured out a few ways to make the presentation match the effort.
The simple approach: Place the bracelet on a piece of cardstock (I cut a small rectangle with a notch on each end to hold the bracelet in place). Put it in a small cellophane bag and tie it with ribbon. Cost: about $2 in packaging materials. Looks way better than just handing someone a loose bracelet.
The nice approach: Buy small gift boxes from a craft store (they sell packs of 6-12 for about $8). Line the box with tissue paper or cotton batting. Place the bracelet on a small piece of velvet or felt inside the box. Tie the box with twine or a ribbon. This is what I did for my friend's birthday, and she kept the box. Total packaging cost: about $5.
The extra touch: Write a small card explaining why you chose those specific beads or colors. "I used rose quartz because it's supposed to represent love and friendship, and the gold spacers reminded me of that sunset we watched together." Cheesy? Maybe. Will the recipient love it? Absolutely. People don't just receive handmade gifts — they receive the story behind them.
Making beaded bracelets turned into a bit of an obsession for me after that first birthday gift. I've made probably 30 or 40 bracelets at this point — for friends, for my mom, for myself, even a few as wedding favors for a friend's bridal shower. The materials are cheap, the learning curve is gentle, and the result is something genuinely wearable and personal. Give it a shot. Worst case, you're out $15 and 45 minutes. Best case, you discover a new hobby and make someone's day with a gift that no store could ever sell.
Comments