Crystal Grids Look Intimidating but the Mechanics Are Simple
Crystal Grids Look Intimidating but the Mechanics Are Simple
I'd seen crystal grids on Instagram for years before I actually tried making one. They always looked the same: an elaborate geometric arrangement of dozens of crystals, surrounded by dried flowers, feathers, and candlelight, with captions about "manifesting abundance" or "aligning chakras." The whole thing seemed like it required a degree in sacred geometry and a cabinet full of expensive stones.
Then I watched a friend set one up in about fifteen minutes using a piece of cardboard, a printed geometric pattern, and six crystals she'd bought at a craft store. No ceremony, no chanting, no incense. Just placement. And it looked great. She told me the arrangement was based on basic geometry, not mystical requirements, and that the "rules" were more like guidelines that people had built up over time.
That was the moment crystal grids went from "too complicated" to "actually doable" for me. Here's a practical, no-nonsense guide to setting up your first one, focused on the visual and structural elements rather than the metaphysical framework.
What a Crystal Grid Actually Is
At its most basic level, a crystal grid is an arrangement of stones in a geometric pattern. That's it. The pattern provides structure, the stones provide visual and tactile elements, and the overall composition creates a decorative piece that some people also use as a meditative or intentional focal point.
The geometric patterns used in crystal grids come from a few common sources: the Flower of Life (overlapping circles creating a flower-like pattern), Metatron's Cube (a complex arrangement of circles and lines), hexagonal grids (honeycomb-like patterns), and simple radial designs (a central stone surrounded by rings of other stones). These patterns have been used in art, architecture, and design for centuries across many cultures, so they're not exclusive to crystal work.
The crystals themselves are arranged along the lines and intersection points of the pattern. The central stone is usually the largest or most visually prominent. Surrounding stones are placed at key points in the geometry — vertices of a hexagon, tips of a star, or evenly spaced around a circle.
What You Need to Get Started
The supply list for a basic crystal grid is short:
A base. This can be anything flat and reasonably sized. A piece of cardboard, a wooden board, a ceramic tile, a piece of fabric, or even a clean section of desk. Some people print out geometric patterns and place them under a piece of glass or clear plastic. Others draw the pattern directly on the base. You can also buy pre-made grid boards with patterns etched or printed on them, but that's not necessary.
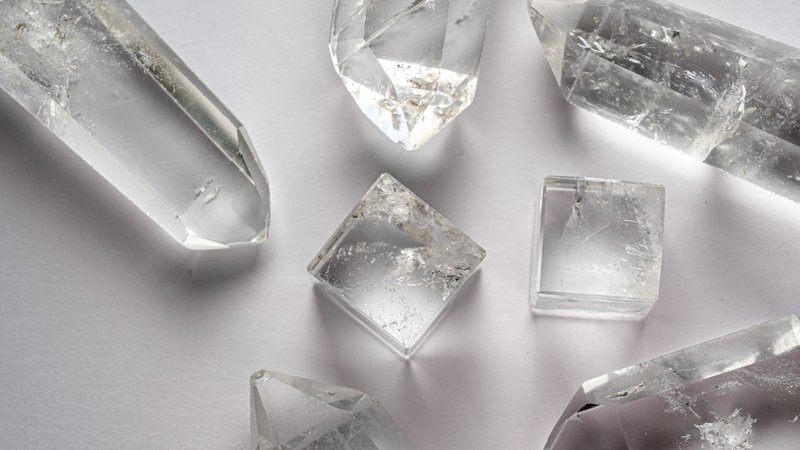
A central stone. This is the anchor of the grid. It should be larger than the surrounding stones and placed at the center of your pattern. A tower-shaped crystal (like a quartz point) works well visually because it draws the eye to the center. A sphere, a pyramid, or a large tumbled stone also works.
Surrounding stones. You'll need between six and twelve stones to fill out the pattern, depending on which geometry you choose. These should be smaller than the central stone and can be the same type of crystal or a mix of different ones. Tumbled stones work well for beginners because they're affordable, uniform in shape, and easy to place.
Optional extras: Some people add small accent stones at secondary intersection points, use sand or salt to outline the pattern, or include non-crystal elements like dried flowers or shells. These are decorative choices, not requirements.
Step-by-Step: Your First Grid
Step 1: Choose your pattern
For your first grid, I'd recommend a simple hexagonal arrangement. It's forgiving (stones don't have to be perfectly placed for it to look right), uses a manageable number of stones, and the hexagon is a satisfying shape that works well at any size.
To set up a hexagonal grid, imagine or draw a circle. Place your central stone in the middle. Then place six stones at evenly spaced points around the circle, roughly at the 12, 2, 4, 6, 8, and 10 o'clock positions. Connect them visually (or with lines if you've drawn the pattern) and you have a basic hexagonal grid.
Step 2: Select your crystals
The simplest approach for a first grid is to use a single type of stone. Clear quartz is the default choice because it's inexpensive, widely available, and neutral in color. An all-quartz grid looks clean and cohesive, and you can buy a bag of small tumbled quartz pieces for under fifteen dollars.
If you want more visual variety, you can mix stone types. A common approach is to choose stones based on color harmony rather than traditional associations — matching blues and purples for a cool palette, or warm tones for something more energetic. The visual cohesion matters more than any symbolic correspondence for a beginner grid.
Step 3: Place the central stone
Put your largest or most visually striking crystal at the center of your pattern. This is the focal point — everything else radiates outward from here. If you're using a printed pattern, line up the center of the stone with the center point of the design.
Take a moment to make sure it's stable and upright. If you're using a tall crystal point, make sure the base is flat enough that it won't tip over. A small piece of adhesive putty can help with stability if needed.
Step 4: Arrange the outer ring
Place your surrounding stones at the key points of your pattern. For a hexagonal grid, that's six stones evenly spaced around the central one. Start at the 12 o'clock position and work your way around, checking the spacing as you go.
Don't stress about perfect symmetry. A grid that's slightly asymmetric looks organic and natural. The important thing is that the overall shape reads as intentional — close enough to regular that the pattern is clear, not so precise that it looks mechanical.
Step 5: Fill in secondary points (optional)
If you have extra stones and want to make the grid more complex, add a second ring of stones outside the first, or place small accent stones between the main points. You can also place tiny stones along the lines connecting the outer points to the center, creating a pathway effect.
This step is optional for a first grid. Start simple, see how you like the result, and add complexity in future iterations.
Step 6: Step back and assess
Look at the grid from a few feet away. Does the pattern read clearly? Is the central stone drawing your eye? Does the color scheme work? Make adjustments — move a stone an inch to the left, swap a stone that's too big for one that fits better, or rotate the whole arrangement slightly for better visual balance.
Three Beginner-Friendly Grid Patterns
Once you've done the basic hexagon, here are two more patterns to try:
The star pattern
Use five or six points arranged in a star shape. A central stone with five outer stones makes a pentagram-like arrangement. Six points gives you a Star of David shape. This pattern uses fewer stones than a full hexagonal grid and has a stronger directional quality — the points create clear lines radiating outward.
The spiral pattern
Arrange stones in a loose spiral, starting from the center and working outward. There's no strict geometry here — just place each stone slightly further from the center than the last, rotating as you go. The spiral is the most freeform grid pattern and works well with mixed stone types and sizes. It looks organic and flowing rather than structured.
The grid within a grid
Place a small hexagonal grid (central stone plus six surrounding stones), then place six more stones at a larger radius around the whole thing. This creates a layered effect — a hexagon within a hexagon. It uses more stones (thirteen total) but the result is visually striking and worth the extra effort.
Practical Tips from Someone Who's Made a Lot of These
Work on a stable surface. Grids are fragile by nature — one bumped table and your careful arrangement becomes a pile of scattered stones. If you have cats, small children, or an enthusiastically wagging tail near your workspace, either work somewhere else or accept that your grid will have a short lifespan.
Photograph your grids when you finish them. Crystal grids are temporary — you'll eventually disassemble them to use the stones for something else. Having photos lets you recreate arrangements you particularly liked and track how your style evolves over time.
Don't overspend on stones for your first grid. Tumbled stones from a craft store or online supplier are perfectly fine. You can always upgrade individual pieces later if you want a specific crystal or a better-quality specimen. The geometry and arrangement matter more than the individual stone quality for a beginner.
Experiment with scale. Grids can be tiny (fitting in the palm of your hand) or large (covering a table). Smaller grids are faster to set up and easier to leave in place. Larger grids are more visually impressive but require more space and more stones. Start small and scale up as you get a feel for what you enjoy about the process.
Finally, don't get caught up in whether you're "doing it right." Crystal grids don't have an enforcement committee. The geometric patterns are design tools, not sacred prescriptions. If your hexagon looks a little lopsided, or if you used five stones instead of six because that's what you had, the grid is still valid. The point is the process of arranging something beautiful and intentional — not following a set of rules perfectly.
Comments