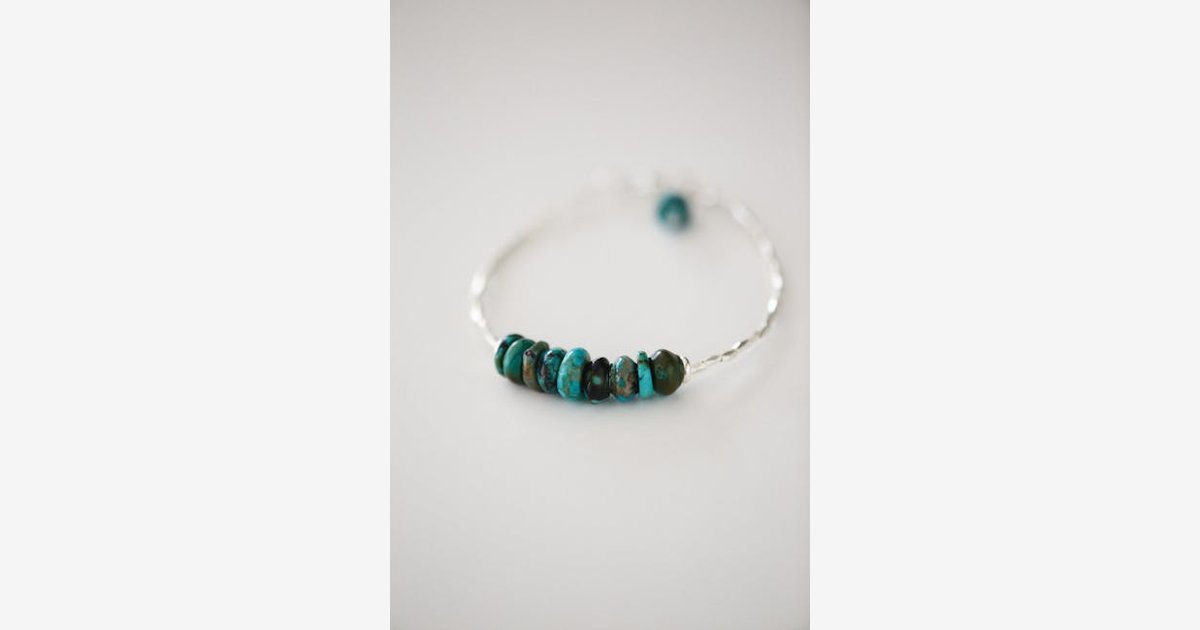
How to Clean Turquoise Jewelry
What makes turquoise tricky to clean
Turquoise is a phosphate mineral that forms in arid conditions, usually near copper deposits. Its chemical formula is CuAl₆(PO₄)₄(OH)₈·4H₂O — and that "·4H₂O" part is the whole problem. Turquoise contains water in its crystal structure, which means it's porous by nature. Most turquoise on the market rates between 5 and 6 on the Mohs scale, making it softer than quartz, feldspar, and most of the other stones you'll find set in jewelry.
The porosity means turquoise absorbs whatever it touches — skin oils, soap residue, lotion, perfume. Over months and years, this buildup dulls the surface and can actually change the stone's color, usually darkening it. The paradox is that the cleaning methods that work fine for harder stones — ultrasonic cleaners, steam, boiling water, chemical dips — will wreck turquoise. You need a gentler approach, and that's what this guide covers.
Step 1: Figure out what kind of turquoise you have
Before you clean anything, you need to know if your turquoise is natural, stabilized, or reconstituted. This matters more than you'd think.
Natural turquoise is cut and polished straight from the rough with no treatment beyond cutting. It's the most valuable and the most fragile. Only a small percentage of turquoise on the market is fully natural — most of it comes from older Native American pieces or high-end collectors.
Stabilized turquoise has been treated with a resin or polymer under pressure to fill the pores and harden the surface. The vast majority of turquoise jewelry sold today — probably 80–90% of it — is stabilized. It's more durable, holds its color better, and can actually tolerate slightly more aggressive cleaning than natural stone. The trade-off is that it's less valuable per carat and the color sometimes looks slightly "plastic-y" compared to natural material.
Reconstituted turquoise is basically turquoise dust and fragments mixed with resin and pressed into blocks, then cut into cabochons. It's the cheapest option and the most durable, but it's also the least interesting visually. If your turquoise pendant cost $15, it's almost certainly reconstituted.
You can usually tell stabilized from natural by looking at the surface under good light. Natural turquoise has a slightly waxy or matte luster with visible texture, while stabilized material often has a glossy, almost glassy surface from the resin coating. Reconstituted turquoise sometimes shows a uniform color with no matrix (the dark veining patterns) at all.
Step 2: Gather your cleaning supplies
What you need is minimal, and you probably have most of it already:
• Lukewarm water — not hot, not cold. Room temperature is fine.
• A few drops of mild unscented soap. Dish soap like Dawn works. Avoid anything with lemon, citrus, or "degreasing" additives — these are too harsh.
• A soft-bristled toothbrush. Not a medium or firm one. Baby toothbrushes work great.
• A soft, lint-free cloth. Microfiber is ideal. Cotton works too.
• A bowl to hold the water.
What you should not use: silver polish dips, ultrasonic cleaners, jewelry steamers, baking soda paste, vinegar, toothpaste, or any commercial "jewelry cleaner" that doesn't specifically say "safe for turquoise and opals." Most of those are formulated for harder stones and metals, and they'll eat through turquoise over time.
Step 3: The actual cleaning process
First, check your jewelry for any loose stones or damaged settings. Turquoise is usually set in bezels (a thin metal rim folded over the edge of the stone), and if the bezel is bent or the stone rattles at all, skip the wet cleaning and just wipe it with a dry cloth. Water can get under a loose stone and, in the worst case, cause the backing to separate from the turquoise — particularly with older Native American pieces where the backing is often shell or epoxy.
If everything is secure, dip the toothbrush in the soapy water and gently scrub the turquoise surface. Work in small circles. Pay attention to the edges where the stone meets the metal setting — that's where grime builds up fastest. For turquoise beads on a necklace or bracelet, run the brush along the string holes, since that's where skin oils accumulate and cause the string to degrade.
Rinse under lukewarm running water. Don't soak the piece — just let the water run over it for a few seconds. If your turquoise is set in sterling silver, the soapy water won't harm the silver, and you can give the silver a gentle brush too while you're at it. Dry immediately with your cloth. Don't air-dry turquoise — sitting wet accelerates any potential deterioration.
Step 4: Handling stubborn tarnish on the metal parts
This is where most people mess up their turquoise jewelry. The turquoise is fine, but the silver or copper setting is tarnished, and they reach for a polishing cloth or dip that gets on the stone. Even a brief contact with silver polish can leave a residue on porous turquoise that's difficult to remove.
The safe approach is to mask the turquoise before polishing the metal. Take a small piece of plastic wrap and press it over the stone, tucking the edges under the bezel so the stone is fully covered. Then use your silver polishing cloth on the exposed metal. When you're done, peel off the plastic and give the turquoise a quick wipe with a damp cloth to pick up any stray polish particles.
If the tarnish is really baked in and the masking method isn't cutting it, your best bet is to take the piece to a jeweler who works with turquoise regularly. They can polish the metal without risking the stone. It costs a few dollars, but it beats ruining a turquoise cabochon that might be irreplaceable if it came from a now-depleted mine like the Bisbee or Morenci deposits in Arizona.
Step 5: Drying and storage
After cleaning, dry the turquoise thoroughly — every surface, every crevice around the setting, and especially the back of the stone. Moisture trapped between the turquoise and its backing is the number one cause of deterioration in older pieces. Use a dry corner of your cloth and work it into any tight spots.
For storage, keep turquoise jewelry in a dry environment. A jewelry box with silica gel packets is ideal. Avoid plastic zip-lock bags for long-term storage — they trap moisture from the stone itself and can create a humid micro-environment. A cotton pouch or a compartment in a wooden jewelry box works well. If you live in a humid climate, a small dehumidifier in the room where you store your jewelry makes a noticeable difference over time.
One thing that surprises people: turquoise can actually benefit from being worn regularly. The gentle contact with skin oils keeps the surface from drying out too much, and the movement prevents dust and debris from settling into the pores. A turquoise ring you wear daily will often look better after a year than one that's been sitting in a drawer. The key is the regular light cleaning described above — don't let body oils and products build up unchecked.
Common turquoise cleaning mistakes
The biggest one is using ultrasonic cleaners. These work by generating high-frequency vibrations in a cleaning solution, and they're fantastic for diamonds, rubies, and sapphires. But those vibrations can cause internal fractures in turquoise, especially natural material with existing micro-cracks. I've seen pieces come out of an ultrasonic cleaner looking fine on the surface but developing internal cracking weeks later that eventually causes the stone to break.
Second is using hot water. Turquoise's structure contains water molecules, and rapid temperature changes can cause thermal expansion that stresses those bonds. Going from cold tap water to hot is the worst case — always use water close to room temperature.
Third is over-cleaning. Some people clean their turquoise jewelry every week with soap and water, and that's honestly too much. Once a month is plenty for pieces you wear regularly. For pieces you wear occasionally, clean them after each wearing and then leave them alone. Turquoise doesn't need a regular "deep clean" — it needs consistent, gentle maintenance.

Comments