DIY Crystal Hair Accessories: Bobby Pins, Headbands, and Hair Sticks
May 13, 2026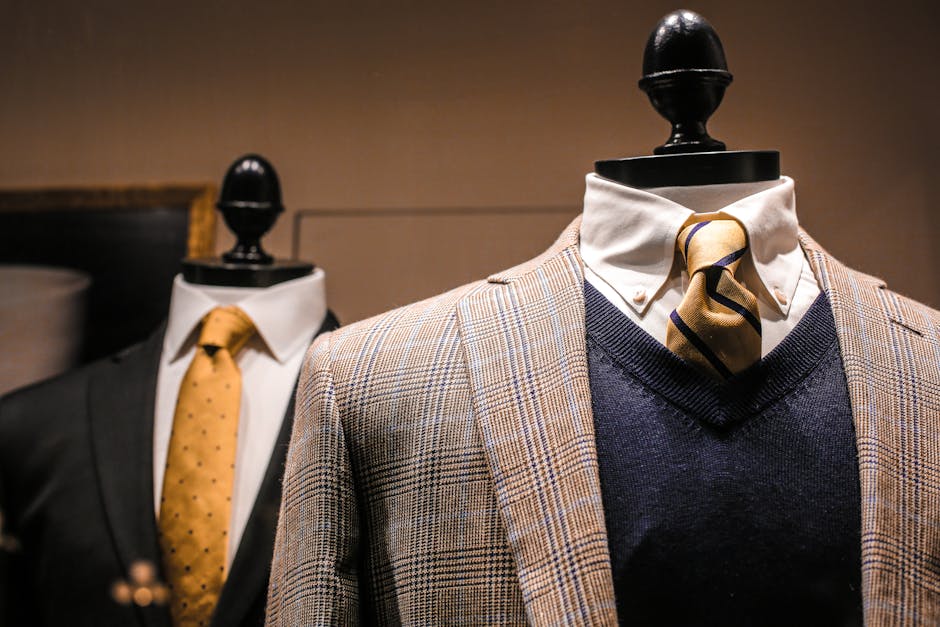
DIY Crystal Hair Accessories: Wedding-Worthy Pieces You Can Make at Home
I used to scroll through bridal boutiques and Etsy listings, admiring crystal-encrusted hairpins that cost $60 a piece. Then it hit me — the materials to make those exact same pieces cost about $4. If you can hold a pair of pliers and wait five minutes for glue to dry, you can create hair accessories that rival anything sitting behind a glass display case.
Crystal hair accessories have been showing up everywhere lately — runway shows, music festivals, wedding Pinterest boards, even casual coffee-run outfits on Instagram. The appeal is obvious: they catch light in a way that plastic rhinestones never will, and genuine crystal has a weight and clarity that elevates even the simplest hairstyle.
This guide walks you through making three different types of crystal hair pieces, from a simple bobby pin to an elaborate hair stick. None of them require specialized skills or expensive tools.
Why Make Your Own Crystal Hair Accessories
The price difference between DIY and retail isn't small — it's dramatic. A crystal-encrusted headband from a bridal shop typically runs $45 to $80. The materials to make one yourself? About $8 to $15, depending on the crystals you choose. Crystal bobby pins that sell for $25 a set cost roughly $3 in supplies.
But cost isn't the only reason. When you make your own, you control every detail — the exact shade of amethyst, the spacing between each stone, whether the piece leans minimalist or dramatic. Your hair accessory becomes something nobody else owns, which matters when you're attending an event and don't want to match three other people wearing the same mass-produced piece.
There's also something satisfying about wearing something you made. Friends notice, and when they ask where you got it, you get to say you made it. That conversation tends to lead to requests, which is how more than a few small jewelry businesses have started.
Materials You Will Need
The Basics
Hair accessory bases: Plain bobby pins (flat style, not ridged), thin metal headbands, and wooden or metal hair sticks. You can find these at any craft store or beauty supply shop for a dollar or two per pack.
Crystals and gemstones: This is where the fun begins. Small tumbled stones (4-8mm), crystal points, flat-back rhinestones (glass or crystal, not plastic), chip beads, and rondelle beads all work well. Amethyst, clear quartz, rose quartz, and labradorite are popular choices because their natural facets catch light beautifully.
Adhesive: A strong two-part epoxy or jewelry-grade cyanoacrylate glue. Hot glue works for quick projects but yellows and weakens over time. Epoxy takes longer to cure but holds for years.
Tools: Flat-nose pliers, round-nose pliers, wire cutters, and tweezers for placing small stones.
Wire: 24- to 28-gauge copper or silver-plated craft wire. This is the same wire used in our wire wrapping projects, and it's versatile enough for hair accessories too.
Optional extras: Prong settings (also called snap-on settings or claw mounts) for round stones, small jump rings, and a small file for smoothing wire ends.
Project 1: Crystal Bobby Pins
This is the easiest project and the best place to start. A single crystal bobby pin takes about ten minutes to make, and you can line several of them up in your hair for a constellation effect.
What you need
Flat bobby pins, small flat-back crystals or tumbled chips (4-6mm), epoxy glue, tweezers.
Step-by-step
Step 1 — Design: Decide on your arrangement. A single stone centered on the pin is classic. Three stones in a graduated row looks elegant. A small cluster at different angles feels organic and modern.
Step 2 — Prepare the surface: Clean the flat side of the bobby pin with rubbing alcohol. Any oil or residue will weaken the bond. Let it dry completely.
Step 3 — Attach: Apply a tiny dot of epoxy to the bobby pin using a toothpick or pin. Less is more — excess glue clouds around the stone and looks messy. Use tweezers to place the crystal, press gently for 5 seconds, then set aside to cure. Most epoxies reach handling strength in 5 minutes but full strength in 24 hours.
Step 4 — Refine: Once cured, check for any visible glue. A cotton swab dipped in acetone (for cyanoacrylate) or careful scraping with a craft knife (for epoxy) cleans up stray adhesive. If a stone feels loose, re-glue it rather than hoping for the best.
Project 2: Crystal Headband
This is the showstopper. A crystal headband can look bridal, bohemian, or editorial depending on your stone choices and arrangement. It takes more time and patience than bobby pins, but the result is genuinely stunning.
What you need
Thin metal headband (the kind that's basically a curved wire, about 3-5mm wide), an assortment of crystals in your chosen colors, epoxy, 26-gauge wire, flat-nose pliers.
Step-by-step
Step 1 — Design your layout: Before attaching anything, lay your crystals out on a towel next to the headband. Play with patterns: a gradient from large to small, alternating colors, clustered at the crown with tapering ends, or a single dramatic row across the top. Sketch it if that helps — even a rough drawing keeps you on track when you're mid-project.
Step 2 — Prepare crystals: Sort by size and color. For a cohesive look, use 2-3 stone sizes (like 4mm, 6mm, and 8mm) and stick to a palette of 2-3 colors. Clear quartz mixed with one accent color (amethyst, rose quartz, or blue lace agate) is a safe starting point that looks expensive without being complicated.
Step 3 — Attach stones: You have three methods, and the best choice depends on the stone shape.
Gluing: Best for flat-back stones and tumbled chips. Apply a small dot of epoxy to the headband, press the stone on, hold for a few seconds. Work in sections — glue 4-5 stones, let them set for a few minutes, then continue.
Wire wrapping: Best for irregular stones and crystal points. Wrap 26-gauge wire around the stone and then around the headband, twisting the ends tight and tucking them flat with pliers. This technique pairs well with the methods in our wire wrapping guide if you want to practice first.
Prong settings: Best for round, faceted stones. Snap-on settings grip the stone and have a flat base you can glue or solder to the headband. This gives the most professional, jewelry-store look.
Step 4 — Assemble and finish: Once all stones are attached and the glue is fully cured (wait the full 24 hours), check every stone by gently wiggling it. Re-secure any that feel loose. Run your fingers along the inside of the headband to make sure no wire ends or glue bumps will snag hair. Use a file or flat pliers to press down any sharp spots. If you used wire wrapping, arrange the wraps neatly and trim excess wire close to the surface.
Project 3: Crystal Hair Stick or Fork
Hair sticks are underrated. They hold buns and updos securely while looking like intentional jewelry rather than a functional tool. Adding a crystal to the end turns a basic hair stick into a statement piece.
What you need
Wooden or metal hair stick (6-8 inches long), a crystal point or larger tumbled stone, epoxy, 24-gauge wire, pliers.
Step-by-step
Step 1 — Design: The crystal sits at the top of the stick, so consider the weight. A 1-2 inch crystal point is ideal — large enough to be visible but not so heavy that it unbalances the stick. For a dramatic look, a cluster of smaller stones wrapping partway down the stick creates a cascading effect.
Step 2 — Prepare: If using a wooden stick, lightly sand the top quarter-inch to give the glue more grip. For metal sticks, clean with rubbing alcohol.
Step 3 — Attach the crystal: For a crystal point, apply epoxy to the base and press it onto the top of the stick. Then wrap 24-gauge wire around the base of the crystal and down the stick in a tight spiral — about 8-10 wraps. This adds both security and a decorative element. Tuck the wire end flat against the stick.
For a tumbled stone, use the wire-wrapping method: create a wire cage around the stone, leaving two long wire tails. Wrap those tails tightly down the stick, securing with glue underneath if needed.
Step 4 — Finish: Check that the crystal is firmly attached by gently rotating and tugging it. Add a second layer of wire wrapping if there's any movement. Smooth all wire ends. Optionally, add small chip beads glued along the stick below the main crystal for extra detail.
Four Occasions to Wear Your Crystal Hair Accessories
Weddings: Crystal bobby pins scattered through an updo, or a crystal headband with a veil attached, are genuinely bridal-tier. The trick is restraint — choose one type of accessory, not all three at once. Clear quartz or moonstone reads elegant and traditional. Rose quartz feels romantic. Amethyst adds a subtle pop of color for non-traditional brides.
Everyday wear: A single crystal bobby pin or a simple hair stick with a small stone is enough to elevate a basic bun or half-up style. This is where the cheaper stones work fine — even glass crystals look good in natural daylight when they're not competing with formal attire.
Music festivals: Go maximal. Layer multiple bobby pins with different colored crystals, use a headband with bold stones, add crystal hair sticks to a messy updo. Festivals are the one context where more is more. Labradorite and sunstone look incredible under stage lighting because of their natural flash and shimmer.
Vintage and retro themes: Art deco style works beautifully with crystal hair accessories. Think symmetrical arrangements, geometric patterns, and clear or champagne-colored stones. A crystal headband worn low across the forehead channels 1920s glamour. Pair with a bold lip and you're set.
Cost Comparison: DIY vs. Retail
Here's what you're actually saving. These are rough estimates based on typical craft store and online prices:
Crystal bobby pin set (3 pins): DIY $3-5 in materials vs. $25-35 retail
Crystal headband: DIY $8-15 vs. $45-80 retail
Crystal hair stick: DIY $5-10 vs. $30-50 retail
The biggest savings come on the headband, where retail markup is highest because bridal accessories carry a "wedding tax." The same headband sold as a festival accessory might cost $30, but put it near a wedding dress and the price doubles.
Buying materials in bulk — a mixed bag of tumbled stones, a multipack of bobby pins, a spool of wire — drives the per-piece cost down even further. If you make five or six pieces, your average cost drops to about $3 each.
How to Make Your Crystal Hair Accessories Last
Crystal hair accessories aren't fragile, but they do need basic care. Store them in a small box or soft pouch — tossing them loose into a jewelry drawer is how crystals get chipped and glue joints get stressed. Keep them away from prolonged direct sunlight, especially if you used epoxy, which can yellow over time with UV exposure.
Avoid getting them wet. A light mist is fine, but full immersion in water weakens most adhesives and can tarnish wire. If the stones get dusty, wipe them with a soft, slightly damp cloth. Never use chemical cleaners or ultrasonic cleaners on crystal hair accessories — the settings aren't built for that kind of agitation.
Check the glue joints every few months if you wear a piece regularly. It's much easier to re-glue a loosening stone than to find and replace one that fell out at a restaurant. If a wire wrap loosens, simply tighten it with flat-nose pliers and press the end flat again.
If you're making pieces as gifts — and honestly, a set of crystal bobby pins in a nice box makes a genuinely good present — check out our crystal gift guide for ideas on which stones suit different people and occasions.
Final Tips Before You Start
Start with the bobby pins. They're low-risk and give you a feel for working with the materials before you commit to a headband. Use good lighting — a desk lamp or daylight makes it much easier to place small stones accurately. And take photos of your finished pieces; our crystal photography tips will help you capture how they catch the light, which is honestly the best part.
Crystal hair accessories sit at a sweet spot where craft meets fashion. The materials are affordable, the techniques are learnable in an afternoon, and the results look far more expensive than they are. Whether you're making something for your own wedding, adding sparkle to your daily routine, or creating gifts people will actually use, these pieces deliver outsized returns on the time and money you invest.


Comments