DIY Beaded Bracelet: Complete Beginner's Guide
Last month, my best friend Emma's birthday was coming up and I was completely broke. Like, $10-left-in-my-checking-account broke. I'd already told her I had something special planned, so backing out wasn't an option. I wandered into a craft store on a whim, bought a pack of beads and some elastic cord, and spent a Sunday afternoon figuring out how to make a beaded bracelet. Long story short — she now wears that bracelet every single day and has asked me to make her three more. Meanwhile, the $50 bracelet another friend bought her sits in a jewelry box somewhere.
That's the thing about DIY beaded bracelets that nobody tells you. They cost almost nothing, they take way less time than you'd think, and people genuinely treasure them because you made them with your own hands. I've now made probably 40-something bracelets for friends, family, and even a few to sell at a local market. I'm not a professional jeweler by any stretch — I'm just someone who figured out the basics and ran with them.
If you've never made a beaded bracelet before, you're in the right place. This is the guide I wish I'd had when I was sitting on my living room floor at midnight, beads scattered everywhere, wondering why my knots kept coming undone. Let me save you some frustration.
What You Need to Get Started
The beauty of beaded bracelet making is that the supply list is incredibly short. You don't need fancy tools or a dedicated workspace. I made my first bracelet on a dinner plate because I didn't own a bead tray yet.
The Essential Materials
Elastic cord (0.5mm or 0.7mm): This is your foundation. Go with 0.5mm if you're working with small beads (4-6mm) and 0.7mm for standard 8-10mm beads. The 0.7mm is more forgiving for beginners — it's harder to accidentally snap, and the knots hold better. I buy the clear stretch cord, but they also make it in black and a few colors if you want the string itself to be part of the design.
Beads (8mm or 10mm): Start with 8mm round beads. They're the most versatile size, easy to thread, and you'll find the biggest selection. Once you get comfortable, you can experiment with 10mm for bolder designs or mix sizes. Stone beads, glass beads, wood beads — they all work the same way, so pick whatever catches your eye.
Scissors: Any pair will do. You just need them to cut the elastic cleanly.
Jewelry glue or superglue: This is non-negotiable. The one thing that separates a bracelet that lasts two weeks from one that lasts two years is a tiny drop of glue on your knot. I use G-S Hypo Cement because it dries clear and doesn't make the cord stiff, but honestly, even basic superglue works fine.
Bead tray or sorting dish: This is a quality-of-life upgrade. A bead tray with compartments lets you plan your design without beads rolling all over your table. A muffin tin works in a pinch. Or, like I said, a plate with a rim.
Where to Buy Your Materials
Amazon: Best for beginner kits and bulk buying. Search for "bead bracelet making kit" and you'll find tons of options in the $10-15 range that include beads, cord, and basic tools — enough to make 5-8 bracelets. The selection isn't the most unique, but it's perfect for practicing.
Etsy: This is where you go once you know what you're doing. You can find individual bead strands in specific gemstones, custom color palettes, and even pre-made design kits from other jewelry makers. Prices are higher per bead, but the quality and variety are worth it. I've found some gorgeous natural stone beads on Etsy that I never see on Amazon.
Local craft stores: Michaels, Joann, and independent bead shops let you see and feel the beads before buying, which matters more than you'd think. Some bead shops even let you buy individual beads, so you can grab exactly what you need without committing to a whole strand.
Step-by-Step: Making Your First Beaded Bracelet
Okay, here's the part you actually came for. I'm going to walk you through this the way I wish someone had walked me through it — with all the little tips that make the difference between "this looks okay" and "wait, I actually made this?"
Step 1: Measure Your Wrist
Grab a flexible measuring tape (or a piece of string and a ruler) and wrap it around your wrist where you want the bracelet to sit. Don't pull it tight — let it rest comfortably. Now add 1-2cm to that measurement. This is your bracelet length.
Why the extra length? The beads take up space on the cord, and you need room for the knot. If you cut the cord exactly to your wrist size, the bracelet will be too tight once it's finished. Trust me, I learned this the hard way after making a bracelet I literally couldn't get over my hand.
Cut your elastic cord to about 8-10 inches — you want plenty of extra length to work with. You can always trim the excess later.
Step 2: Design Your Pattern
Before you start threading, lay out your beads on the tray in the order you want them. This is called "stringing layout" and it's honestly one of the most fun parts. You can see the whole bracelet at once and rearrange things until it looks right.
A few design principles I've picked up:
Odd numbers look better than even numbers for repeating patterns. Five beads of one color alternating with three of another will look more balanced than four and four. Symmetry isn't required, but a focal bead in the center — a larger stone or a different color — gives the eye somewhere to rest.
If you're using natural stone beads, hold them up to natural light. Some stones look completely different in sunlight versus indoor lighting. I once made a bracelet that looked beautiful on my desk but turned out to be a muddy brown-green combo in daylight. Not great.
Step 3: Thread the Beads
Here's a trick that will save you so much frustration: tape one end of the elastic cord to your work surface, or tie a small temporary knot. This stops the beads from sliding off the other end while you're threading. Nothing worse than getting halfway through a pattern and having all your beads cascade onto the floor.
Thread your beads one at a time, following the pattern you laid out. If the cord won't go through a bead, don't force it — you'll damage the cord. Try the bead from the other end (sometimes the hole is wider on one side) or switch to a slightly thinner cord.
Step 4: Tie the Knot (This Is the Most Important Step)
This is where most beginners mess up, and I don't blame them because I sure did. A simple overhand knot will work for about three days before the elastic stretches and the bracelet falls off your wrist at the worst possible moment.
Use a surgeon's knot. It's like a regular knot but you wrap the cord through twice on the first pass instead of once. This creates a much more secure base knot. Then tie a regular overhand knot on top of it.
Here's the critical part: before you pull the knot tight, pull the bracelet to remove all the slack between the beads. You want the beads snug against each other but not compressed. If there's visible cord between beads, the bracelet will stretch over time and look sloppy.
Once the knot is tight, add a tiny drop of glue directly on the knot. I mean tiny — we're talking the size of a pinhead. Too much glue will seep into the adjacent beads and make them look cloudy. Let the glue dry completely (check your glue's drying time — usually 10-24 hours for full strength).
Step 5: Hide the Knot
After the glue dries, use scissors to trim the excess cord, leaving about 3-4mm. Then gently pull the knot into the hole of the nearest bead. The knot should tuck inside the bead and disappear. This is why I recommend using beads with slightly larger holes — it makes hiding the knot so much easier.
If the knot won't fit inside any bead, trim the cord as short as possible and just let it sit between two beads. It's not ideal, but it works. With practice, you'll get a feel for how much cord to leave before tying the knot so everything fits perfectly.
Three Designs to Try Once You've Got the Basics Down
Once you've made a basic single-color or random-pattern bracelet, these three designs will level up your game without being complicated.
1. Gradient Color Fade
Pick one color family and arrange beads from lightest to darkest (or darkest to lightest). For example, if you're working with blue beads: start with pale aquamarine, transition through sky blue, and end with deep lapis. This creates a beautiful ombré effect that looks way more sophisticated than it actually is to make.
The trick is finding enough shades in one color family. Etsy is great for this — many sellers offer bead strands in graduated colors. You can also mix different stone types that happen to share a color palette. A rose quartz to pink tourmaline to deep rhodonite gradient is absolutely stunning.
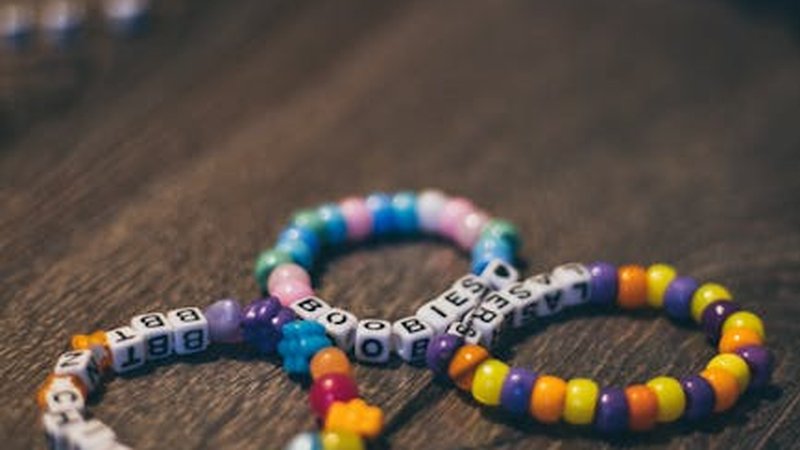
2. Letter Bead Name Bracelet
String alphabet beads to spell out a name, word, or short message, framed by small spacer beads on either side. "LOVE," "MAMA," "DREAM," or someone's name — these make incredibly personal gifts.
Use smaller beads (4-6mm) for the spacers around the letter beads, which are usually 7mm cubes. The size contrast makes the letters pop. Place the letters in the center of the bracelet with an equal number of spacer beads on each side for a balanced look.
3. Two-Color Alternating Pattern
The simplest design that still looks intentional and polished. Alternate two colors in a consistent pattern: one white, one black, one white, one black. Or one gold, one silver. Or one green, one clear.
This sounds basic, but the key is choosing colors that actually work together. Complementary colors (opposite on the color wheel) create bold, eye-catching designs. Analogous colors (next to each other on the color wheel) create soft, harmonious vibes. Metallic beads paired with any stone color almost always look good.
Troubleshooting: When Things Go Wrong
Because they will go wrong. Here's how to fix the most common problems.
The Cord Snapped While I Was Threading
This usually means you're pulling too hard or the bead hole has a sharp edge. If it happens repeatedly with the same bead strand, the holes might be poorly drilled — return them or toss that particular bead. Otherwise, switch to 0.7mm cord (it's more durable) and thread more gently. Sometimes warming the cord slightly by rubbing it between your fingers makes it more flexible and less prone to snapping.
A Bead Won't Fit on the Cord
First, try the bead from the other end. Second, try gently wiggling the cord while pushing. Third, if nothing works, that bead has a manufacturing defect — skip it. Don't force anything, because stretching the cord weakens it at that point, and your bracelet will break later.
My Knot Keeps Coming Undone
You're probably not using a surgeon's knot, or you're not using glue. Go back to Step 4 and follow it exactly. Also, make sure you're pulling the knot tight enough — you should see the cord compress slightly where the knot sits. And use the right glue. Regular craft glue doesn't bond well to elastic. Superglue or jewelry cement is what you need.
The Bracelet Is Too Tight or Too Loose
If it's too tight, unfortunately, you'll need to restring it with a longer cord. If it's too loose, you can sometimes salvage it by removing one or two beads and retying — but if you've already glued the knot, you're starting over. This is why I always do a test fit (hold the beaded cord around my wrist, pinch where the knot would go, and check the fit) before tying anything permanent.
The Real Cost of Making Beaded Bracelets
Let's talk money, because this is one of the most appealing parts of making your own jewelry.
A single bracelet typically uses 15-25 beads depending on bead size and wrist circumference. If you buy beads in bulk strands (usually 30-40 beads per strand), you're paying roughly $0.10-0.20 per bead. Elastic cord is essentially free per bracelet — a single spool costs $3-5 and makes dozens of bracelets. Add a negligible amount for glue.
Total material cost per bracelet: $1.50 to $3.00.
Meanwhile, similar handmade beaded bracelets sell for $8-15 on Etsy, and retail versions at boutiques can go for $20-40. If you're making these as gifts, the value-to-cost ratio is absurd. If you're considering selling them, the margins are excellent — even after accounting for packaging and your time, you can easily price them at $10-12 and make a solid profit.
Packaging That Makes It Feel Like a Real Gift
If you're giving these as gifts or selling them, packaging transforms a handmade bracelet from "oh, that's nice" to "oh my god, I love this." And it costs almost nothing.
Organza pouches: You can buy 100 of these on Amazon for about $8. They come in every color imaginable. Drop the bracelet in, pull the drawstring, and it instantly looks like it came from a real store.
Clear jewelry boxes: Slightly more expensive ($0.30-0.50 each in bulk) but they let the bracelet be visible without opening anything. These are better if you're selling at markets or online.
Handwritten thank-you card: A small card that says "Handmade with love by [your name]" or a personal note adds a touch that mass-produced jewelry can never compete with. I write mine on card stock and tie them to the pouch with a piece of twine.
Total packaging cost per bracelet: under $0.50. Combined with the $1.50-3.00 material cost, you're looking at $2.00-3.50 total per gift that looks and feels way more expensive than that.
Ready to Start?
That Sunday afternoon I spent making Emma's birthday bracelet turned into a hobby I genuinely love. There's something meditative about sorting beads, planning patterns, and watching a bracelet come together piece by piece. And the reaction you get when someone opens a gift you made by hand? No store-bought present can compete with that.
Grab some beads, cut a length of elastic, and give it a shot. Your first one might be a little crooked or have a visible knot — that's fine. Mine was terrible. But by your third or fourth bracelet, you'll be making things you're genuinely proud of. And you might just end up with a new obsession. I know I did.
Comments