How to Wire Wrap a Crystal Without Any Special
May 14, 2026
How to Wire Wrap a Crystal Without Any Special Tools
If you've ever picked up a pretty stone at a beach or a crystal shop and thought, "I wish I could wear this," wire wrapping is the answer. And here's the part most tutorials won't tell you: you don't need pliers, cutters, or a workbench to get started. A pair of scissors and some craft wire from a dollar store will do.
This guide walks through a dead-simple method for wrapping crystals and stones using only household items. No jewelry-making experience required. The whole process takes about fifteen minutes from start to finish once you've done it a couple of times.
What You Actually Need
The whole shopping list fits in a sentence:
- 20-gauge craft wire (copper or aluminum — both are soft enough to bend by hand). A spool costs about $3 at any craft store.
- Scissors or nail clippers for cutting the wire.
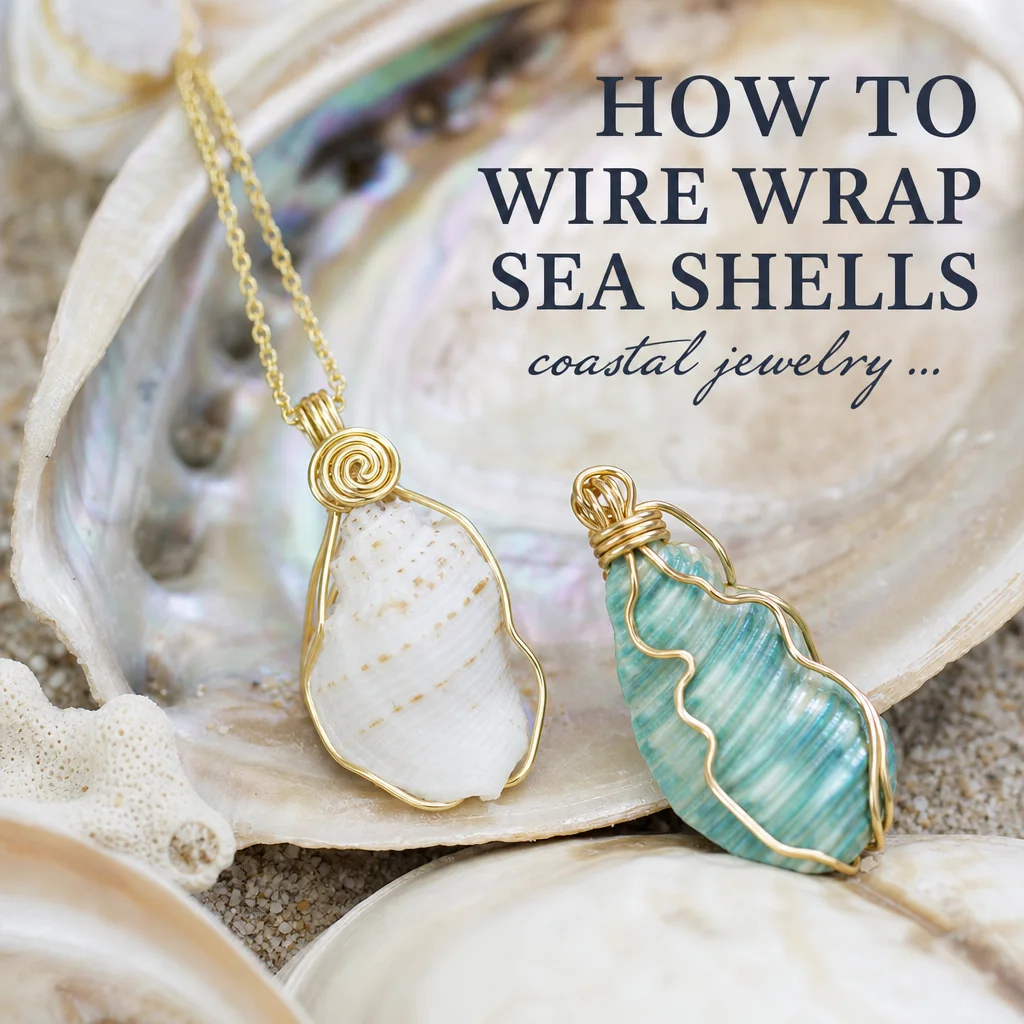
- A stone or crystal roughly 1–3 cm across. Oval or teardrop shapes are easiest for beginners. Flat-backed stones sit more predictably in the wrap.
- Optional: a chopstick or pen to help shape curves.
That's it. No round-nose pliers, no nylon-jaw pliers, no third hand. The trick is using wire that's soft enough to manipulate with your fingers.
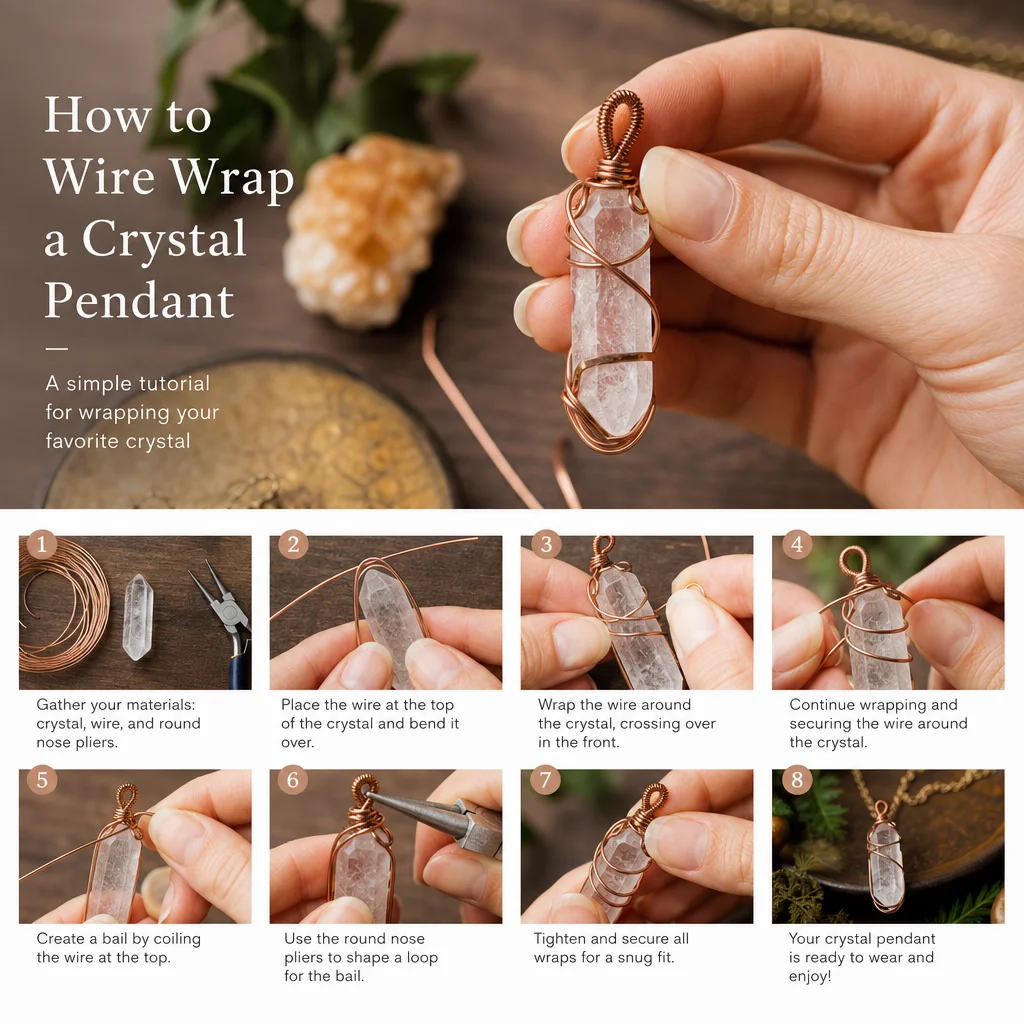
The Three-Step Wrap: A Method Anyone Can Follow
Step 1 — Measure and Cut Your Wire
Unroll wire and wrap it loosely around your stone five times. Add two extra inches for the bail (the loop that goes through a chain). Cut it with scissors — copper and aluminum wire are thin enough for this.
Straighten the wire gently by pulling it between your thumb and index finger a few times. Don't overdo it; work-hardening makes the wire stiffer and harder to shape.
Step 2 — Build the Cage
Hold the wire about an inch from one end. Lay the stone against the wire, then fold the wire over the stone's widest point. The short tail should now press against the stone on one side.
Rotate the stone 180 degrees. Fold the wire over the opposite side. You've just made one full wrap. Repeat this two more times, spacing the wraps slightly apart so the stone is cradled in a loose wire cage.
Don't stress about perfection. Wire wrapping is forgiving — if a wrap sits a bit crooked, the next one will pin it in place. The stone won't fall out as long as at least three wraps cross over the widest point.
Step 3 — Form the Bail and Finish
Once the stone feels secure in its cage, take both wire ends at the top and twist them together three or four times. Then form a loop with the longer end, wrap the tail tightly around the base of that loop two or three times, and tuck the sharp end down between the stone and the nearest wrap.
Run your finger over every wire end. If anything pokes, press it flat against the stone with your thumbnail. Copper and aluminum are soft enough that you can mash sharp points down completely.
Troubleshooting Common Problems
The stone keeps slipping out. Your wraps are probably too loose or all sitting at the same height. Slide one wrap higher and one lower so they pinch the stone at different points. Three wraps at different heights hold better than five at the same level.
The wire kinked while I was bending it. Kinks happen when you bend, unbend, and re-bend the same spot. Cut the kinked section out and start that segment fresh. A short piece of wire is still usable for small wraps.
The finished pendant looks messy. This is normal for your first five or six attempts. The wire develops a patina over time (especially copper), which adds character and hides small imperfections. You can also darken the wire deliberately by soaking it in a mixture of vinegar and salt for an hour, then rinsing — instant antiqued look.
Making It Look Intentional: Simple Design Upgrades
Once the basic cage feels easy, try these modifications that require zero extra tools:
- Spiral accents. Before wrapping the stone, curl one end of the wire into a flat spiral using just your fingers. Position the spiral on the front of the pendant for a decorative element.
- Double bail. Instead of twisting the wires together at the top, separate them and form two small loops side by side. Thread a chain through both — the pendant hangs more stably.
- Coiled accents. Take a leftover 4-inch piece of wire and wrap it tightly around the bail area like a tiny spring. This covers messy twists and looks polished.
- Beads between wraps. Slide a small glass or metal bead onto the wire before each wrap. It adds color and texture without any technical skill.
Choosing Wire for Different Effects
The wire you pick changes the whole feel of the piece. Here's a practical breakdown:
- Copper wire (20 gauge): The classic choice. Warm color, extremely easy to bend, develops a rich patina. Best for earthy, bohemian looks.
- Aluminum wire (18 gauge): Silver-colored, slightly thicker but very lightweight. Good for larger stones. Won't tarnish.
- Brass wire (20 gauge): Gold tone, slightly stiffer than copper. Holds its shape well. Works beautifully with darker stones like obsidian or smokey quartz.
- Colored craft wire (22 gauge): Enamel-coated copper in every color imaginable. Thinner, so use six wraps instead of five. Great for matching a pendant to an outfit.
Avoid steel wire or galvanized wire — they're too hard to bend by hand and will fight you the entire time.
Understanding Wire Gauge (Without the Jargon)
Wire gauge is a number that tells you how thick the wire is. The system is counterintuitive: higher numbers mean thinner wire. Here's what matters for crystal wrapping:
- 18 gauge — thick and sturdy. Good for large stones (3+ cm). Harder to bend by hand, holds shape firmly.
- 20 gauge — the sweet spot for most beginners. Works with stones 1–3 cm. Easy to bend, holds well.
- 22 gauge — thin and delicate. Good for tiny stones or wrapping wire around wire (coiling). Too thin to hold a stone on its own.
- 24 gauge and above — very thin. Used for weaving and decorative coils, not structural wraps.
For your first project, buy 20-gauge copper wire. Once you understand how it feels in your hands, branching out to other gauges becomes intuitive rather than confusing.
Caring for Your Wire-Wrapped Pendant
Copper and brass will naturally darken over time. Some people love this look. If you prefer the shiny finish, drop the pendant in a bowl of lemon juice for five minutes, rinse, and dry. The acid strips the oxidation right off.
Don't wear wire-wrapped jewelry in the shower or swimming pool. Chlorine and soap accelerate tarnishing and can weaken thin wire over time. Hang the pendant on a hook or lay it flat — tossing it in a jewelry box with other pieces will scratch the wire and might bend the cage loose.
If the wrap loosens after months of wear, simply press the wires back against the stone with your fingers. The softness that makes copper easy to shape also makes it easy to maintain.
A Few Stones That Work Especially Well
While you can wrap almost anything, these shapes and types are beginner-friendly:
- River stones — smooth, flat, and free.
- Labradorite — the flash makes even a basic wrap look stunning.
- Thin quartz slices — flat pieces are the easiest shape to cage-wrap.
- Sea glass — frosted edges grip wire well and the colors are beautiful.
Turning Wraps Into Gifts and Small Products
Wire-wrapped pendants make genuinely good gifts because each one is obviously handmade — the small irregularities are proof that a person sat down and bent metal around a stone. If you've made twenty or thirty pendants and feel confident, here are some things to consider:
Gift presentation. Drop a pendant into a small kraft paper box with a cotton pad. Tie it with twine. The total packaging cost is under a dollar, and it elevates the whole experience for the recipient.
Selling at markets. Tool-free wire wrapping is fast once you're practiced. A simple cage wrap takes about eight minutes. That means you can produce a full display's worth of inventory in a single evening. Price point for copper-wrapped stones at craft markets typically runs $12–25 depending on the stone.
Photographing your work. Natural light on a plain background is all you need. Lay the pendant on a piece of white paper near a window and shoot with your phone. Avoid flash — it flattens the wire's texture and hides the dimensionality of the wrap.
The real joy of tool-free wire wrapping is that it lowers the barrier to nothing. You can start tonight with supplies from a corner store. Every pendant you make teaches you something about tension, spacing, and how wire behaves under your hands. By pendant number ten, you'll have developed a personal style without ever having opened a jewelry-making catalog.
Related Guides
- Clear Quartz: The Universal Crystal Guide
- 15 Creative Ways to Display and Store Your Crystal Collection
- 5 Practical Tests to Tell Real Crystals From Fakes
- Black Obsidian: What Makes This Volcanic Glass So Special
- Complete Crystal Guide: Identification and Meanings
- Essential Jewelry Storage Tips
- Colored Gemstones Buying Guide for Beginners
Frequently Asked Questions
What do I need to wire wrap a crystal at home?
You do not need expensive equipment to start wire wrapping. For a basic crystal pendant, you only need some crafting wire (like copper or artistic brass), a pair of household pliers—ideally needle-nose—and a pair of wire cutters or heavy scissors. At SagStone, our artisans always recommend starting simple before moving to professional-grade jewelry tools.
What is the easiest way to wire wrap a crystal for beginners?
The easiest method for beginners is the three-step caged wrap. Simply cut a long piece of soft wire, create a small loop at the top for your chain, and gently spiral or weave the wire around the stone. Because natural stones come in unique shapes, there is no need for absolute perfection; just focus on securing the crystal while creating an organic look.
What size wire is best for wrapping natural stones?
Choosing the right wire gauge depends on your goal. For making the sturdy frame of your pendant, a thicker 20-gauge wire provides excellent stability. To add decorative weaves or secure delicate edges, use a softer 24-gauge or 26-gauge wire. When crafting our handcrafted crystal jewelry, we often mix both gauges to ensure both durability and beautiful texture.
How do you wire wrap an oddly shaped crystal?
Irregularly shaped stones are actually the easiest to wrap because the wire naturally hugs their organic curves! The secret is to find the stone's "belly" or widest point. Anchor your wire below that point so the crystal cannot slip out. Using a highly flexible wire allows you to mold the setting precisely to the stone's unique silhouette.
Will the wire on my homemade pendant tarnish?
Copper and brass crafting wires will naturally develop a beautiful, antique-style patina over time. If you prefer to keep your wire shiny, store your pendant in an airtight ziplock bag away from moisture. To restore the shine, gently polish the wire with a jewelry cloth. For long-lasting wear, many artisans eventually upgrade to solid sterling silver or gold-filled wire.

Comments